Starting new project 1973 Sea Ray 240 SRV

52FordF2

Petty Officer 1st Class
Joined
May 31, 2013
Messages
372
If you need to change out the old shift cable to a new one here's a procedure


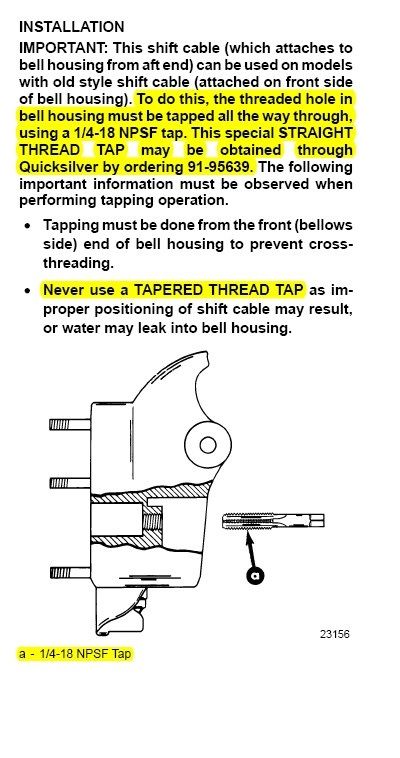
This is a National Pipe Straight thread tap NOT tapered.

Also NAPA sells a 9/16 Spark plug socket that you can use with a deep well to remove or tighten shift cable into bell housing. The Spark plug socket has the HEX on the backside that a deep well can slide onto and use with a ratchet wrench. This is a cheaper option instead of buying the more expensive installation tool.
 

sheboyganjohn

Senior Chief Petty Officer
Joined
Aug 2, 2005
Messages
753
Thanks for the info. I already welded a nut to the end of a cheap 9/16 socket to make my own shift cable removal socket. I will have to see if I can track down a straight thread socket. As I said, I have two other bell housing so I may be able to just swap it out with one of the other ones but may just tap the existing one out if it is less corroded then the other ones.
 

White90GT

Petty Officer 2nd Class
Joined
Jul 5, 2011
Messages
161
Tagging along sir. I have a 1978 SeaRay 260-SRV with Twin Merc 165 six cylinders. Transom is probably identical to yours although my floor is raised above the engines so no doghouse. Plan to use your and Mark's threads as a reference when I start on mine.
About how much Fiberglass cloth and resin do you think you've gone through thus far?
 

52FordF2

Petty Officer 1st Class
Joined
May 31, 2013
Messages
372
sheboyganjohn, Bought my 1/4-18 NPSF tap through "Fastenal"

Don't know how much sheboyganjohn used,

but on my 19.5 foot Hammond I used around 40 gallons of resin so far.
I bought about (10 yards x 50") of 1708, 3 (12")rolls 1708 for tabbing. about 30 yards of 38" CSM, and 1 (12")roll CSM and I'm running out of 1708 for some reason.

4(4galon buckets) Cabosil, and 2 gallons of 1/4 chop strand. Still have enough CSM to do one more layer on deck, 3 gallons of resin left. May need one more 5 gallon of resin.

Once that's done, Gel coat deck then fill all little hinky's in hull gel coat.
 

sheboyganjohn

Senior Chief Petty Officer
Joined
Aug 2, 2005
Messages
753
I have only done from the cabin bulkhead back. I am somewhere around 20 or 25 gallons of resin. I bought a full roll of CSM since I knew I would be working on other projects with it. Have gone through about 1/3 of it. I think I had 5 gallons of cabosil and also had a 20 lb bag of aerosil (fairing compound that sands well). I had also bought a partial roll of 1708 and just cut the width I needed as I went. I don't remember if I had a full 5 gallons of 1/4 chopped strand or if it was a couple gallons in a 5 gallon pail. Try to buy the glass in large quantites and the resin in what you will use in a short time. I was getting off E-bay for a great deal, 5 gallons of ISO resin delivered for between $100 and $150 but that ended. I think the seller was forgoing the hazard shipping. I now buy it semi-local (3 hrs away) in 1 gallon cans. Much easier to handle. I also bedded the stringers with PL premium and I think I went through between 5 and 10 tubes. CSM sucks up resin so if I decide to put another layer on the deck I will need another 5 gallons of resin, at minimum.

Good luck on your project. If you have the time, it is worth doing. Just don't expect a return on investment.
 

sheboyganjohn

Senior Chief Petty Officer
Joined
Aug 2, 2005
Messages
753
Didn't feel like a whole lot of progress but did a lot the last few days. Painted the bilge and inside transom today. Tore down my good outer gimbal assembly with the wrong size gimbal mount. Tried drilling out the allen bolt on other one but got out of alignment and went into the aluminum. Decided since the ring is now shot I just cut it in half at each bell housing pivot point. Cleaned up and painted the gimbal mount from this unit. Painted both inner transom assemblies. Pulled the gimbal bearings from both donor gimbal assemblies, One because I was cleaning it up and did not want to get crud in the bearing, the other one since it is the wrong size assembly, but the same size bearing, so now I have a spare. Time to go get cleaned up for the day. Won a dinner at the chefs table at the yacht club so going to relax and have a good afternoon / evening. Tomorrow I will work on putting everything together and ready to put back on the boat, finally.
 

sheboyganjohn

Senior Chief Petty Officer
Joined
Aug 2, 2005
Messages
753
Well I guess the good news is I am getting real good and outer transom assemblies. Put the good unit together and set it aside,. Went to pull the bearing out of the other good unit with the bad bearing and could not get that damn snap ring out with the bell housing on. While removing the bell housing and bellows I somehow took a chunk out of the outer ring of the mounting surface for the drive shaft bellows on the gimbal housing. While getting the snap ring out for the bearing doing my usual method of needle nose pliers and two screwdrivers and manage to take more of a chunk out. I then looked at the bellows and they were torn. This unit had the smooth mounting surface and the other set of bellows I have are the ones for the units with the groove. So I decided to just tear it all the way down and use the gimbal ring on the other original assembly from the boat. While tearing it down I determined I had put the shims in the wrong place on the other unit so I tore that one part way down to swap around the shims. I will finish the teardown on the other original unit this week one night and get it assembled with the other donor parts. Kind of feel like I am going in circles, or gimbals, right now.
 

sheboyganjohn

Senior Chief Petty Officer
Joined
Aug 2, 2005
Messages
753
Broke the one I had. Went out to autozone and bought their heavy duty snap ring pliers and bent the tip mid shaft. I am guessing there is some super special tool that I will need to buy, or one made for working on semi's.
 

Scott Danforth

Grumpy Vintage Moderator still playing with boats
Staff member
Joined
Jul 23, 2011
Messages
47,562
AutoZone tools won't cut it. Need snapon, OTC or Bluepoint
 

sheboyganjohn

Senior Chief Petty Officer
Joined
Aug 2, 2005
Messages
753
I will look into a good set. Only need it for one more snap ring on the drive, but it never hurts to have a good set for the future. Not putting those snap rings back in. From what I have read, and looking at the design there really is no need for them.

Tonight worked on disassembling the other assembly for the parts. This time went to remove the shift cable and the nut stripped out. Then I went to pull the allen screw for the swivel pin and it stripped out on this one too. Did not mess around just cut the gimbal ring. Got all the corrosion cleaned up inside. scrubbed it with vinegar. Will give it a coat of primer and paint tomorrow and hopefully assemble Thursday. Of course it is going to be hotter then snot here the rest of the week so we will have to see if I get a chance to put them on the boat. Have to the last Saturday in the month to work on the Sea Ray, then I need to switch gears and get the duck boat built. I will start a new thread for that, may even do some video's.
 

sheboyganjohn

Senior Chief Petty Officer
Joined
Aug 2, 2005
Messages
753
It is the never ending battle of the outer transom assemblies. I got the gimbal housing and gimbal ring assembled with-out a problem, all that was left was to put a bell housing on. One had a stripped out nut on the shift cable so I had soaked the other one in PB blaster leaving a puddle on it for two days. Put the socket and wrench on it, took it easy this time and it nice and easily stripped out also. So it was time for the grinder and drill press. The first one was not fun, but I figured out what I was doing and the 2nd one was a bit better. Even drilled out over 3/4 of the way I could not get them to budge with an easy out. So I have two drilled out bell housings that need to be tapped out. Guess I will be ordering a tap. Taking the rest of the day off. Will clean up the mess in the shop tonight or tomorrow. While I wait on the tap to ship I will work on assembling the head for the one motor.
 

sheboyganjohn

Senior Chief Petty Officer
Joined
Aug 2, 2005
Messages
753
Did a little sanding on the transom today.

IMG_1173.JPG

Also noticed that the hatch over the cabin was looking a little saggy and some water leaked in from the storm last night. Looks like I am lucky only a little water leaked in. Next project is the hatch.

IMG_1175.JPG
 
Last edited:

sheboyganjohn

Senior Chief Petty Officer
Joined
Aug 2, 2005
Messages
753
Made a temporary cover for the hatch out of scrap wood I had laying around (seem to have a lot of that now a days). I also had tried to take apart the manifolds for inspection and cleaning. Snapped a bolt of each one removing the end caps and one had a bolt already snapped. One manifold has a crack in it I repaired but decided I should just replace it. If I can get the broken ones off using the weld a nut on hot wrench method that I used on the transom assemblies I will rebuild the un cracked one for use and then will see if I can pressure test the other and use it as a spare.

Will be in Indy all next week for work. Will spend my nights doing the to scale drawings of the duck boat so I can just start building when I get home.
 

sheboyganjohn

Senior Chief Petty Officer
Joined
Aug 2, 2005
Messages
753
Got 2 of the 3 bolts out with the weld a nut method. Will look at drilling out the other one at a future date. Have the new manifold to put together. Tap came in and was able to easily completely tap the one bell housing that had the rear mounted shift cable, but does not have the groove in the bellows mounting surfaces so it will not work with my gimbal assemblies. I then went to re-tap the other two. Had to use a 1/2x20 normal tap to get the first few threads started. The tap I got did not have enough initial taper on the tap to get it started. I then was able to tap out the holes, but I had one minor issue. Even using the drill press I did not get the hole completely square on either one and had it off center when it came out the boat side of the housing. Running the tap through knocked out the remaining brass from the old shift cable so there is a bit of slop with the hole in both. I am putting it together and going to see if the shift cable will pull in square. I can always seal up the threaded area with some 4200.

Will clean the shop up this morning and get the bags packed for Indy. I will start a new thread this week if I am not too busy at night for the duck barge.
 

sheboyganjohn

Senior Chief Petty Officer
Joined
Aug 2, 2005
Messages
753
The project is still alive. Ordered new exhaust manifolds for both engines. Decided it was not worth the risk playing around with the old ones. Hauled the one engine in the basement for the last month and worked on the rebuild. Ended up finding out it was not an original merc. engine, it appears to be an old fork truck engine. Crank journals were ground undersized and the block was bored 0.060 over. Even after a light hone one cylinder wall does not feel real good at one spot, but it is going back together and in the boat. I did pick up a spare block that has not been bored at all but has one blown piston. Since I pre purchased parts for the last build before checking I have everything except one piston to rebuild this new short block. This way I will have one ready if the fork truck engine pukes on me. In the next week or so I will get the boat uncovered and will start the work on getting the transoms back together and installing the engines. Will start providing pictures once the work starts. Hoping to splash it by early June.
 

Scott Danforth

Grumpy Vintage Moderator still playing with boats
Staff member
Joined
Jul 23, 2011
Messages
47,562
You know the difference between fork truck motors, boat motors and truck motors is minimal
 

sheboyganjohn

Senior Chief Petty Officer
Joined
Aug 2, 2005
Messages
753
I know but being bored 0.060 over with a slight defect in one on the holes has me a bit worried. If it was not for that I could care less where it came from.
 

sheboyganjohn

Senior Chief Petty Officer
Joined
Aug 2, 2005
Messages
753
Have both engines back together. One I could not get the new exhaust manifold to go on. It was the one that was a old industrial engine and had an extra bolt boss on the side of the block. A few minutes with a grinder and the boss went by-by and the manifold went on. The other one I put the new manifold on and went to bolt the throttle cable mount in place and found that one of the mounting bosses was not drilled and tapped. After 15 minutes (10 of which was finding proper drill bits) had the mount drilled and tapped. So now it is time to install the transom plates. I only had one bottom bolt that was worth using. When I saw they only come in pairs and are $45 a pair, I decided I am going with regular bolts put in from the inside out with a large washer, nut and sealing gasket. I will put the anodes on the end of the bolts. This is a trailer boat so I am not too worried. It survived as a slip boat for one of the previous owners with the zincs painted so it cannot be any worse this way.

Went to put the transom plates in and realized I still had over half the original shelves left on each side so I had to break out the grinder again and cut them off. I then used the flap wheel to grind a clean surface so I can install the new shelves. I think I may, and I stress may, finally be done with grinding and cutting fiberglass. Have 5 gallons of resin coming so I can finish the shelves and install the last of the stringer sections and sole in the cabin.

I will get some new pictures the next time I get into the boat to work. Looks like rain all next weekend so It may not be until next week.
 
Top