88 Bayliner Trophy 1710 - wet foam and ...?

Status
Not open for further replies.

kcassells

Fleet Admiral
Joined
Oct 16, 2012
Messages
8,600
I have several small holes drilled through the transom, each with a wood screw pulling the new layer in tight to the previous layer. I use pieces of polyethylene vapour barrier between the hull and the bits of plywood that act as washers for the 3" wood screws. Epoxy doesn't stick to polyethylene, so any squeeze out is separated from the wood.

I find that the green coated deck screws are easy to remove from cured epoxy, but we (Dad) had trouble removing a couple of the brass coated ones we had kicking around for this project.

Wood stove has been keeping the shop at 20 degrees or above... I think that's around 70 degrees in old units. :) We got another face cord of hardwood delivered last week, which should see us through this project. Last year it set up fine in much cooler temps, so the only part I'm really concerned about heatwise is the foam pouring.

Tune in next week when our hero uses a hole saw to overdrill the transom holes and fill them with thickened epoxy prior to the glassing over.


Wow ...I guess the Turkey didn't make you sleep like everyone says. That's alot of great progress. Ya know you could always get one of those do-hickey temp. things that lets you know if the temps get too low in the garage while, prior, after doing the foam. At least then you could feel comfortable knowing temps were balanced while you slept.
 

Arawak

Chief Petty Officer
Joined
Aug 27, 2010
Messages
486
Wow ...I guess the Turkey didn't make you sleep like everyone says. That's alot of great progress. Ya know you could always get one of those do-hickey temp. things that lets you know if the temps get too low in the garage while, prior, after doing the foam. At least then you could feel comfortable knowing temps were balanced while you slept.

We have our Thanksgiving up here in October, so it wasn't the big turkey day for us last weekend. If it were, I'd still be in a coma ;)

My dad actually installed said do-hickey last week, and now derives immeasurable satisfaction from constantly monitoring the temperature in the shop (it's at his place). I get regular reports by instant message :)

The temperature has been perfect in conjunction with the intermediate hardener I have been using. I get well over an hour of working time, and in the morning it's all set up, and when I get there in the evening it's perfectly sandable.

I think (hope) the foam expands and sets up quickly. I had assumed it would be a few hours. I'm thinking of sticking a hair dryer in one of the pour holes for a while just before I pour to make sure the surface temperatures are high.

But that's a long way off just yet.
 

kcassells

Fleet Admiral
Joined
Oct 16, 2012
Messages
8,600
We have our Thanksgiving up here in October, so it wasn't the big turkey day for us last weekend. If it were, I'd still be in a coma ;)

My dad actually installed said do-hickey last week, and now derives immeasurable satisfaction from constantly monitoring the temperature in the shop (it's at his place). I get regular reports by instant message :)

The temperature has been perfect in conjunction with the intermediate hardener I have been using. I get well over an hour of working time, and in the morning it's all set up, and when I get there in the evening it's perfectly sandable.

I think (hope) the foam expands and sets up quickly. I had assumed it would be a few hours. I'm thinking of sticking a hair dryer in one of the pour holes for a while just before I pour to make sure the surface temperatures are high.

But that's a long way off just yet.


That was a Good chuckle you gave me. My pop passed but I sure could see him watching that temp gauge and calling me on the hour..."Add wood will ya!!" After he retired he would cut my grass around the house like 3x a week! Enjoy!
It's nice being able to dabble with the temps. Just retarped up my piggy so I can do some things over the cold spell other than looking at her from the window.
 

Arawak

Chief Petty Officer
Joined
Aug 27, 2010
Messages
486
Today was prepping the transom to glass over it. I cut out a template from a piece of drop cloth to use to cut the layers of 1708 that will go over the inside of the transom. I want to build back up to the original thickness which was around 1/8" so not sure how many layers I'll need. At least two, possibly more. I also have some 12oz 45/45 tape that I'll use to tab the edges.

But first, I had to overdrill the through hull holes and fill them with PB. This way when I drill/cut the correct size there will be a ring of epoxy PB sealing the holes and there will be no way for water to get at the wood.

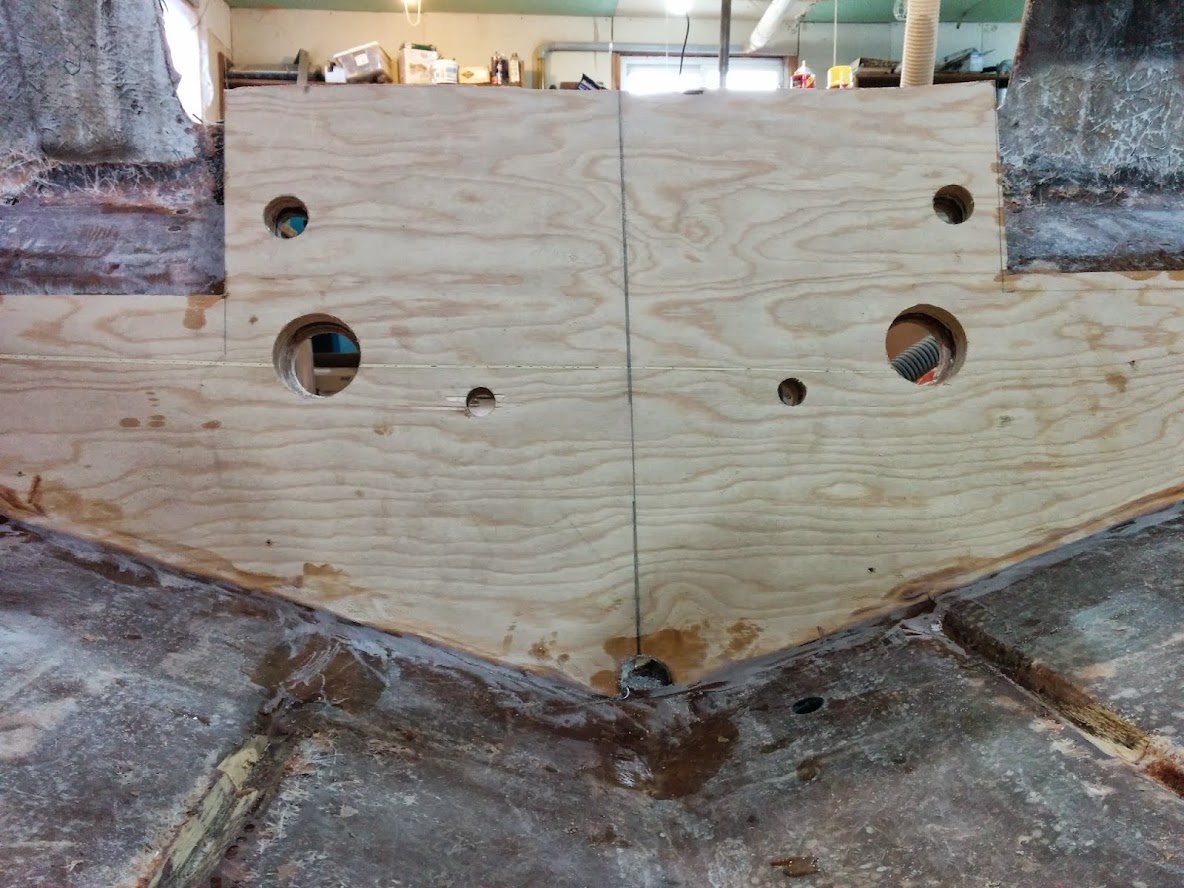
There are 6 holes I need to worry about. Two 2" scupper holes (below the waterline), two 1" drain holes for the splash well, and two holes for the motor clamp bolts. The bilge hole at the bottom won't need to be dealt with until after the transom and stringers are done.

First, I used my holes saws to cut the nominal size from the outside until the pilot bit just cut through on the inside. Then I used the pilot hole and a bigger size hole saw to cut back from the inside until I just reached the glass. It was easy to get the plugs out because the first layer of the transom had rough holes already, but I think I didn't need to do that. Anyway, here's what I ended up with:

2014-12-06%2B11.46.44.jpg

The bolt holes for the motor are actually just 7/8" all the way through. Here's a closeup of one of the scupper holes:

2014-12-06%2B11.16.10.jpg


It's overkill, a big bigger than is needed, but I didn't have a hole saw exactly the size I wanted.

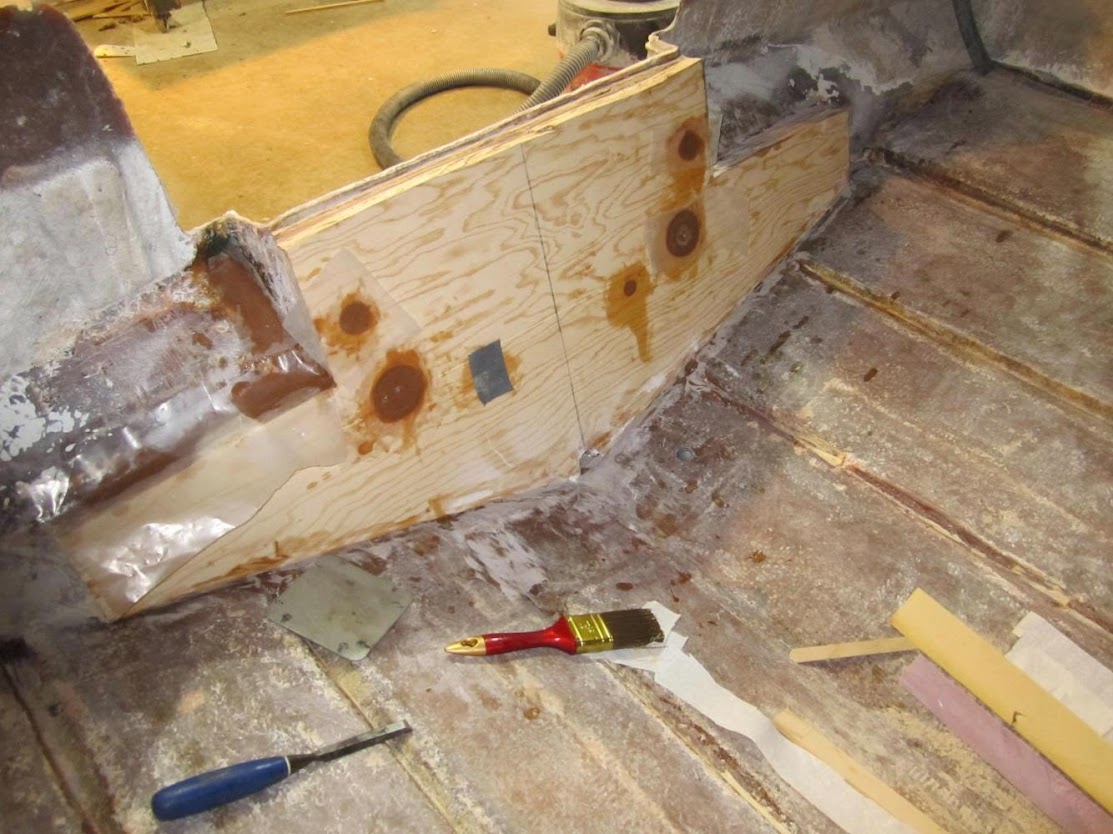
With that done, I cut two 1.25" plugs out of some scrap white oak, mixed up 12oz of epoxy and made PB. It was mostly woodflour, with a little cabosil and chopped fibers to prevent any sagging in the two big holes.

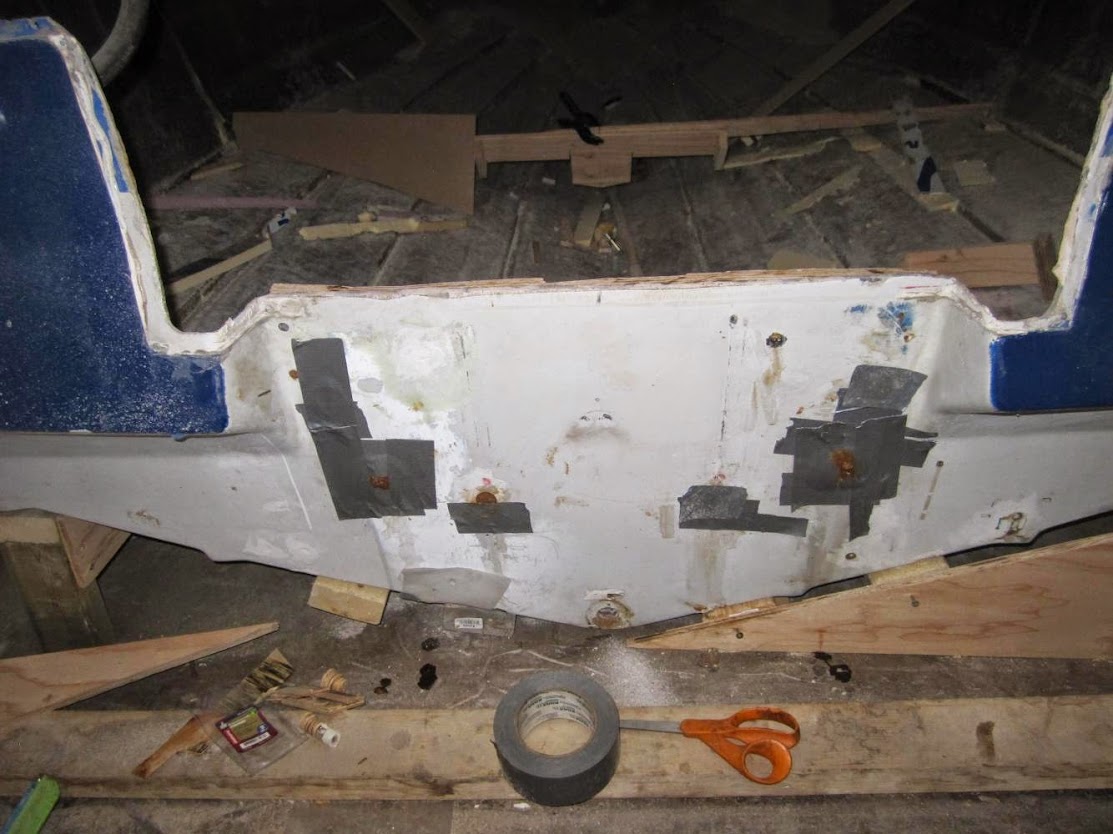
I painted the inside of the hole liberally with neat epoxy first so that even if I get a void the wood is sealed, then I packed the holes, putting the two wooden plugs in the middle of the scupper holes to save some epoxy. The transom side of the holes were mostly covered over with duct tape, leaving a gap near the top so that I could squeeze the PB through the holes, hopefully avoiding any air pockets. Sorry, I failed to take those pics, but will have them later.
 
Last edited:

Arawak

Chief Petty Officer
Joined
Aug 27, 2010
Messages
486
Dad just emailed me photos showing how I left it:

sean%2Bboat%2Bnew%2Btransom%2B6.jpg


sean%2Bboat%2Bnew%2Btransom%2B7.jpg


It's a bit messy on the outside, but the PO has done some work and tried to paint it, so I'm going to have to refinish it anyway, and probably re-gelcoat.

I had some PB left over, so I used it to fill in some pockets in areas that are going get glassed over. Bayliner did sloppy work in the 80s.

There is about half a roll of vapour barrier leftover from insulating the shop, and I use it a lot since epoxy doesn't stick to it. Rather than have a rough finish to the PB that needs heavy sanding, I like to stick the plastic to it. After it's hardened up, you can peel the plastic off and you don't need too much sanding. I just wipe it down with water to remove any amine blush (the epoxy and hardener I use don't have much) and then sand or wire wheel it it with the drill.
 
Last edited:

nurseman

Lieutenant Junior Grade
Joined
Jun 2, 2013
Messages
1,045
Looking good! Good thinking with the plastic sheeting, anything that saves sanding is a good thing, imo.
 

fisheymikey

Chief Petty Officer
Joined
Jul 30, 2012
Messages
450
i feel Very lucky you are ahead of me!! i could see your progress hopefully i will do just as good.
 

Arawak

Chief Petty Officer
Joined
Aug 27, 2010
Messages
486
Dad has been busy filling the chines with foam. Originally they had strips of pine in them, but they were soaked through like most of the wood in the boat. Rather than put wood back in, I decided to use foam board, "glued" in place with spray foam, and then cut flush. Dad volunteered for the task.

sean%2Bboat%2Bchine%2Bfillers.jpg


The chines and the foam will be glassed over by the tabbing, same as it was originally.
 

fisheymikey

Chief Petty Officer
Joined
Jul 30, 2012
Messages
450
Arawak... may i ask why you are doing that arent the stringers going on top? or that gives you better option to change the layout of the boat?
 

Arawak

Chief Petty Officer
Joined
Aug 27, 2010
Messages
486
Arawak... may i ask why you are doing that arent the stringers going on top? or that gives you better option to change the layout of the boat?

The stringers are going back in their original position. They don't sit right on top of the chines. The tabbing for the stringers will cover the foam... basically it will go back just like it was, except that the wood in the chines is replaced by high density foam.
 

Arawak

Chief Petty Officer
Joined
Aug 27, 2010
Messages
486
Pink foamboard, essentially same as blueboard. It's just there to eliminate the void, I think.
 

m casey stock

Chief Petty Officer
Joined
Apr 29, 2012
Messages
514
nice boat, I have a 21 foot CC trophy and we love it, great little boat and plenty of room. Your progress looks great, keep up the good work.
 

tpenfield

Moderator
Staff member
Joined
Jul 18, 2011
Messages
17,712
Subscribing in . . .

I don't see any detail pictures of the fuel tank since you removed it from the boat. You mentioned in another thread that it had some corrosion from where it was sitting in water.

No hard and fast rule about what can be repaired or when it is better to replace the tank. I would not re-use a tank if the pits were 50% of the metal's thickness or more.

Zool repaired his tank and I repaired mine, AllDodge's tank seems to be right around 50% of the thickness compromised, so he decided to err on the side of caution.

Foamed in tanks usually add some stiffness & strength to the hull structure, but not in all cases. So, it is something to keep in mind as to alternate methods of installation. Foam for fuel tanks is usually 4 lb density or greater.

A good epoxy paint is going to be expensive . . . $50-100 per gallon. I used Interlux Interprotect 2000E with good results. It is primarily a barrier coat for hulls, but also serves well as a coating for bare metal. Lots of prep on the tank before painting so you get good adhesion.
 

Arawak

Chief Petty Officer
Joined
Aug 27, 2010
Messages
486
Subscribing in . . .
I don't see any detail pictures of the fuel tank since you removed it from the boat. You mentioned in another thread that it had some corrosion from where it was sitting in water.

Welcome! I haven't spent much attention on the tank since it was removed, but dad took the wire wheel on a drill to it and cleaned it up. I'll have to take my DSLR over to get some photos, because the light is not good enough for the phone camera.

No hard and fast rule about what can be repaired or when it is better to replace the tank. I would not re-use a tank if the pits were 50% of the metal's thickness or more.

Yeah, mine is in pretty good shape overall, just two pits that bother me.

Foamed in tanks usually add some stiffness & strength to the hull structure, but not in all cases. So, it is something to keep in mind as to alternate methods of installation. Foam for fuel tanks is usually 4 lb density or greater.

I dunno. I don't think that the tank should be stressed. I'd want to make sure the compartment provides all the strength and stiffness I need. IMO the foam should support the tank, not the hull. I do have 5lb foam btw.

But also, if I do have to replace the tank in the future, I don't want to have to deal with the nightmare of getting it out like AllDodge did. Originally the tank was just resting on the PVC drain tube and glassed to the stringers at the top. There's very little room between the tank and the stringers... less than an inch on each side, so I'm not even sure if I could get foam in there. I'm not sure how much room there is underneath yet. Once I get the stringers installed I can fiddle with that.

A good epoxy paint is going to be expensive . . . $50-100 per gallon. I used Interlux Interprotect 2000E with good results. It is primarily a barrier coat for hulls, but also serves well as a coating for bare metal. Lots of prep on the tank before painting so you get good adhesion.

If I go with a paint it will likely be Rustoleum Coal Tar Epoxy or similar. But as I stated on AllDodge's thread I'm currently leaning towards glassing the tank both to fill the minor pitting and to seal the surface. The epoxy isn't any cheaper than the paint, but I have it on hand. Just have to decide whether to use gunk to fill the two spots of concern, or to get a welder to patch them.
 

alldodge

Moderator
Staff member
Joined
Mar 8, 2009
Messages
40,760
But as I stated on AllDodge's thread I'm currently leaning towards glassing the tank both to fill the minor pitting and to seal the surface. The epoxy isn't any cheaper than the paint, but I have it on hand. Just have to decide whether to use gunk to fill the two spots of concern, or to get a welder to patch them.

Howdy, had to come have a look my self, nice work so far
The comment about glassing in the tank. If you mean to use glass to fill in the pits I would not do that. If anything use something like JB Weld or similar. If gas comes in contact with glass it will eat it up. If I misunderstood then I'll go back and set down
 

Woodonglass

Supreme Mariner
Joined
Dec 29, 2009
Messages
25,924
If gas comes in contact with glass it will eat it up.

Uhmmm, not sure where you got this idea, but it's not correct. Once cured, Polyester resin/fiberglass is not affected by gasoline.:rolleyes: The main reason you wouldn't want to use glass on the tank is, it just doesn't adhere well to metal.;)
 
Last edited:

alldodge

Moderator
Staff member
Joined
Mar 8, 2009
Messages
40,760
Uhmmm, not sure where you got this idea, but it's not correct. Once cured, Polyester resin/fiberglass is not affected by gasoline.:rolleyes: The main reason you wouldn't want to use glass on the tank is, it just doesn't adhere well to metal.;)

Came from my younger days and having a fiberglass pan which I used one time to clean auto parts. After a couple hours I had leaks everywhere, I used gas cause I it was cheap and plentiful. Don't know what kind of glass it was, but it did dissolve on me
 
Status
Not open for further replies.
Top