Here's a link to parts diagrams for your motor:
http://www.marine engine.com/parts/mercury-outboard-parts/500/2858814-thru-4140999-usa
Since this site parses any references to other sites, you'll need to copy & paste to your browser's address bar, then take out the space.
This is a breakdown of the end caps, manifold & exhaust covers:
http://www.marine engine.com/parts/mercury-outboard-parts/500/2858814-thru-4140999-usa/end-caps-manifold-and-exhaust-covers
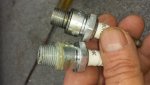
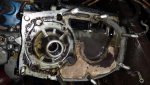
You can remove the lower bearing end cap without splitting the crankcase, to replace seals (if you find they are bad). The end cap is held onto the block by (3) bolts. When you wrench on these bolts, if they don't move with normal force, Stop! Get a propane or Mapp torch and apply heat to the bolt & surrounding areas, to loosen it up. If you twist back-and-forth on a stuck bolt without applying heat, you'll break the bolt and the repair for that is no fun at all!
Once the end cap bolts are removed, take a thin, wide blade (such as a paint scraper or drywall tool) and carefully tap it in-between the end cap & block. The end cap should start to move. When it gets high enough, use 2 prying tools, on opposite sides, to evenly pry the end cap. A wide, flat surface such as a Wonder Bar works best. Small screwdrivers will dig in and gouge the surfaces of the end cap or block. DO NOT pry on the bolt tabs, as they are easily broken.
You'll note that there are 3 extra holes in the end cap, you may be able to tap those for bolts, and use a harmonic balancer puller, which is far better than prying-up the cap.
The seals are pressed into the cap, and the lower crank bearing is pressed in on top of that. So you'll have to remove the bearing before you can get at the seals. Heat the end cap with a torch, around the area where the bearing sits. The bearing will probably fall out.
If not, pad the end cap with a shop rag and gently place in a vice, bearing-side down. Get an old screwdriver and put a bend in the last few inches. Use this bent tool as a driver, on the inner race of the bearing. Drive from the top to push the bearing out the bottom. Once the bearing starts to move, it'll tend to rock in the cap and get stuck; just change the position of the tool to the other side of the bearing, so it's driven evenly out of the end cap.
The seals are removed in a similar manner. Reinstallation is reverse of removal, both seals go lips-down and if you freeze the new bearing, then gently heat the end cap, the new bearing should fall right in.
That's just an overview, highly recommend you get a service manual for more instructions and torque values.
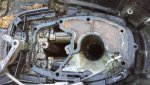
Be sure to check the exhaust side for leakage, since a blown exhaust baffle can spray water into the lower cylinders. Exactly what happened with a motor my good boating bud recently bought to fix up for a G.W. Invader.
The exhaust baffle was rotted thru, and was spraying water into #3 and #4. He's in the process of rebuilding the motor, and it's going back together well. He found lots of good used (and new) parts on eBay. Such as the 90421 inner baffle plate. Lots of clean, freshwater motors being parted-out.
Anyway, hope that helps; let us know if you find any obvious leakers............ed