'74 merc 500, water in #4 cylinder

racerone

Supreme Mariner
Joined
Dec 28, 2013
Messages
36,321
Highest chance of succes is to drill the head of the bolt off.----Then you can apply direct heat to the block to get the studs out.
 

emckelvy

Commander
Joined
Jan 16, 2004
Messages
2,506
I have been working with butane pocket and pencil torches, but I never thought about the mapp gas.

Yeah, you gotta have some serious heat when working on Salty Dogs! I have a Bernzomatic Mapp torch and that puppy really heats the parts up fast. If you don't have enough BTU's, all it does is heat everything up at the same time, and then the aluminum acts as a giant heat sink. What you want to do is heat the aluminum rapidly, so it will expand before the steel bolt does.

Hope the Mapp works better.......ed
 

Rulost

Seaman
Joined
Feb 7, 2012
Messages
57
Didn't get a chance to fool with it tonight, but will give it a go tomorrow. If it doesn't seem to help much then I will get to drilling. Time to pick up some new drill bits in the morning.
 

Rulost

Seaman
Joined
Feb 7, 2012
Messages
57
With Patience, and cycles of heat, oil and vibration, all of the bolts came out intact. I am trying to post pics of the ugliness inside the exhaust cover, but am having a hard time uploading from my computer. Something about a problem with the file. Will try again later
 

emckelvy

Commander
Joined
Jan 16, 2004
Messages
2,506
Looks nasty! I'd say the inner baffle looks pretty rotted, if you can post a pic of the other side it might show rot-thru or leaking. Were there any gaskets on there, it looks like red RTV to me??

The outer cover is in bad shape as well. My buddy found some nice covers for his 50hp on eBay. Just look up the part numbers for your exhaust cover & baffle, and plug 'em into an eBay Motors search. He got an absolute steal on a new cover, and the baffle he found might as well been new, it was in excellent condition.

Well, looks like the worst of it may be over! BTW, how do the pistons & rings look, now that you can see 'em thru the exhaust ports?
 

Rulost

Seaman
Joined
Feb 7, 2012
Messages
57
I can't get the other pictures to load. Says file corrupted or something, but I can see them fine on my computer. Even when I reload them it gives the same msg when I try to post them here. The red/brown is actually gasket material. The 3rd and 4th pics are of the baffle and show some of the holes that are rotted through around the perimeter. There are no cracks or holes in the center, but the edges are totally shot. The cover "might" clean up, but I am going to try to change both and be done with it. I was in a hurry and didn't have time to check the pistons and rings really close, but they look pretty good at first glance. Since it had fair compression before I started the engine, I feel they will be ok for a while.
 

Rulost

Seaman
Joined
Feb 7, 2012
Messages
57
Quite probably a dumb question, but I'm going to ask it anyway... In the picture attached of my exhaust cover, should the area circled in red be an open channel, like mine is, or should most of it be filled in? I found a used cover on Ebay, but most of that part is filled in like mine was when I pulled it off. All of it came out like sand when I scraped on it, so I figured it shouldn't have been filled in. I'd just hate to buy a used one that's no better than what I already have. Also. with a serial number 3817126 (1974), can anyone verify the part number of the exhaust cover? I found someone that supposedly has 10 of them in stock if the part number is correct (46112A 3). But I also don't want to tie up the time and the $100 + shipping if it's wrong. Thanks again for all of the help! Exhaust cover.JPG
 

emckelvy

Commander
Joined
Jan 16, 2004
Messages
2,506
I found only one listed on eBay but it looks like it may be crustier than yours! And yes, that part of the cover you have outlined is not supposed to be plugged with debris, water is expected to be able to flow thru. Your cover looks crusty, but if the gasket sealing surfaces aren't corroded away, and look smooth when you scrape all the gaskets & gunk off, you may be able to reuse it.

This is the diagram for your motor, according to serial #:

http://www.marine engine.com/parts/mercury-outboard-parts/500/2858814-thru-4140999-usa/end-caps-manifold-and-exhaust-covers (of course remove the space after you plug it into your address bar).

And yeah, the 46112 is superceded by the 46112A 3 cover. Whatever improvements caused them to supercede the original part, the new cover would be backwards-compatible.

This used 90421 baffle plate looks like a decent fresh-water part, just needs cleanup.

$31 shipped: http://www.ebay.com/itm/221663137099

Note quite as much old stuff kicking around, I reckon it's all rotted away by now!!!! :0

HTH..........ed
 

emckelvy

Commander
Joined
Jan 16, 2004
Messages
2,506
I just bought some parts for my MK20H from the same guy, he's a straight-up seller.

Not bad, getting all the parts you need (and then some!) in one big lump!
 

Rulost

Seaman
Joined
Feb 7, 2012
Messages
57
Thanks for all of the help. I will update as the parts come in and things start to go back together. On the bolts for all of this, can I use regular grade 5 or 8 bolts (stainless or steel), or does it have to be a special type of metal?
 
Last edited:

emckelvy

Commander
Joined
Jan 16, 2004
Messages
2,506
None of them are high-strength; I would just match material with the old ones. If they were stainless, the new ones should be stainless, etc. BTW, if the old bolts are in good condition, they can be cleaned and reused. A wire wheel chucked into a bench grinder makes a dandy bolt clean-up device. Just don't clean up your fingers, that hurts!
 

emckelvy

Commander
Joined
Jan 16, 2004
Messages
2,506
They're not hi-tensile-strength bolts. Just use the same material for the replacement. If any of the old bolts are in good condition, they can be re-used. A bench grinder with wire wheel cleans 'em up just Dandy. Make sure you don't clean your fingers with the wire brush, that's a bit painful (ask me how I know!!!).
 

Rulost

Seaman
Joined
Feb 7, 2012
Messages
57
All of the bolts are in real good shape, I was just thinking it might not hurt to change them. Ha ha, put my fingers in a wire brush and sanding wheels a few times. You're right, not much fun in it. Thanks!
 

Rulost

Seaman
Joined
Feb 7, 2012
Messages
57
Parts have started coming in, and out of curiosity I was wondering if anyone knew the reason for the different design on the exhaust baffles. I took a picture of the three that I have and you can see the difference (L-R Original 46109, replacement 46109, and replacement 90421). Different exhaust tuning? Obviously it will fit, and should work fine since the 90421 is the newer part number, I just like to understand these things. Also, since it was included in the parts I got, why are there two different designs to the cylinder cover? Now just waiting on gaskets, seals, and bearing. Thanks!
 

Attachments

  • Baffles.JPG
    Baffles.JPG
    88.5 KB · Views: 1
  • End Plate 2.JPG
    End Plate 2.JPG
    79.7 KB · Views: 1
  • End plate 1.JPG
    End plate 1.JPG
    78.2 KB · Views: 1

emckelvy

Commander
Joined
Jan 16, 2004
Messages
2,506
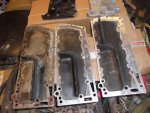
The mfr is always fiddling with things to make 'em run better or last longer (at least we hope that longevity is one of their goals!). So, the baffle was an upgrade to, I'd imagine, the exhaust tuning. The fact that they superceded the old part number instead of making it a new part number, only applicable to the newer engines, kinda tells me that whatever improvement that extra baffle piece gave, would have the same effect on an older engine as well. So, maybe yours will run even better than before!

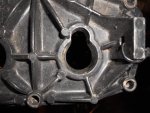
The oblong hole in #1 cylinder on the newer cover corresponded with similar shape on the machined end of the cylinder casting, and was drilled/tapped to accept an optional temperature sensor. No real advantage to that, though, as a water pressure gage is a better indicator of cooling system condition. If you were to lose the water pump, by the time the sensor registered the overheat the engine would be fried. A pressure gage would respond immediately and at least give you a sporting chance to shut 'er down before burnout.

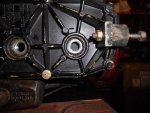
My buddy got his Frankenmerc 50hp Shortie running today, and other than a funny little noise at the top of the engine, it runs really well. He's going to pull the end cap and make sure nothing's messed-up. The crank has a bit more than .012" end-play after replacing the crank bearings, so I think he's gonna pull the upper shim to get it back into specs.

G'luck with your project, let us know how it runs!........ed
 

Rulost

Seaman
Joined
Feb 7, 2012
Messages
57
Thanks for the info and I hope your buddy gets his squared away soon. Got an email that the gaskets shipped this afternoon, so hopefully mine will be back up soon as well. Still messing with the paperwork, so even if I had it running tomorrow I can't hit the water yet. Haven't been in too big of a hurry due to that.
 
Top