1993 Chaparral Gemini 190: Chronicles of a New Boat Owner (Deck Rebuild) [SPLASHED June 2018]

bpounds1991

Petty Officer 1st Class
Joined
Nov 3, 2017
Messages
321
So after picking up the boat today I finally understand what the issue was lol. The TOP of the transom where the motor attaches was at a slightly different angle, in which they simply ground that down and reattached the hull.
 

oldrem

Commander
Joined
Nov 7, 2013
Messages
2,002
Sometimes it just takes another eye. Glad it was simple. Did they still charge for 8 hours?
 

bpounds1991

Petty Officer 1st Class
Joined
Nov 3, 2017
Messages
321
Thanks Rem, it took them 4 1/2 hours and they PB'd the transom to the top cap after grinding it down, and screwed the entire cap on so they just left it at the 800$ quote.
 
Last edited:

Timr71

Petty Officer 1st Class
Joined
Jul 19, 2012
Messages
326
At least, you can sleep easy tonight knowing that it's all put together properly. Not too bad. Congrats!
 

bpounds1991

Petty Officer 1st Class
Joined
Nov 3, 2017
Messages
321
Thanks Tim! Tomorrow we put the aluminum railing on the transom, rub rail, motor, battery trays, motor oil tray, and motor in!
 

bpounds1991

Petty Officer 1st Class
Joined
Nov 3, 2017
Messages
321
Long morning/early afternoon. Aluminum railing wasn't an exact fit to the new cap install (2 holes were off) so we had to pre drill new holes followed by 3M 5200 #12 3/4" screws. After that we moved on to the rub rail insert, all with #10-12 screws (depending on the size of the previous hole). Lastly we ended with putting the motor on, with the admiral manning the shop crane. We got the motor on fairly easy then realized that the previous hole we had the bolts through caused the motor hooks to not sit flush on the transom. It was a simple fix, we just lifted it back up, pulled the bolts out, and then used the next hole up...fits like a glove now. We finished that up around 3:00, so I made the itinerary for tomorrow and hopefully can finish most of the cosmetics up before taking the boat over to the mechanic Monday morning. I added a picture also of the new aluminum motor well tubes the restoration place installed, they said they hate the brass fittings as water usually rots the transom through them...so they installed aluminum ones for me :)

IMG_0184.jpg
 

Attachments

  • IMG_0183.jpg
    IMG_0183.jpg
    90.6 KB · Views: 3
  • IMG_0179.jpg
    IMG_0179.jpg
    110.7 KB · Views: 3
  • IMG_0182.jpg
    IMG_0182.jpg
    110.6 KB · Views: 3
  • IMG_0180.jpg
    IMG_0180.jpg
    103.8 KB · Views: 3

tpenfield

Moderator
Staff member
Joined
Jul 18, 2011
Messages
17,732
So after picking up the boat today I finally understand what the issue was lol. The TOP of the transom where the motor attaches was at a slightly different angle, in which they simply ground that down and reattached the hull.

That's an expensive geometry lesson, but glad they found the solution for you.

:)
 

bpounds1991

Petty Officer 1st Class
Joined
Nov 3, 2017
Messages
321
No kidding, how many grown men does it take to figure out a simple angle issue LOL.
 

Woodonglass

Supreme Mariner
Joined
Dec 29, 2009
Messages
25,924
Glad to hear the caps back on. This is just another example of how IMPORTANT it is to take a Lot of Accurate measurements before tearout and after re-install. They MUST be the same to avoid issue such as this.
Lesson Learned!!!;)
 

bpounds1991

Petty Officer 1st Class
Joined
Nov 3, 2017
Messages
321
Absolutely, and we did take a ton of measurements! Which, surprisingly, every hole lined perfectly up except for the transom and we just couldn't figure out why. If you're looking at the boat from the side, the line in red is the area of the transom that was the issue. I simply just had it too high for the cap to sit down on, so once they ground it down it went right on in.


transom.png
 

bpounds1991

Petty Officer 1st Class
Joined
Nov 3, 2017
Messages
321
Hoping to have it splashed within 2 weeks. Today I’m finishing the cosmetics and installing a few extra components before we take it to the mechanic tomorrow. The maintenance should be done by Friday or at least we hope, and then my dad will help finishing up the final wiring.
 

bpounds1991

Petty Officer 1st Class
Joined
Nov 3, 2017
Messages
321
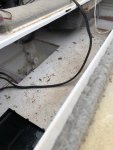
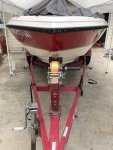
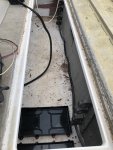
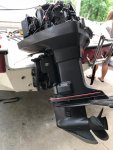
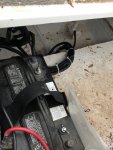
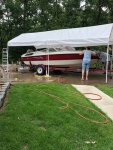
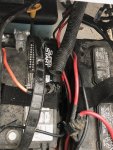
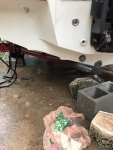
Figured I’d give a mini update since it’s been a while. I’ve been sitting in limbo waiting on the mechanic to do the carburetors, water pump, motor inspection, rewire, hook up steering/throttle cables, and hook up the lines (oil/fuel). We would’ve had power hooked up to it last weekend and the steering/throttle, but the guy I was with said it would be best to let him do everything properly, incase (aka in the likely chance) something is working incorrectly which would cause even more time to have him figure out the problem and fix it. Last Sunday we installed the battery trays/batteries, motor oil tank/tray, screwed the top cap down to the deck, installed the fuel and vent hoses, and cut the pieces out to be installed where your feet would be in the passenger/driver seats.
 

bpounds1991

Petty Officer 1st Class
Joined
Nov 3, 2017
Messages
321
So I got the boat back today.... the mechanic said he had some good news and bad news. The good news: Carburetors were good and so was the water pump, the boat started right up no issues. The bad news: There was only a quarter tank left of oil. I said oh hell if that's the bad news IT'S TIME TO CELEBRATE!!!! The total cost for checking the motor wiring and hooking everything back up: 200$. It's a GOOD DAY!!!!!!!!!!!!!!!!!!!
 

bpounds1991

Petty Officer 1st Class
Joined
Nov 3, 2017
Messages
321
After 8 hours of boat work today, we're ready for a splash tomorrow morning! We started off the day sealing up some screw holes in the back of the boat with fast cure 3M 5200, resealing/attaching the speedometer and depth finder. After that we installed the rub rail (was nice and toasty after sitting out in 90 degrees for 2 hours), and my dad moved on to cleaning up the bilge wiring with zip ties and wire covers while I cut the wood pieces for bow storage. We took a quick lunch break to let the resin cure on the wood pieces, then screwed/ 3M 5200'd them in. My dad moved on to wiring the power to the depth finder, and the ladies worked on cleaning all of the seats. Once that was finished, we installed the row seating, seat bases, and all the cushioning. Sadly the new adjustable seat bases were a little too tall, so we ended up going with the originals. Here's some pics of today. At some point next week we'll take time to give the deck a quick polishing, vacuum, gel coat, and install the SeaDek. PS: We left some of the wooden inserts un-siliconed to allow for water drainage.

IMG_0259.jpgIMG_0253.jpgIMG_0258.jpgIMG_0257.jpgIMG_0255.jpgIMG_0254.jpgIMG_0256.jpgIMG_0248.jpgIMG_0246.jpg
 

Attachments

  • IMG_0249.jpg
    IMG_0249.jpg
    104.8 KB · Views: 3
  • IMG_0251.jpg
    IMG_0251.jpg
    148.5 KB · Views: 3
  • IMG_0250.jpg
    IMG_0250.jpg
    133.8 KB · Views: 3
  • IMG_0247.jpg
    IMG_0247.jpg
    105.2 KB · Views: 2
  • IMG_0252.jpg
    IMG_0252.jpg
    129.2 KB · Views: 3

bpounds1991

Petty Officer 1st Class
Joined
Nov 3, 2017
Messages
321
We certainly were Rem, and folks...we're officially SPLASHED! We have a few cosmetics to finish up on, as well as finding where some water entered the bilge today, but other than that it was a smooth first ride for sure. The first picture is the view of our house from the water, and the second picture is our cove.

IMG_0262.jpgIMG_0263.jpgIMG_0261.jpg
 
Top