1991 MIRROCRAFT TROLLER XL REBUILD/RESTORE

Dignified09@gmail.com

Petty Officer 3rd Class
Joined
Apr 9, 2016
Messages
92
Hello and welcome to my thread. I am excited to show you all this project as it is my first attempt at ever rebuilding/restoring anything ever.

A little bit about myself, I am 25 years old, from Minnesota (10,000 lakes :D ) and have very fond memories of my father taking me out to fish as well as traveling northern MN to Aitkin for the fishing experience as well. This is my FIRST boat ever as well, and I am hoping to gain some helpful knowledge as well as tips or pointers on how to accomplish what I want.

Thank you for taking the time to visit and I hope that I will get some responses from the community.

I have been thouroughly reading through various posts in the past couple of weeks and have gathered a lot of things myself as to what I may need to do or direction I need to take but I am going to need some help from you veterans out there, so I greatly appreciate any comments or help.

Thank you so much, help me get out fishing :)

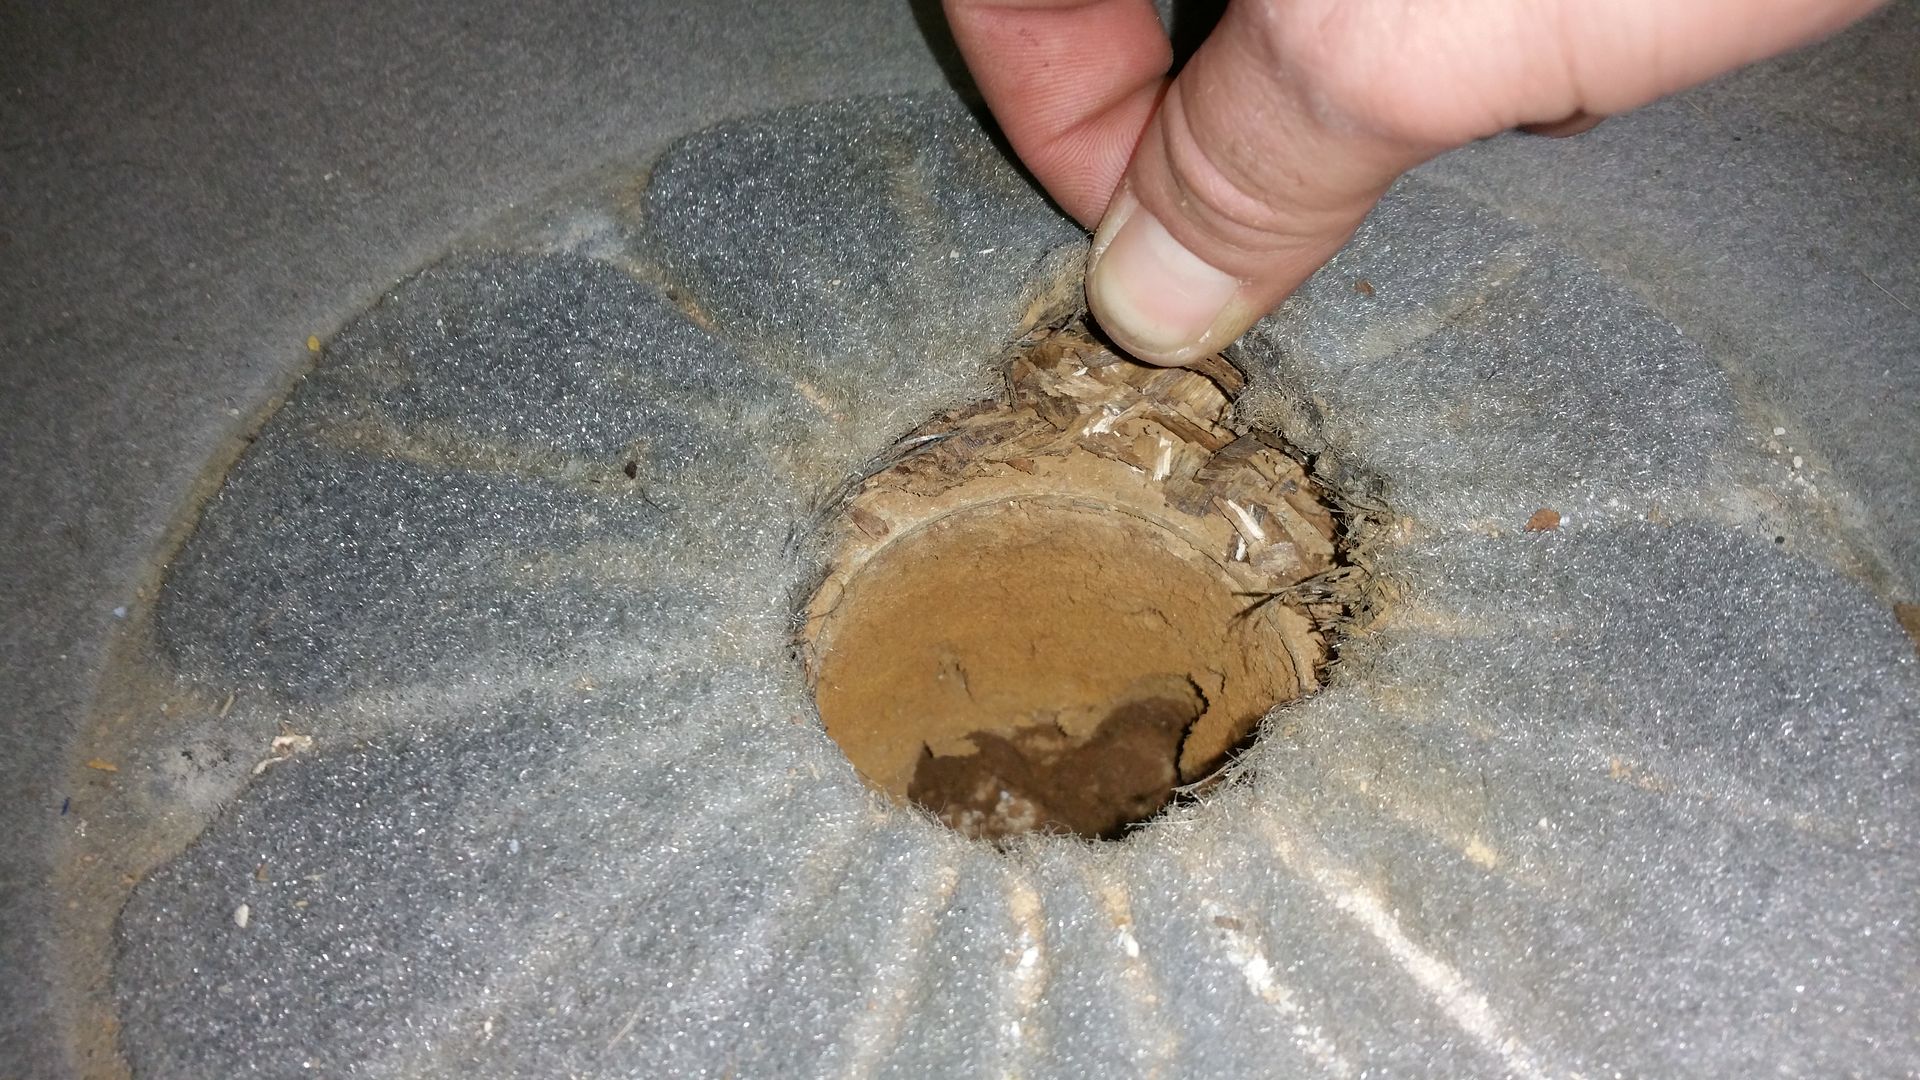
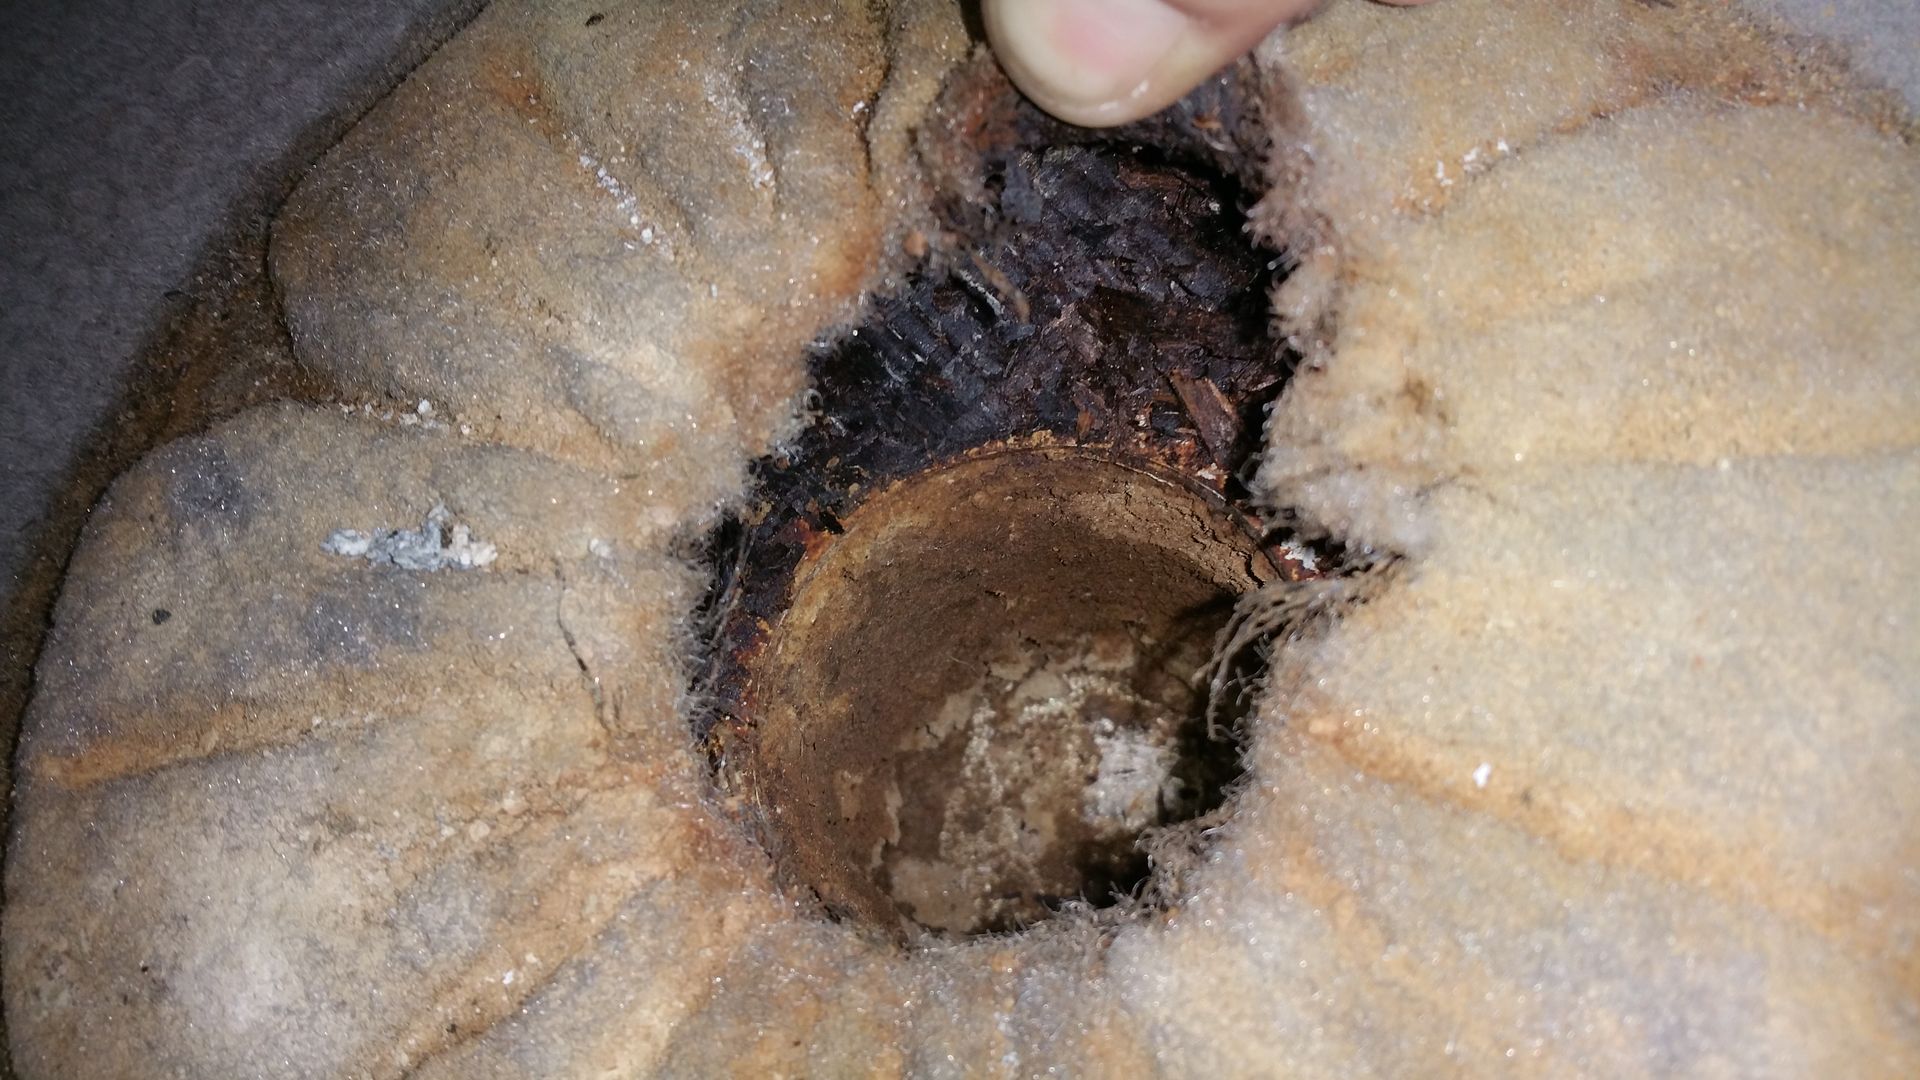
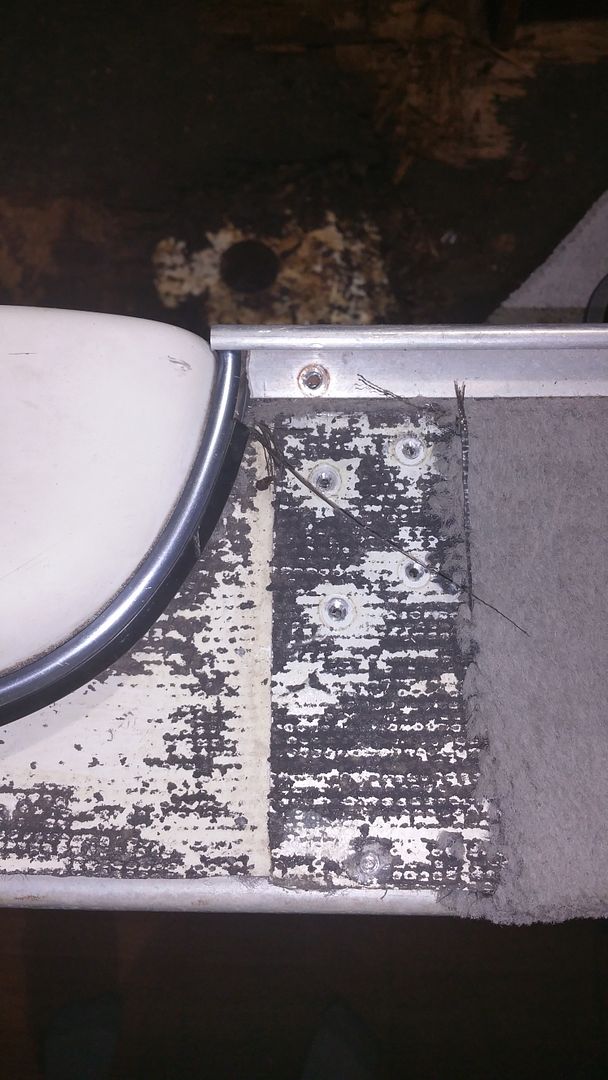
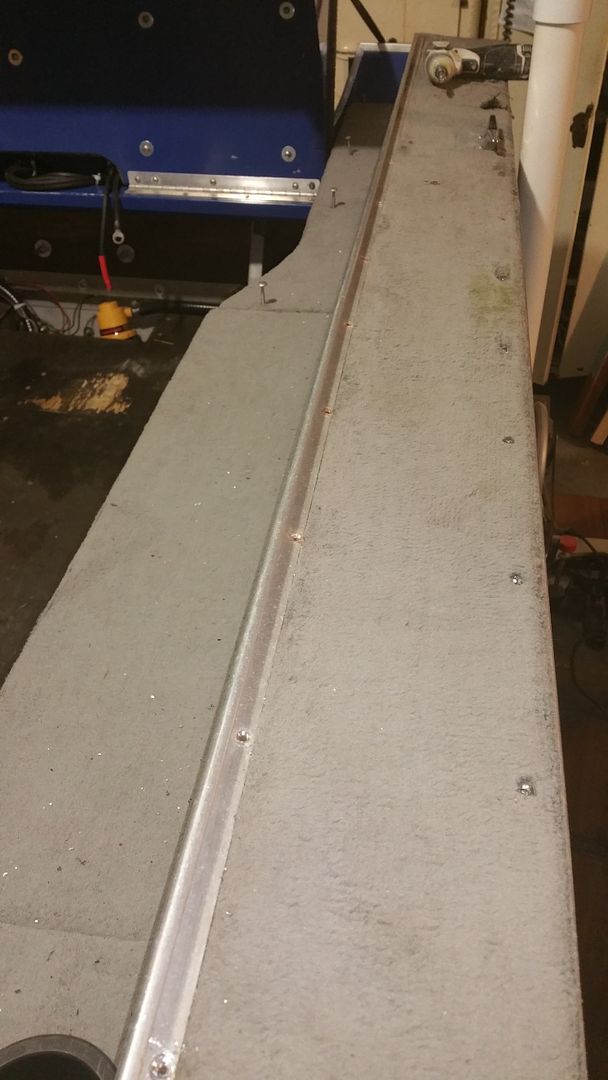
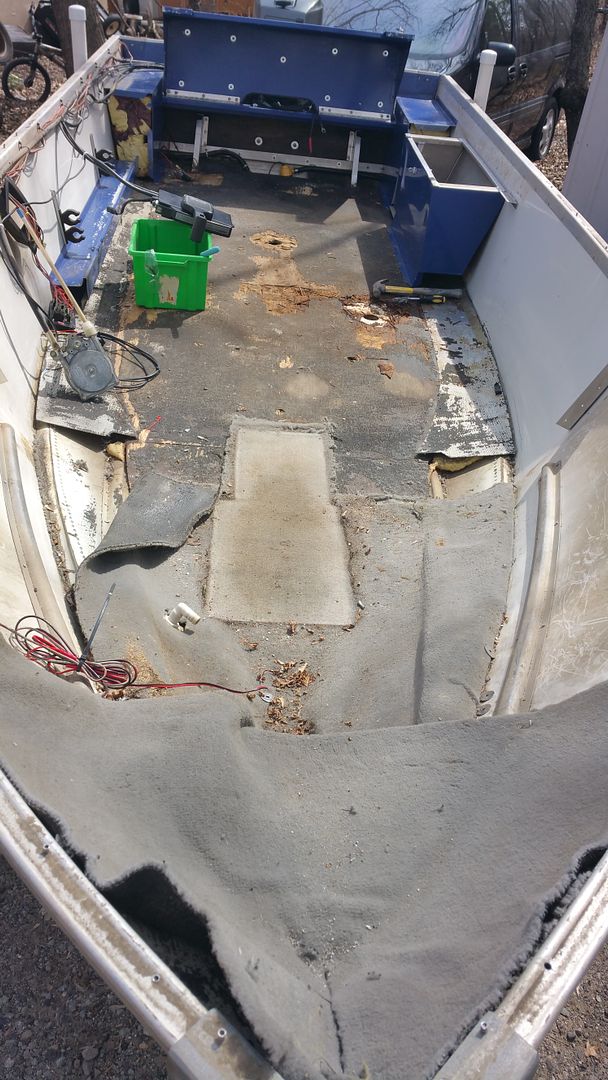
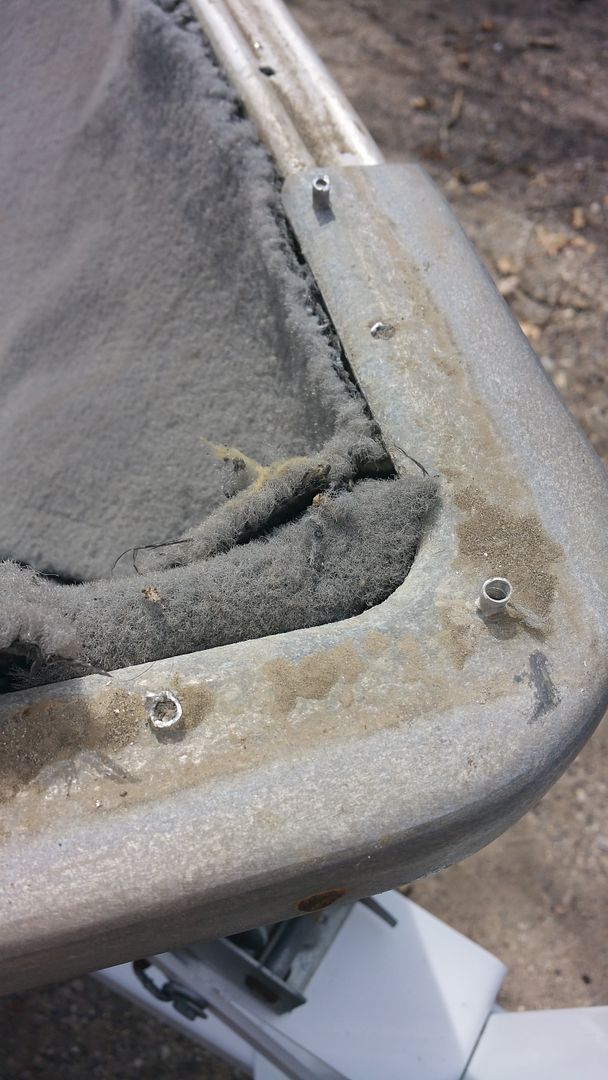
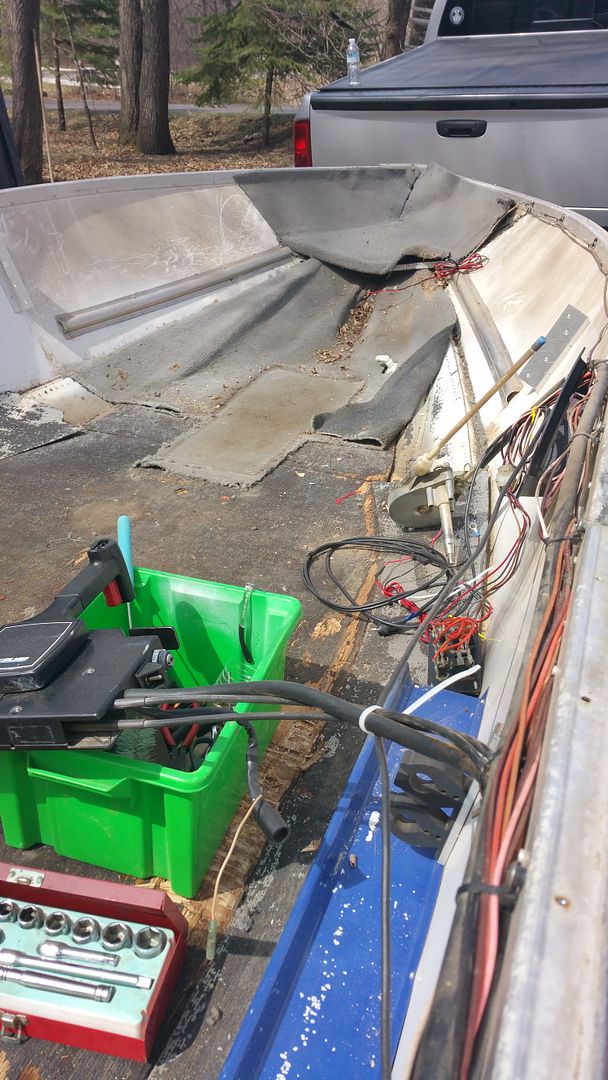
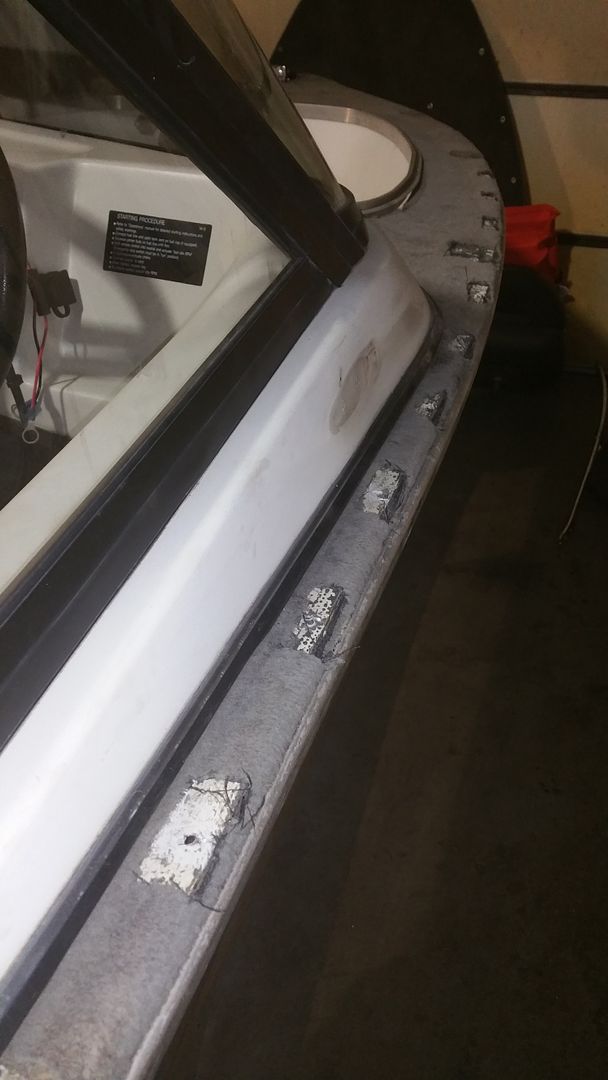
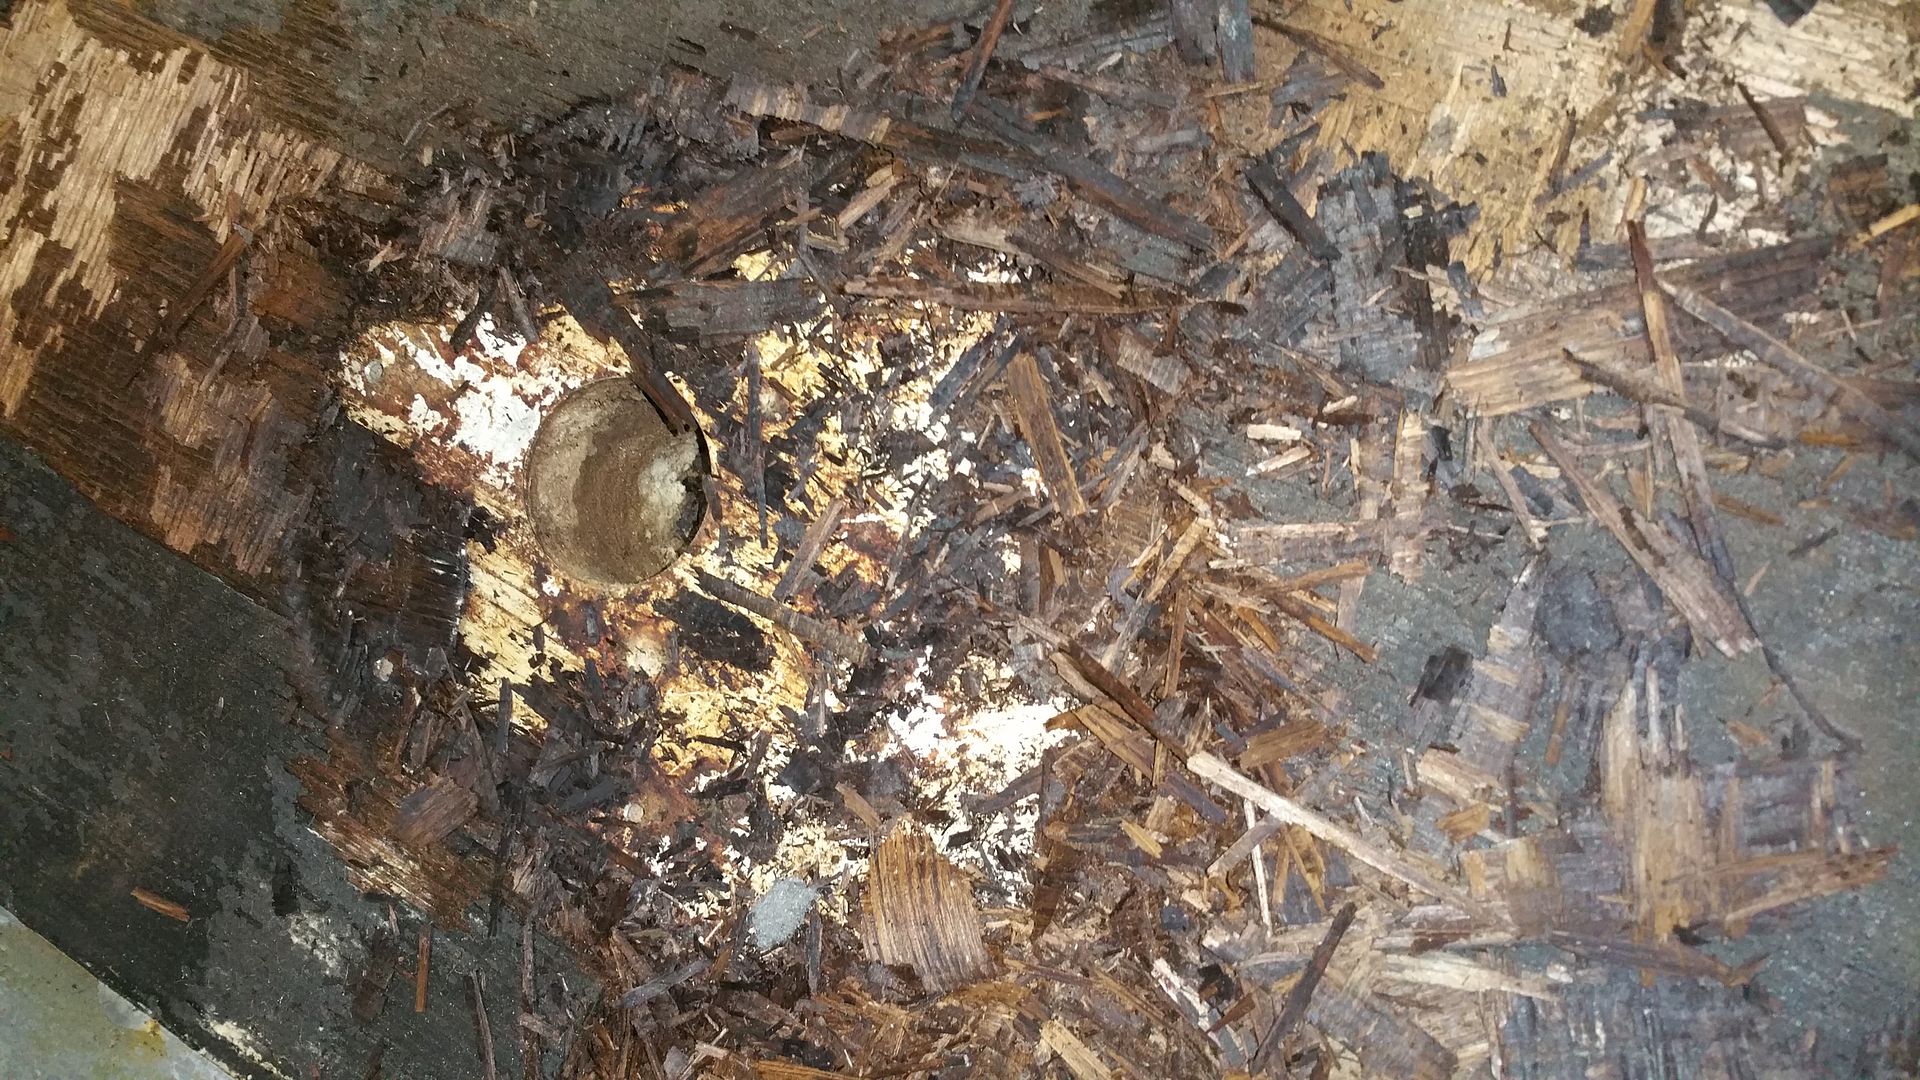
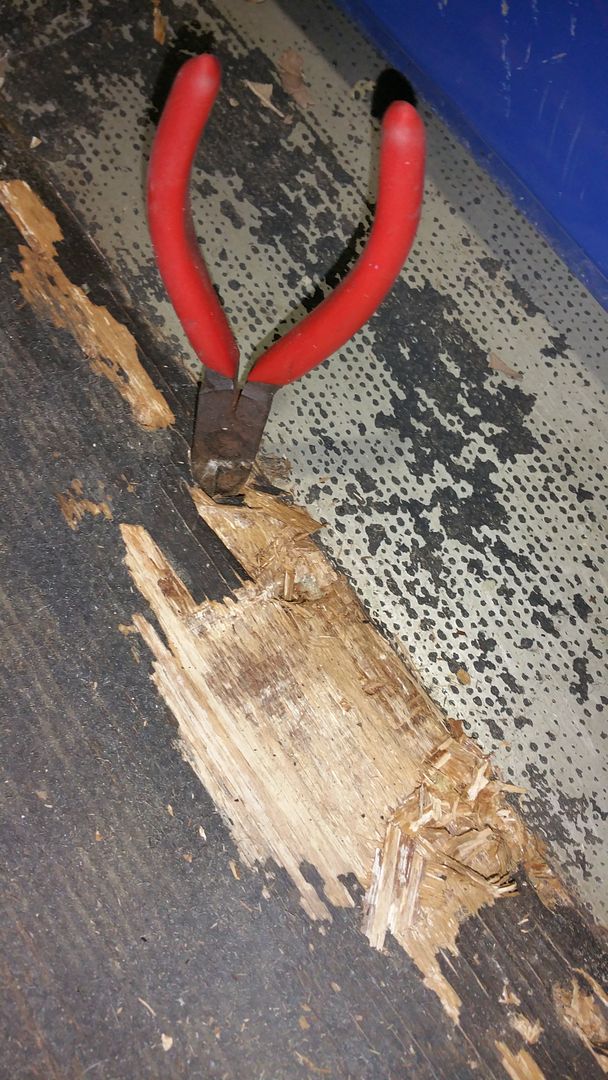
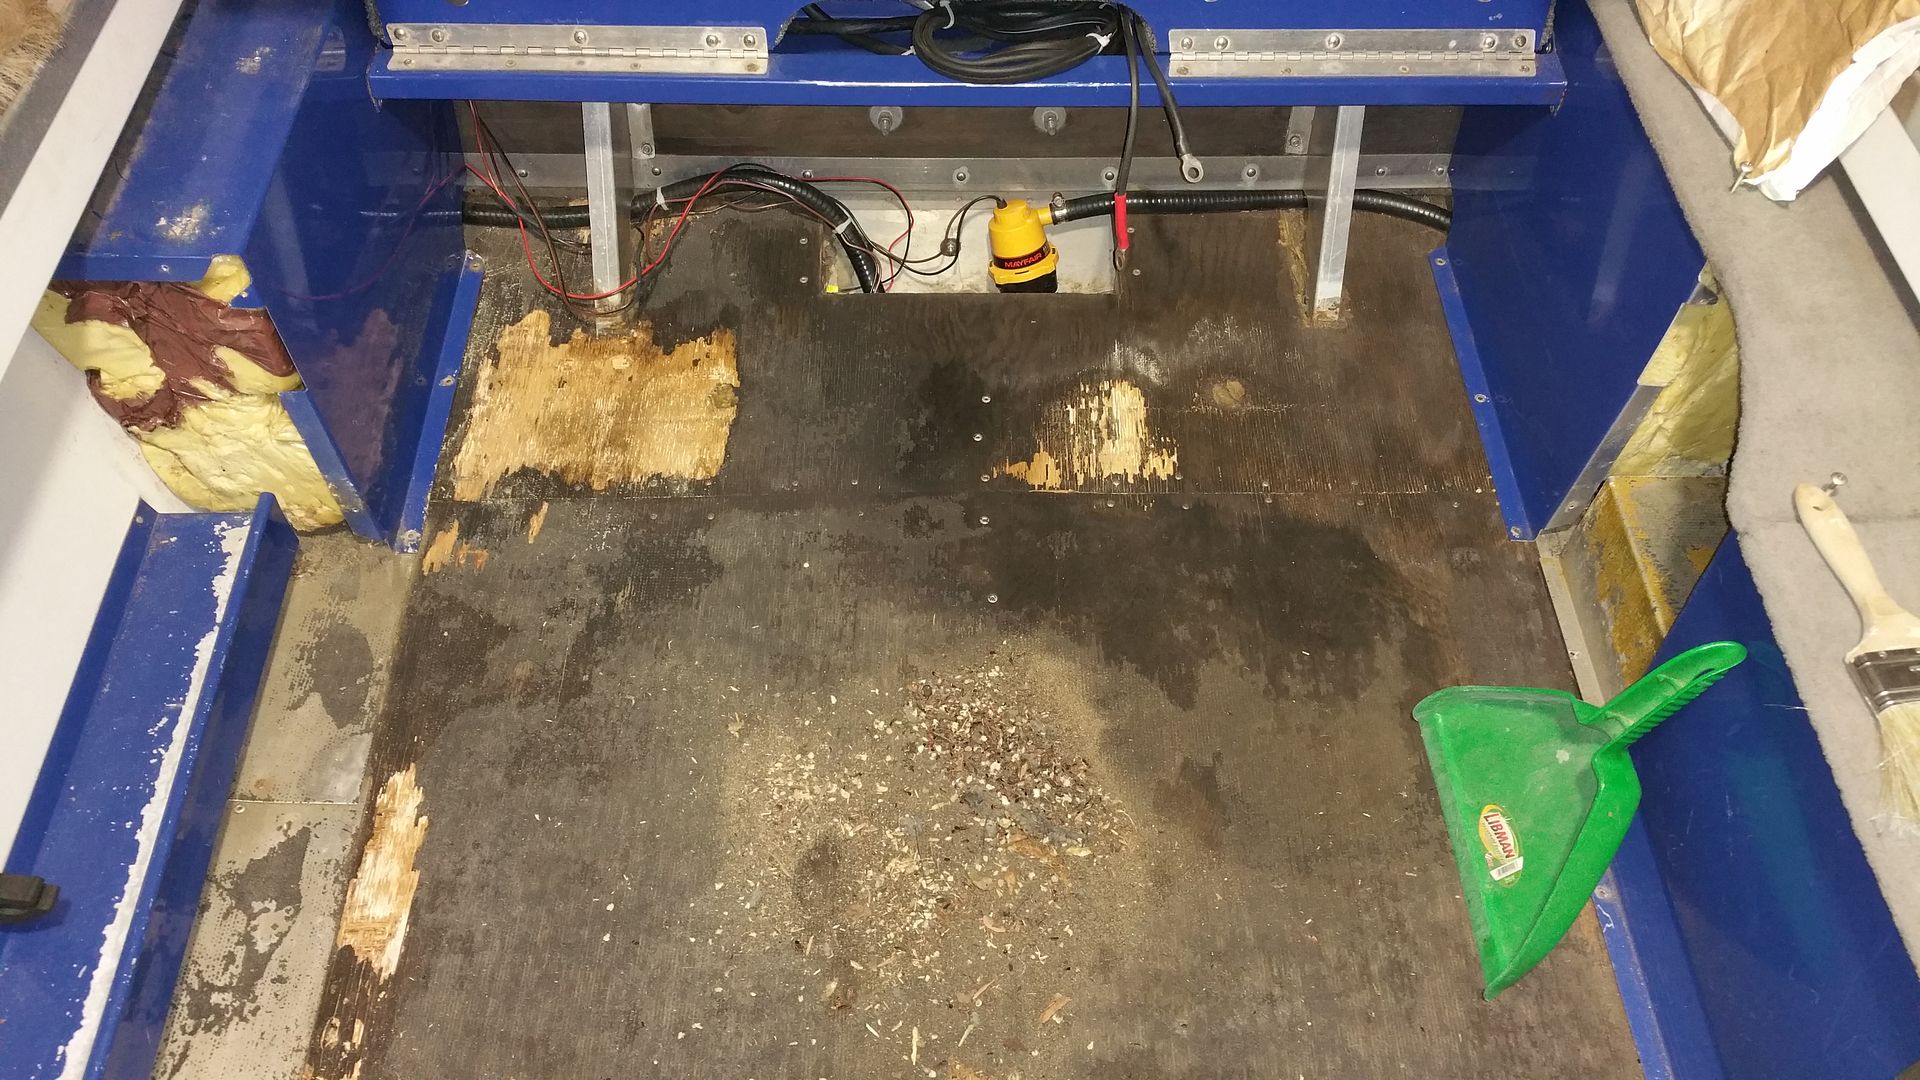
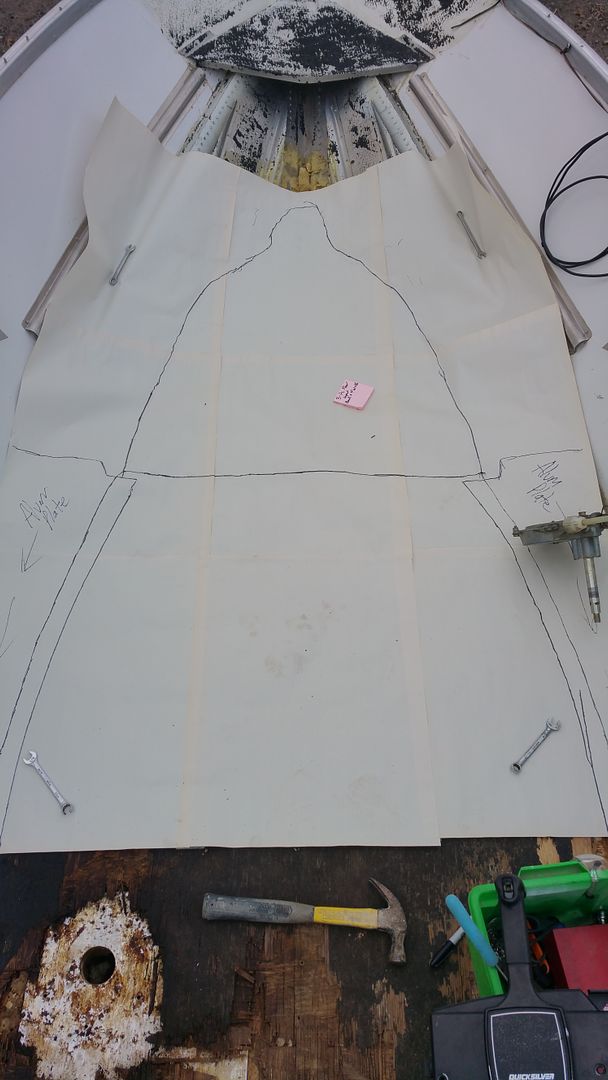
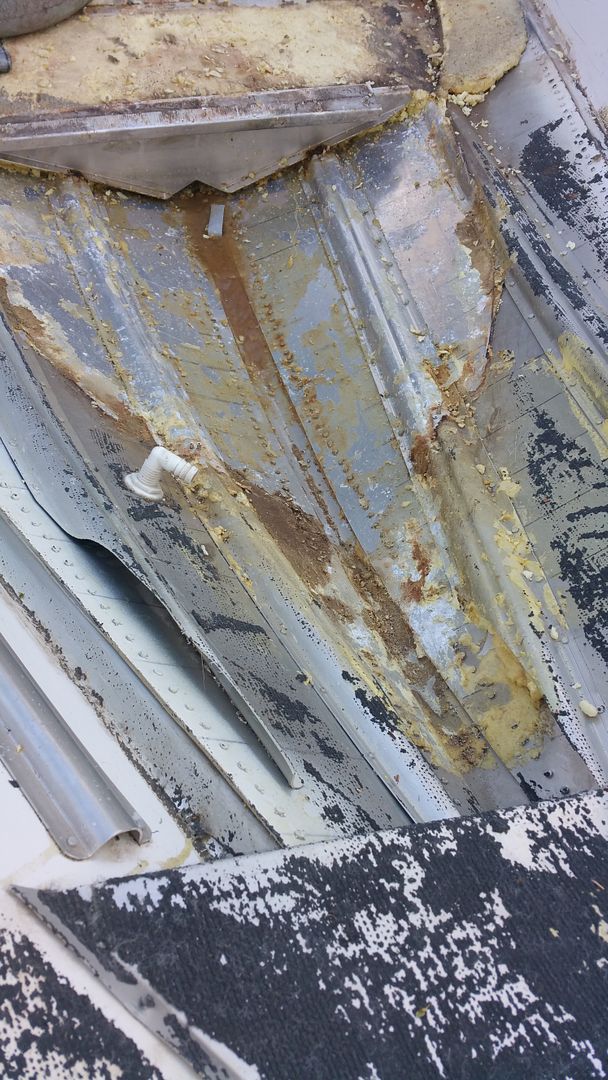
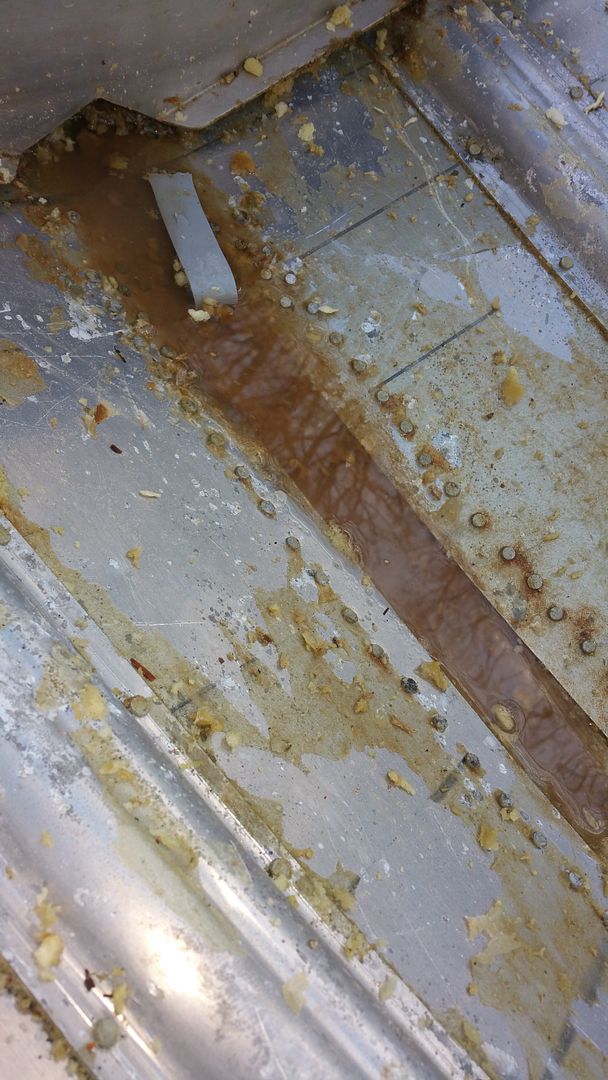
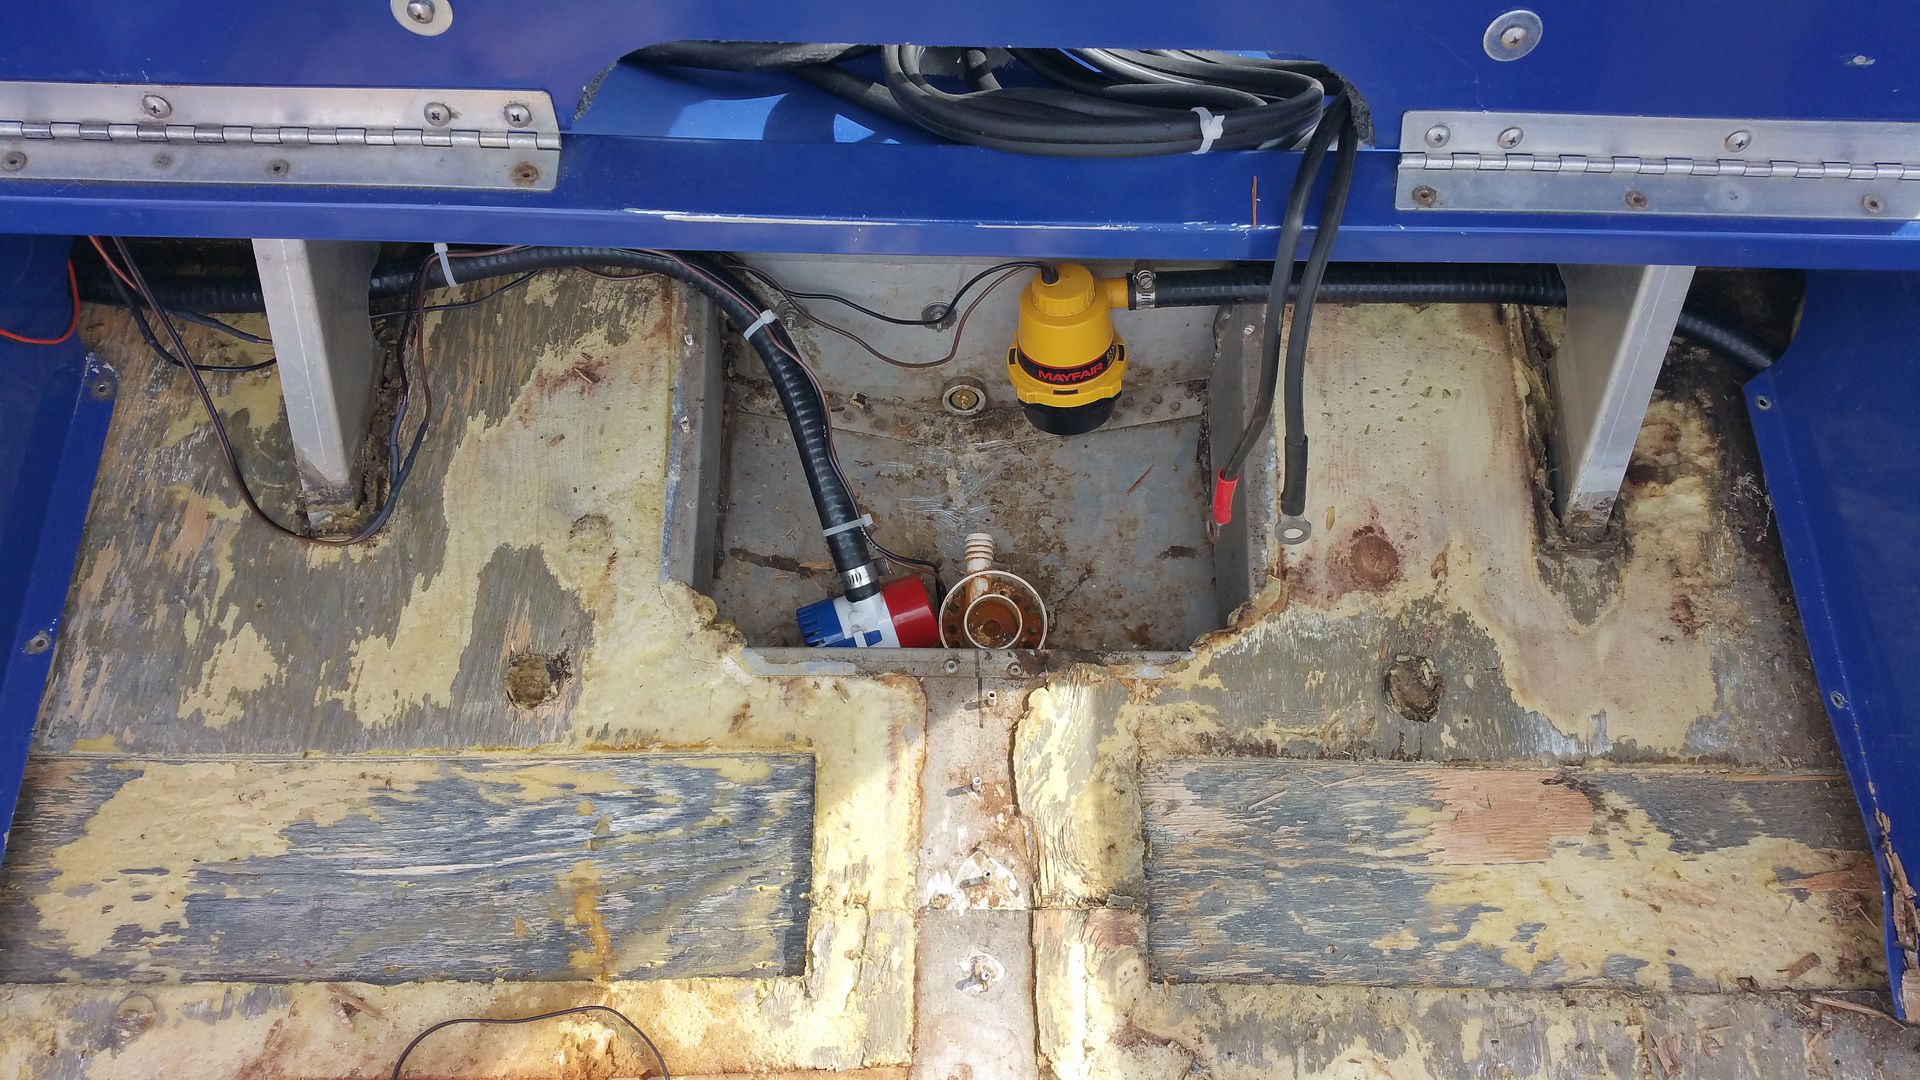
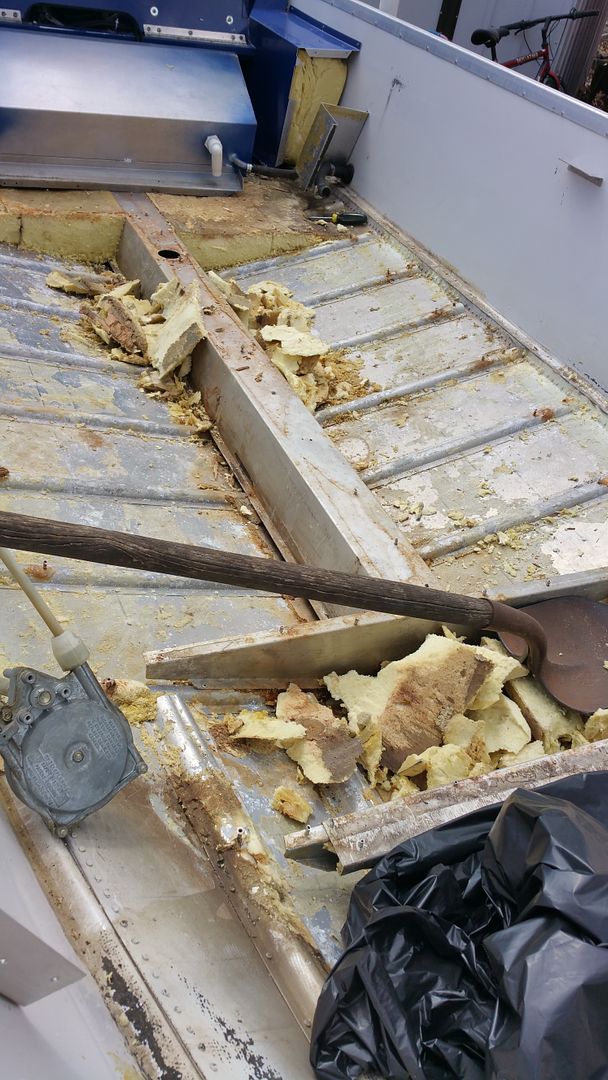
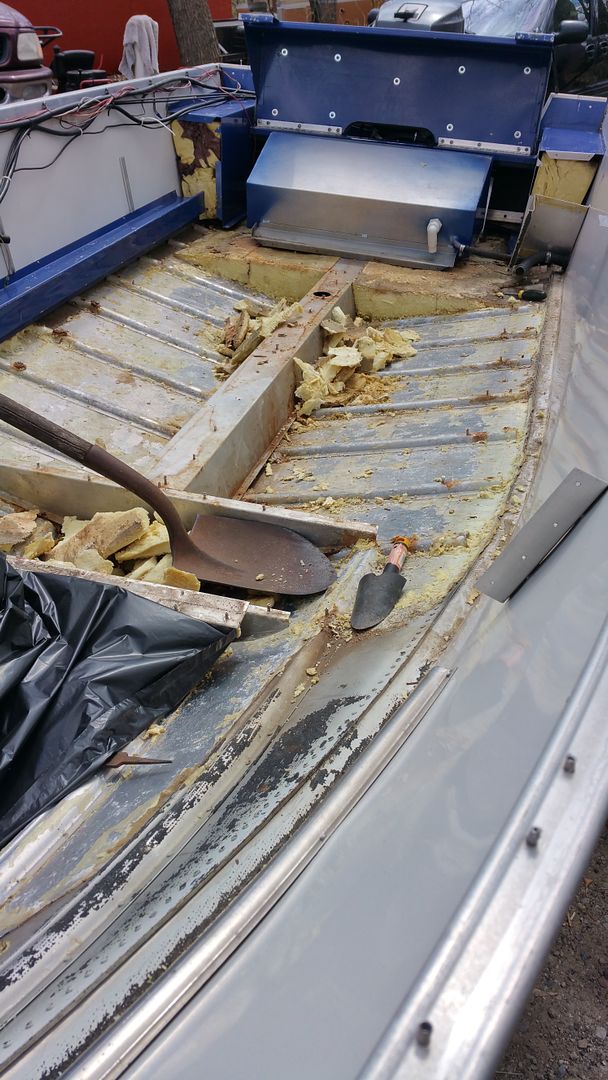
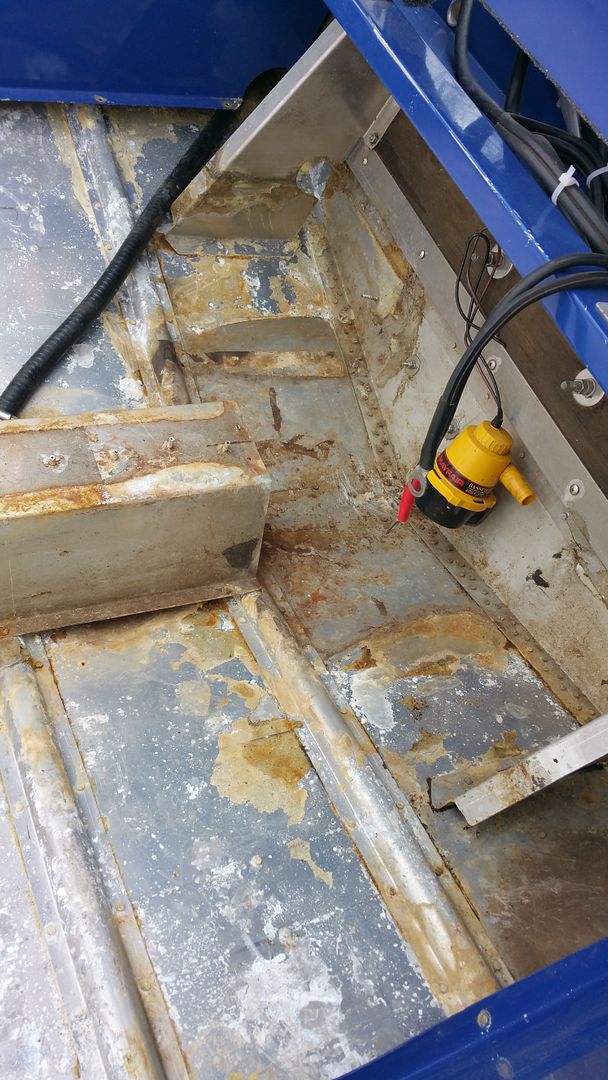
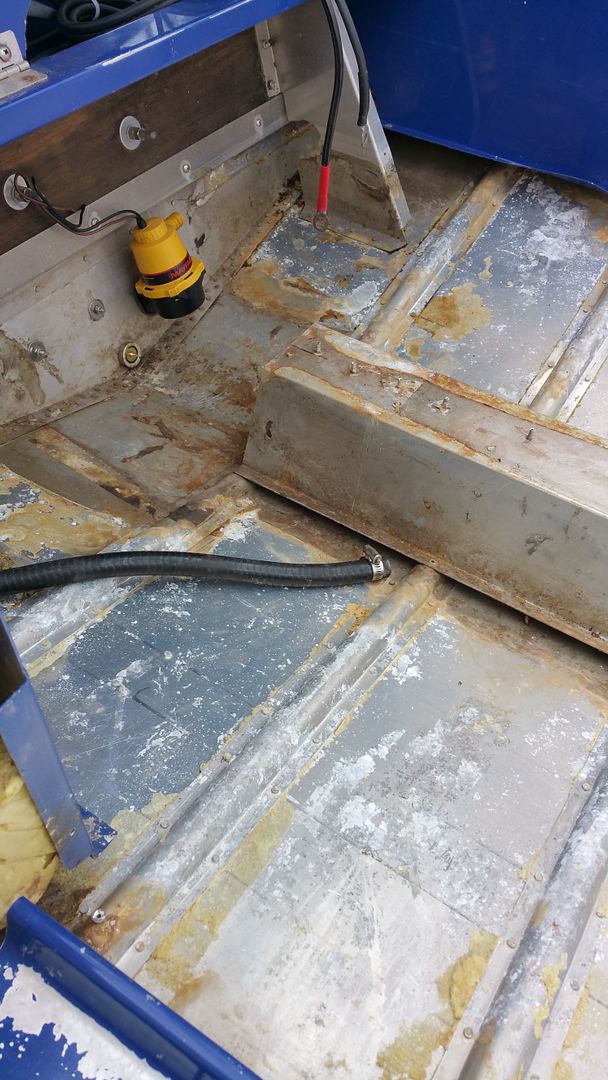
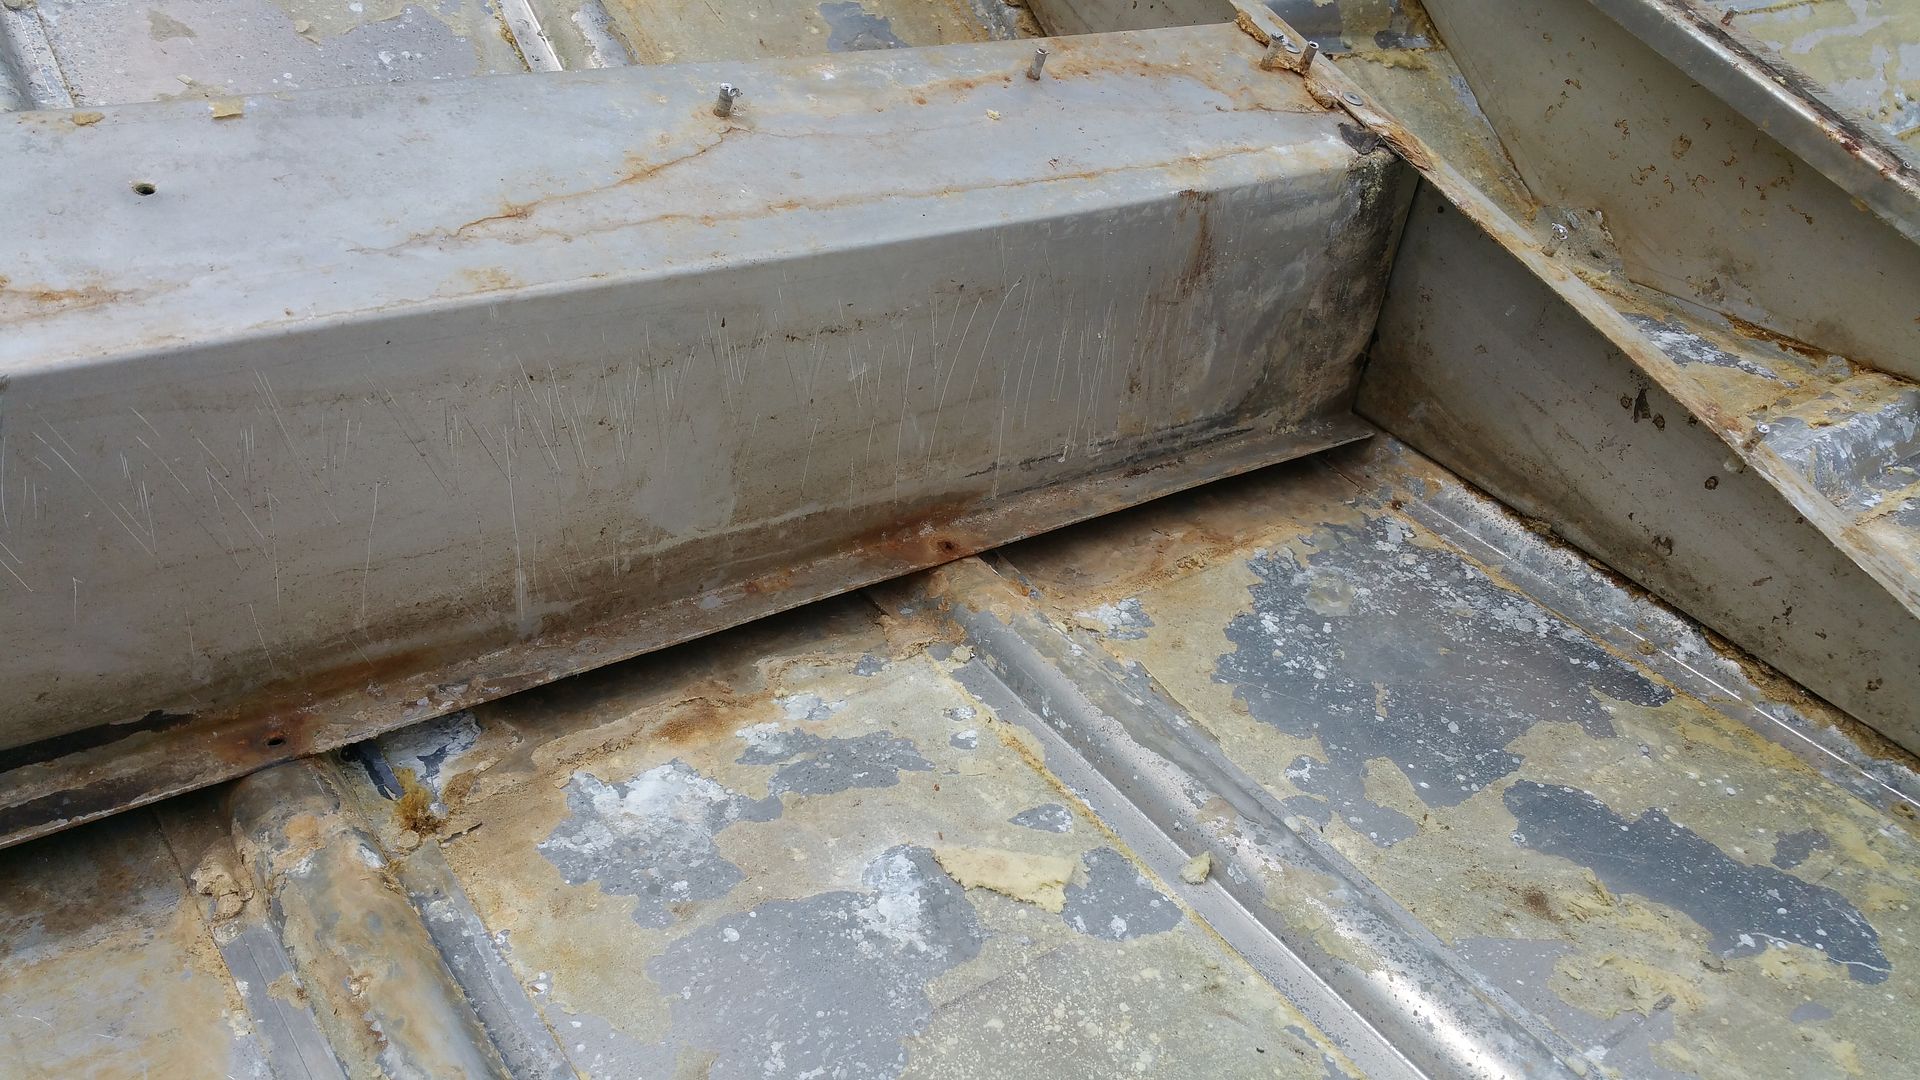
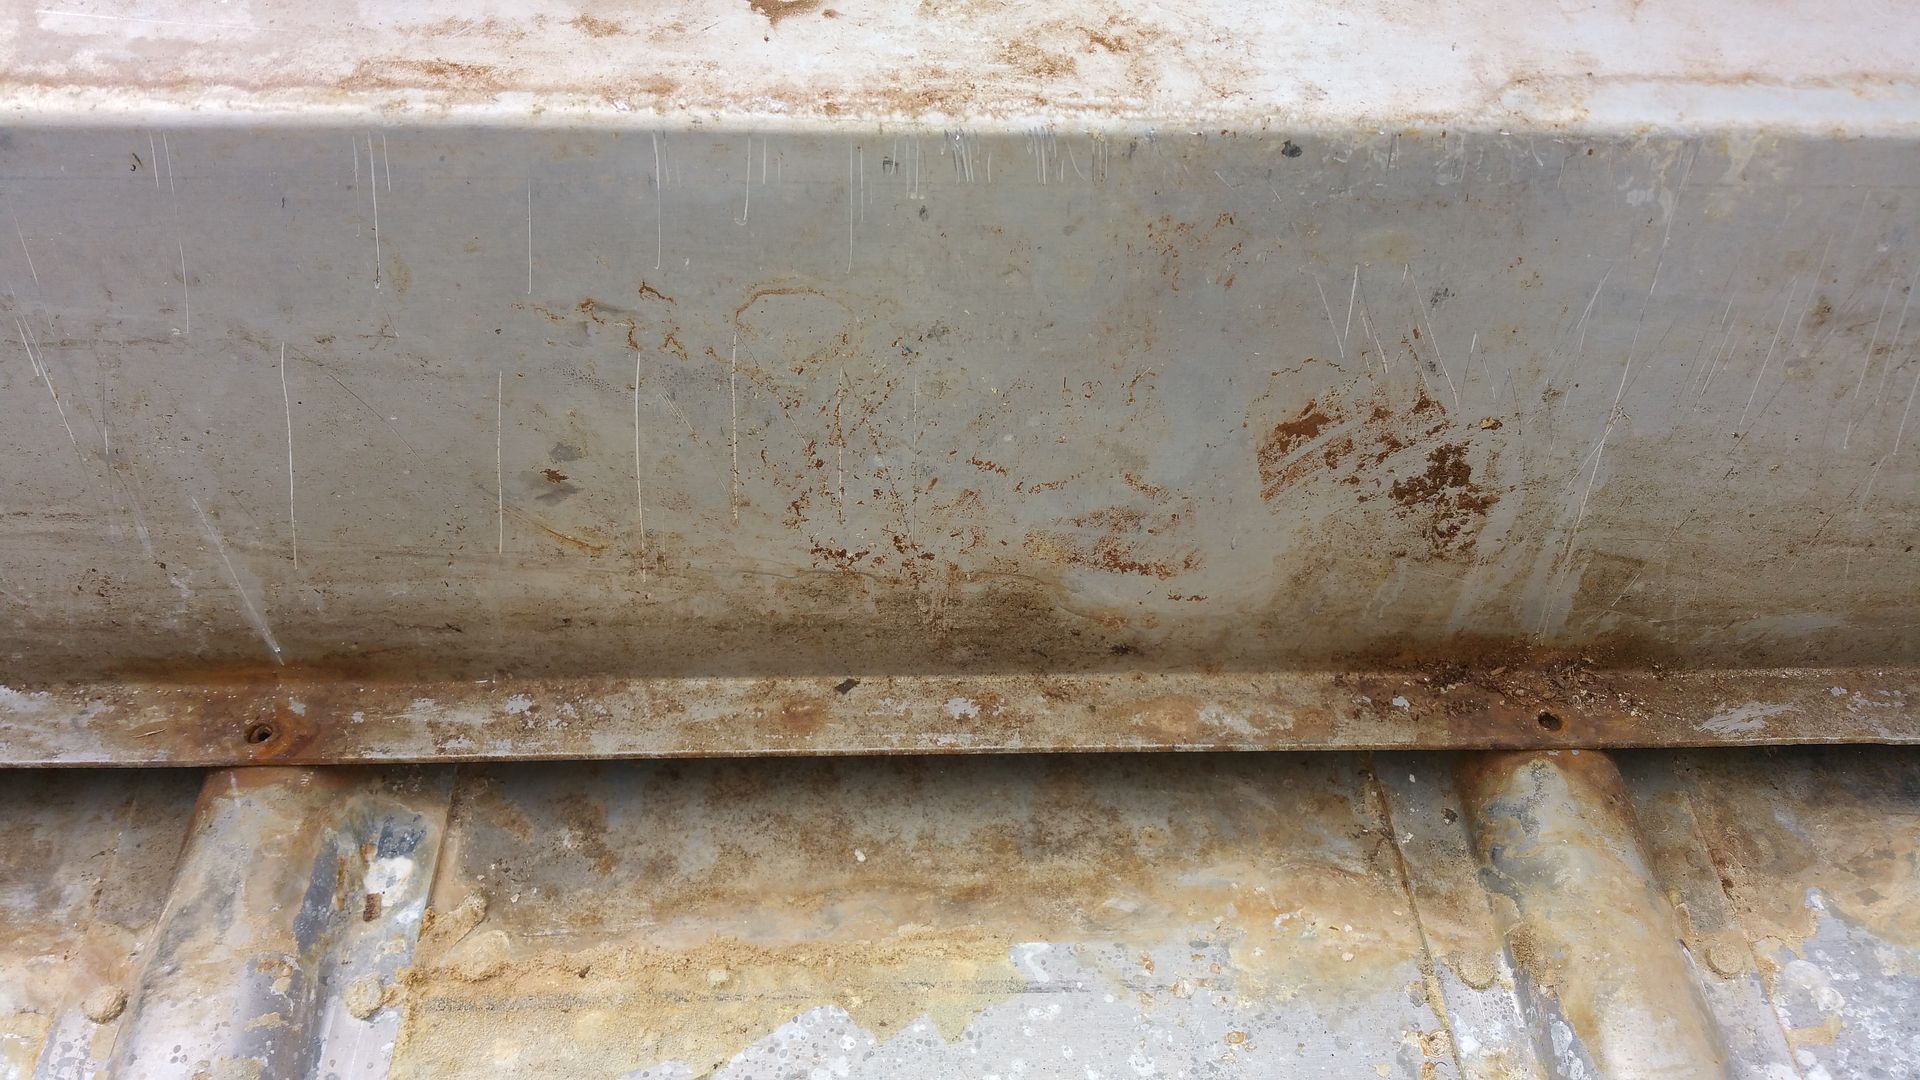
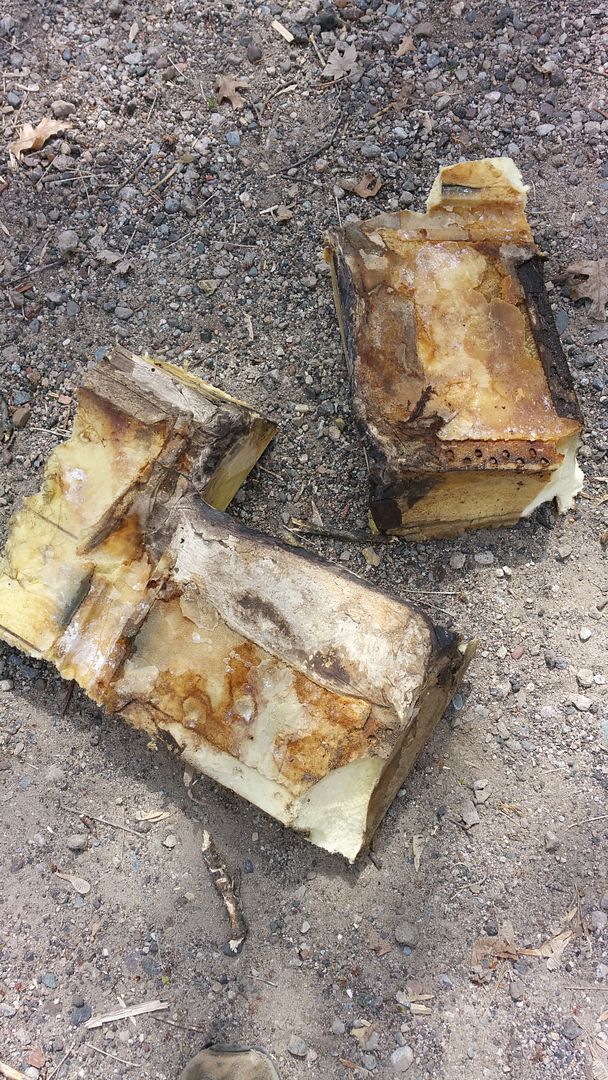
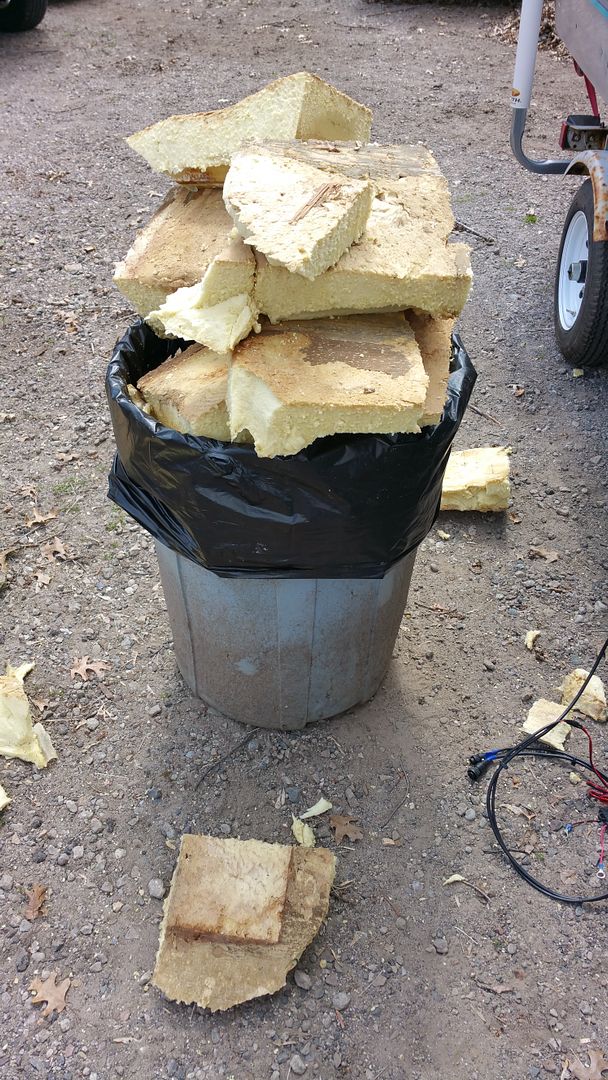
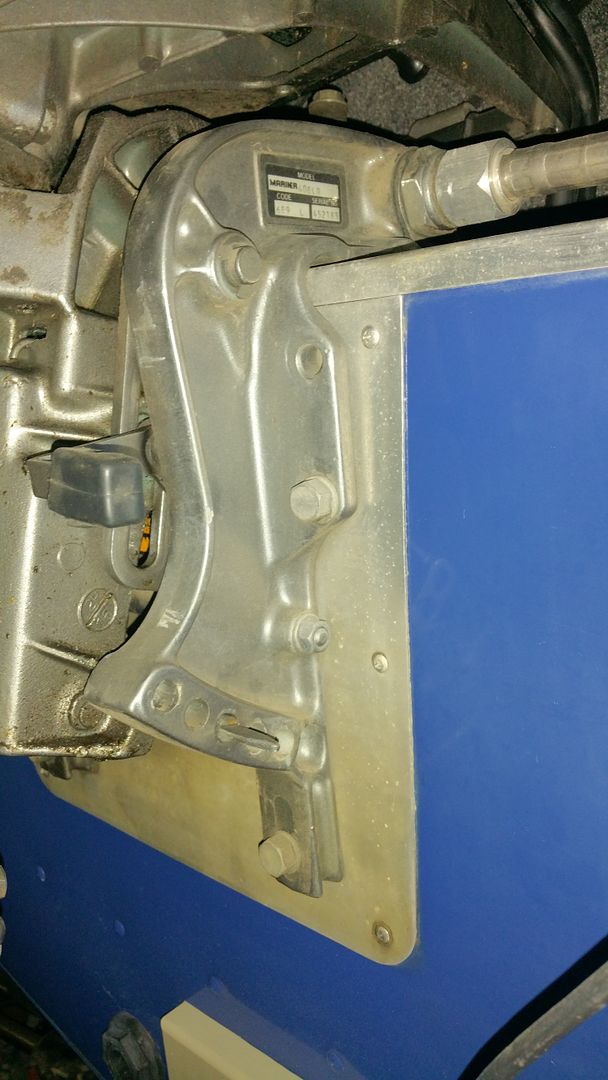
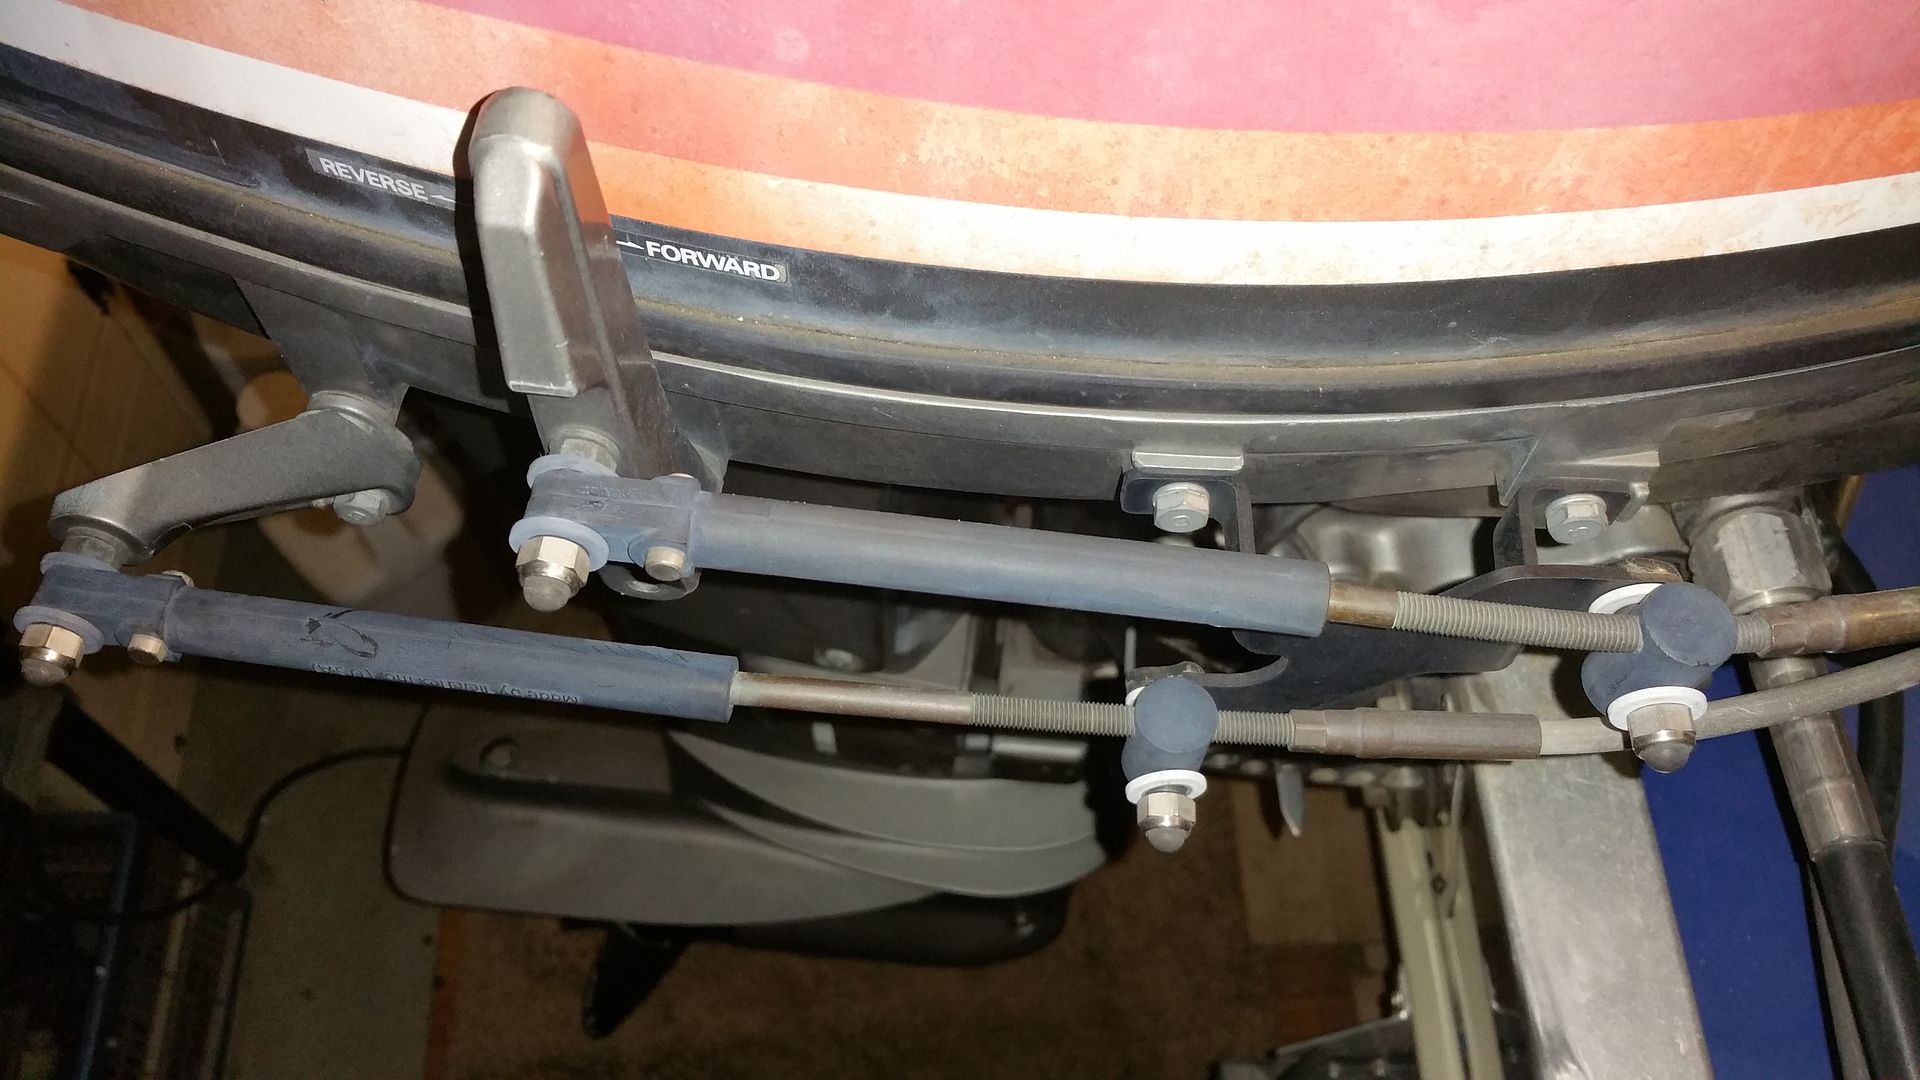
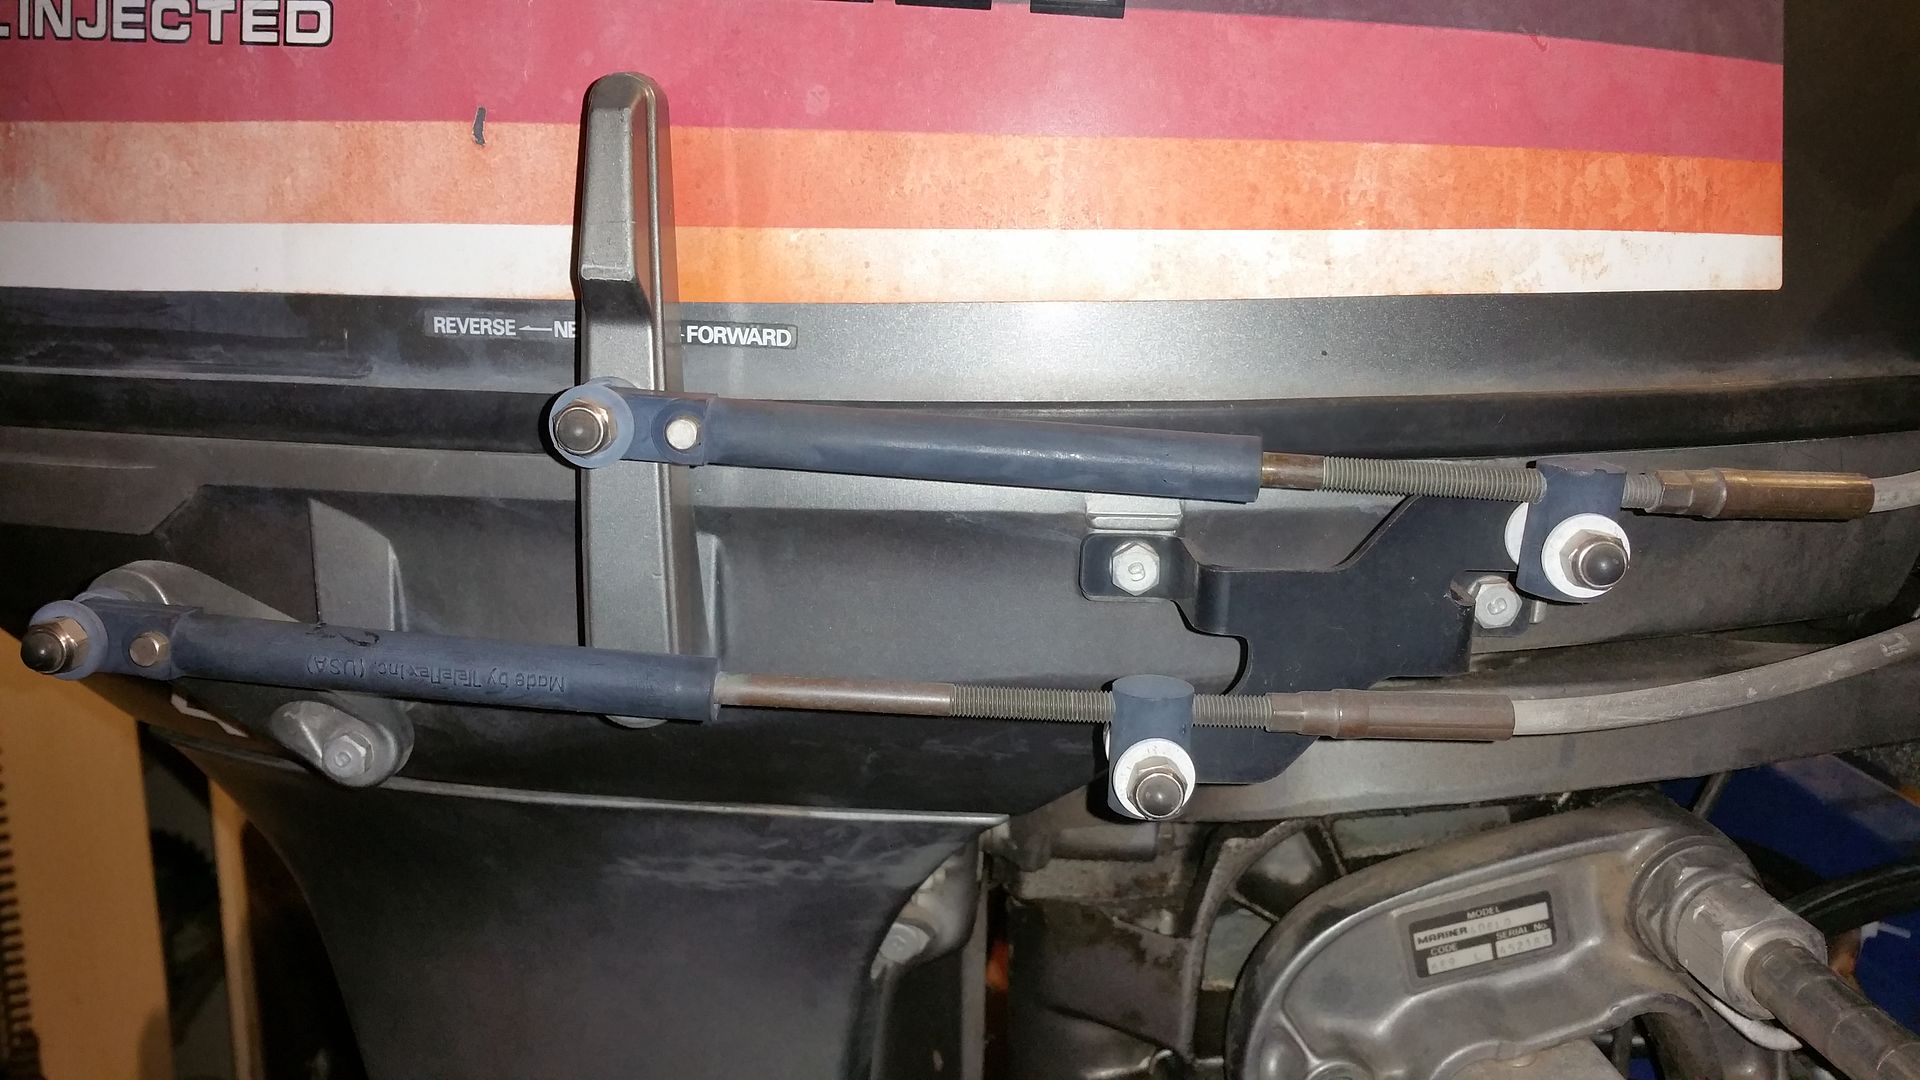
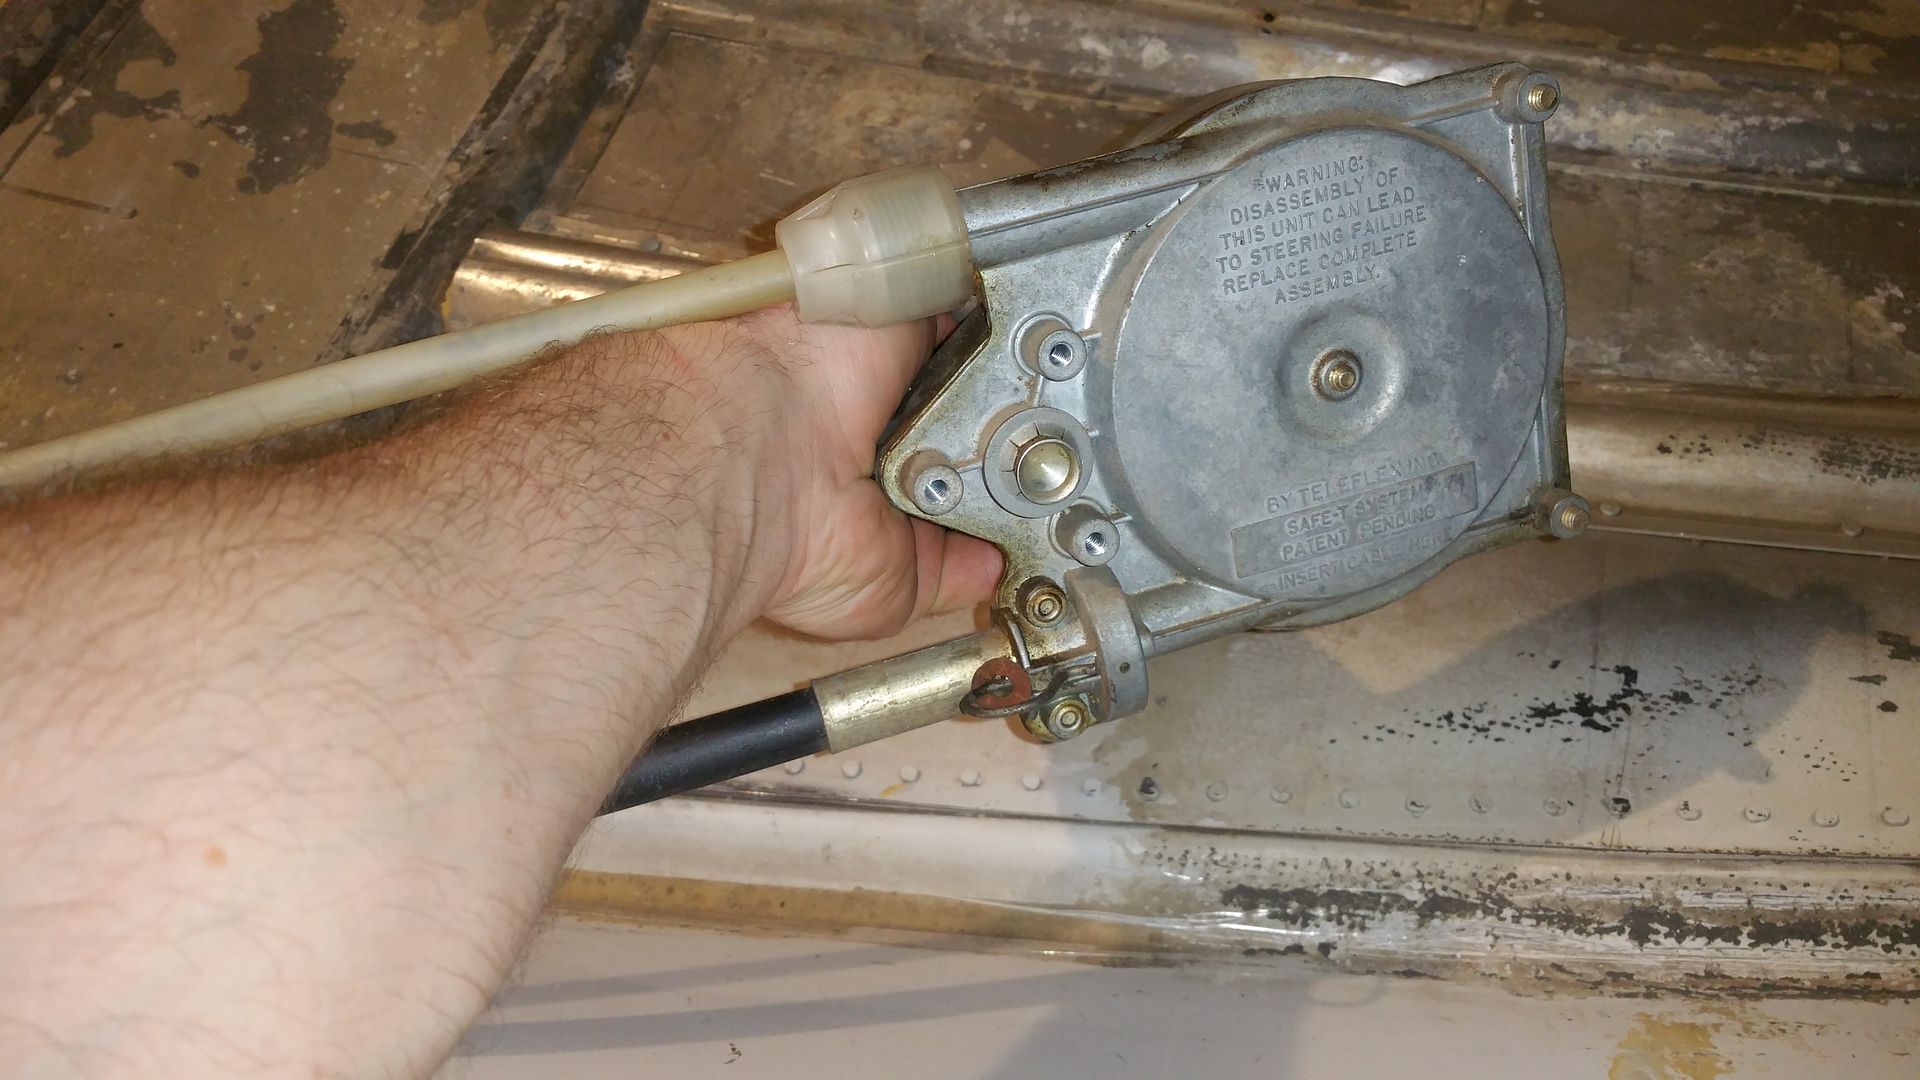
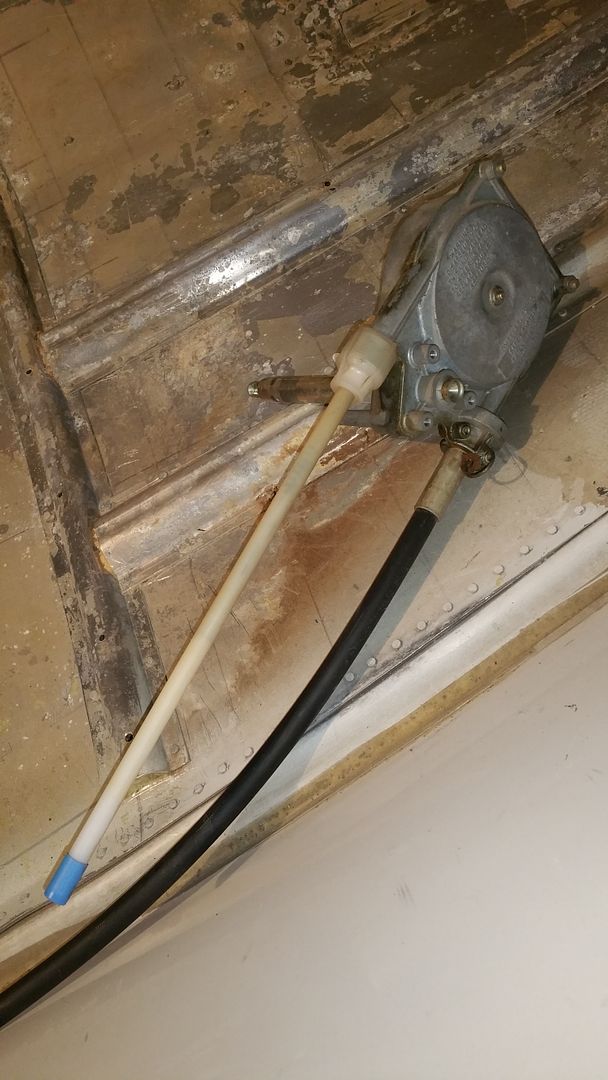
Here is what I have done to the boat already, I have many pictures to help guide anyone who wants to give advice. I will need it. This is a very exciting project for me that I am determined to finish.

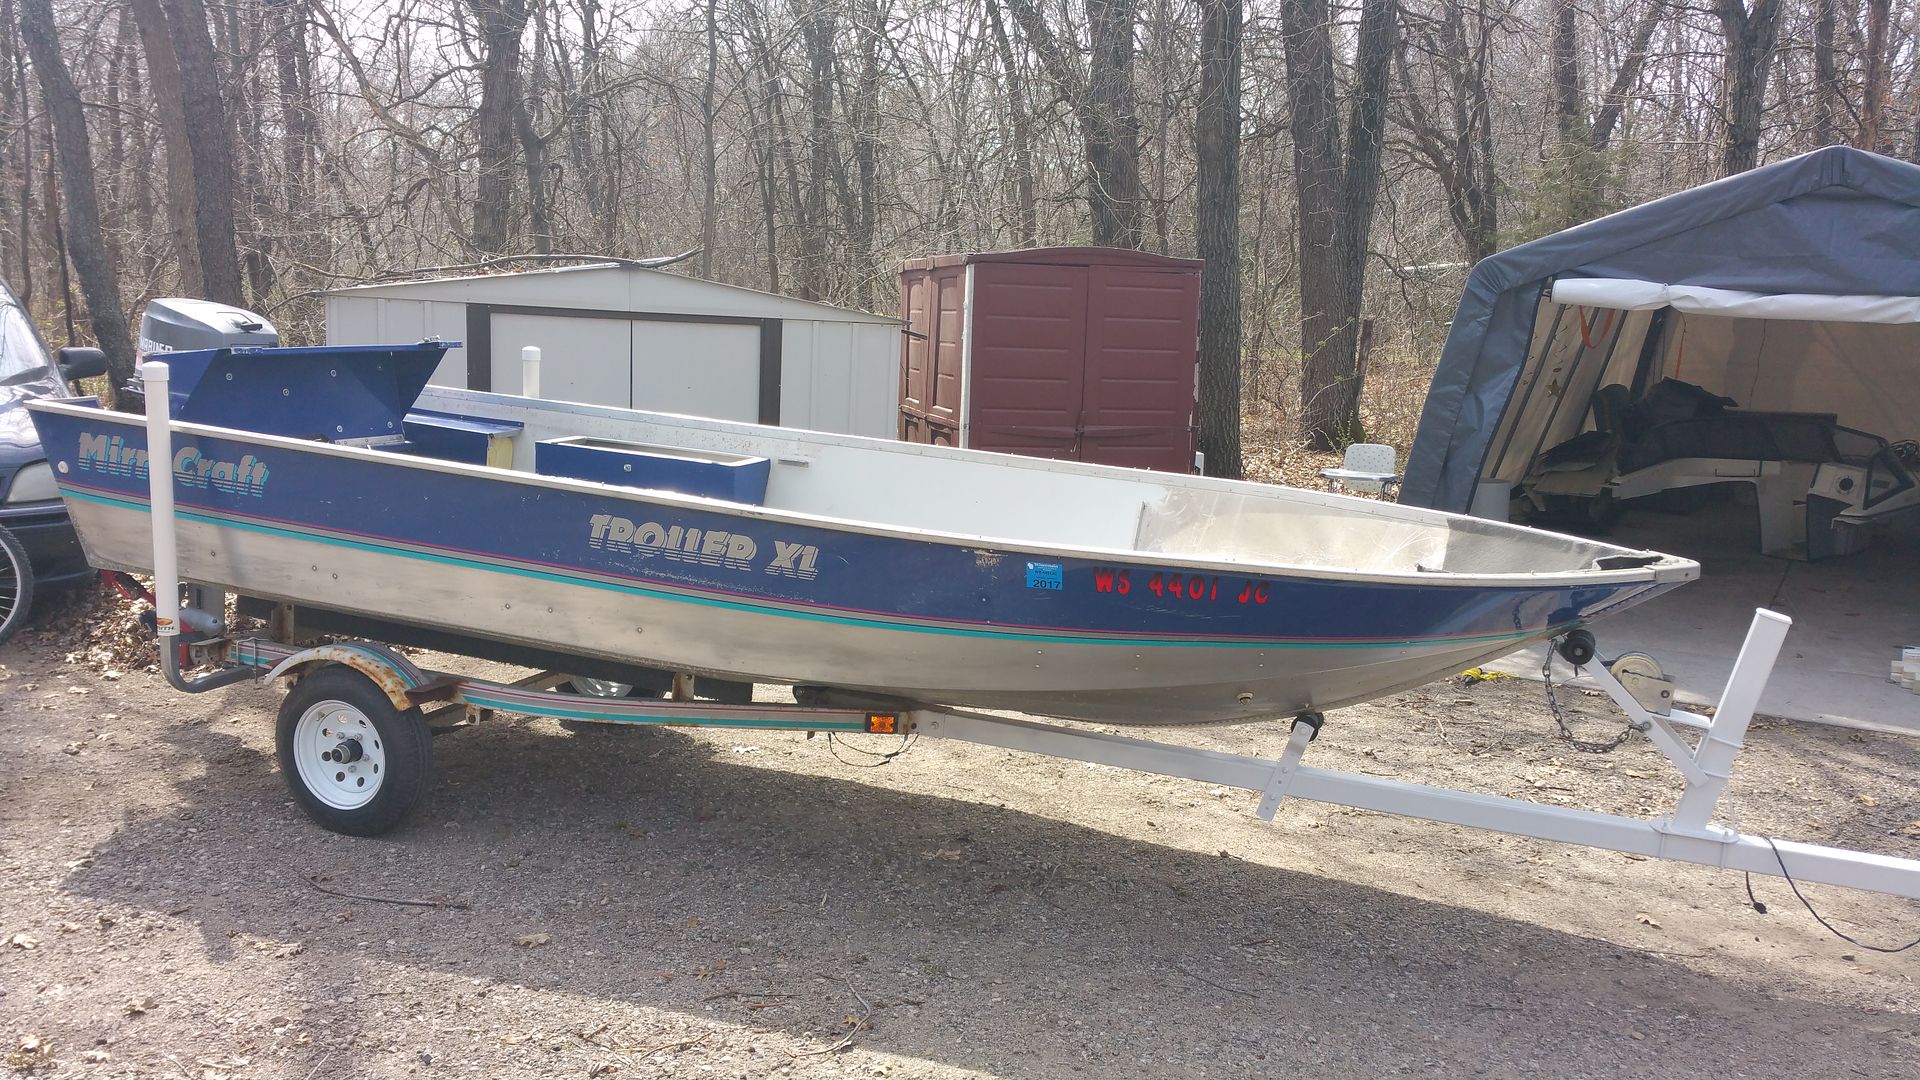
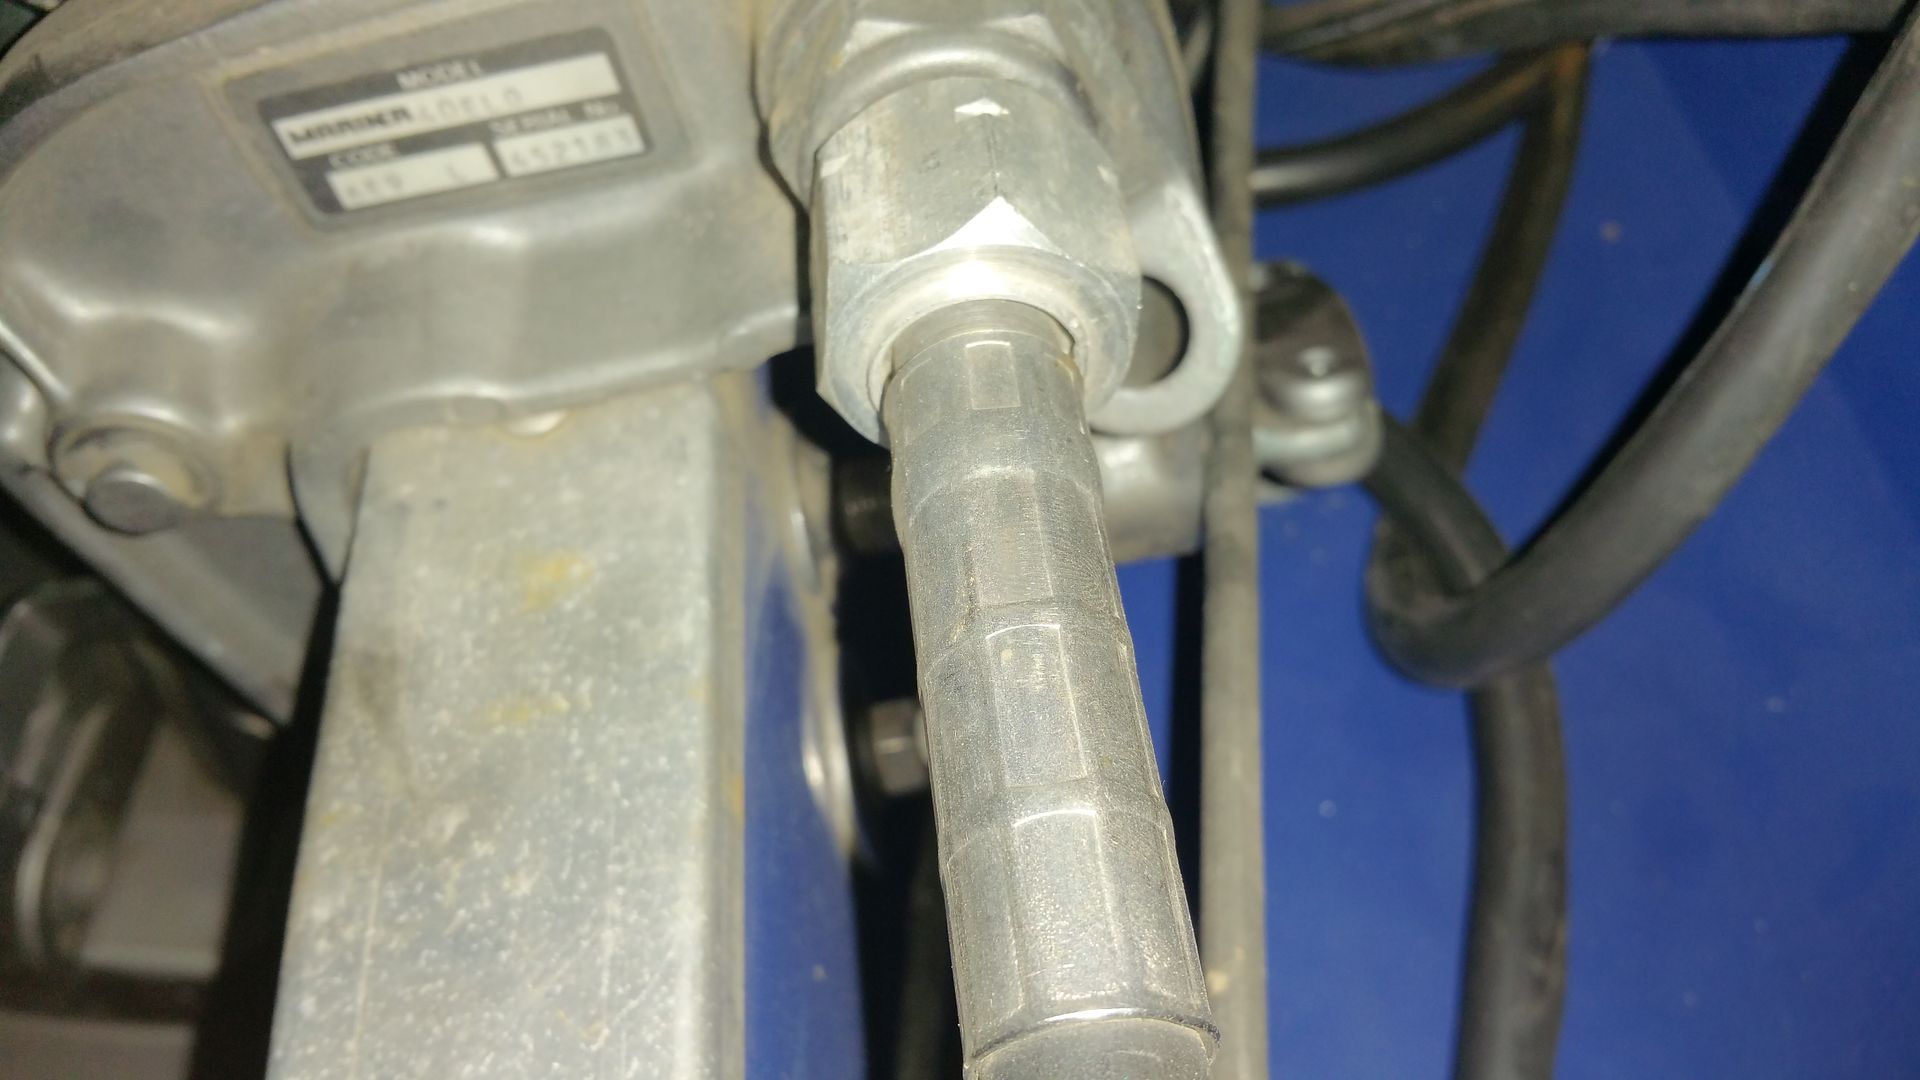
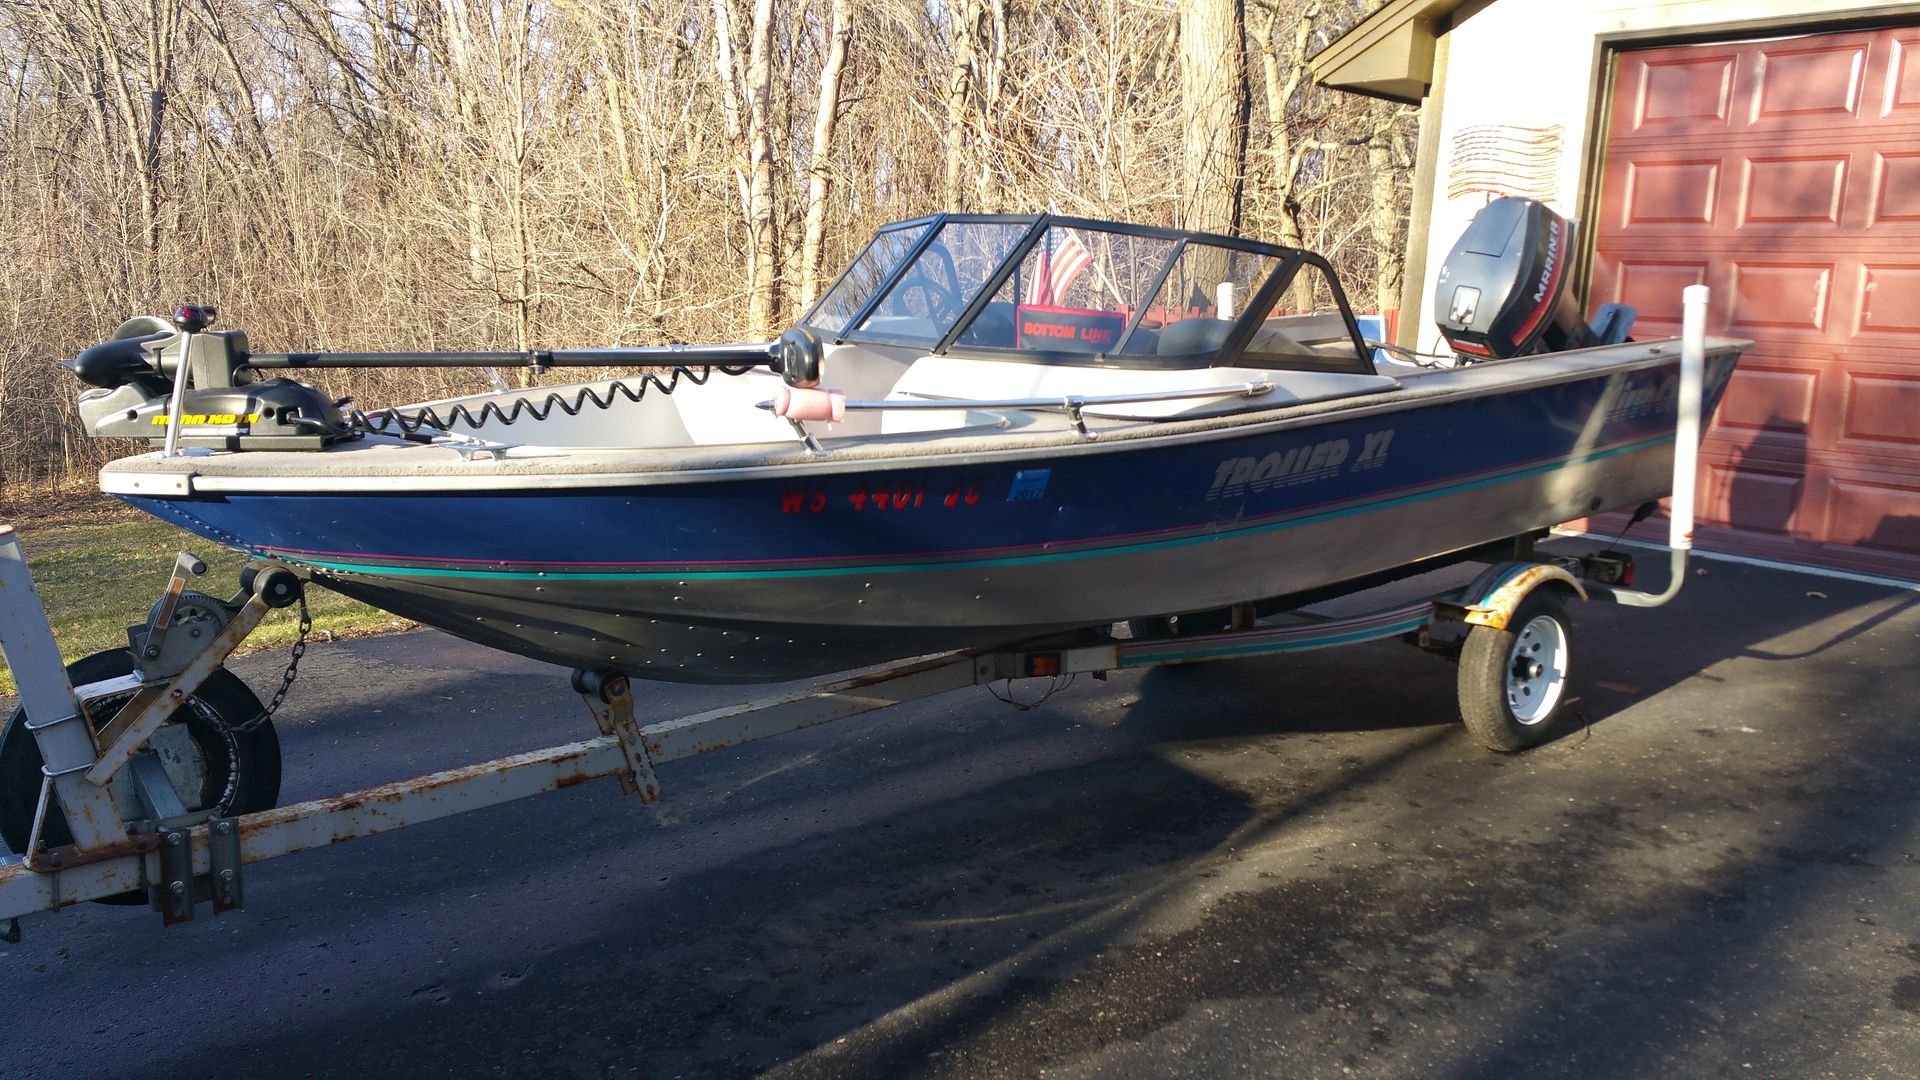
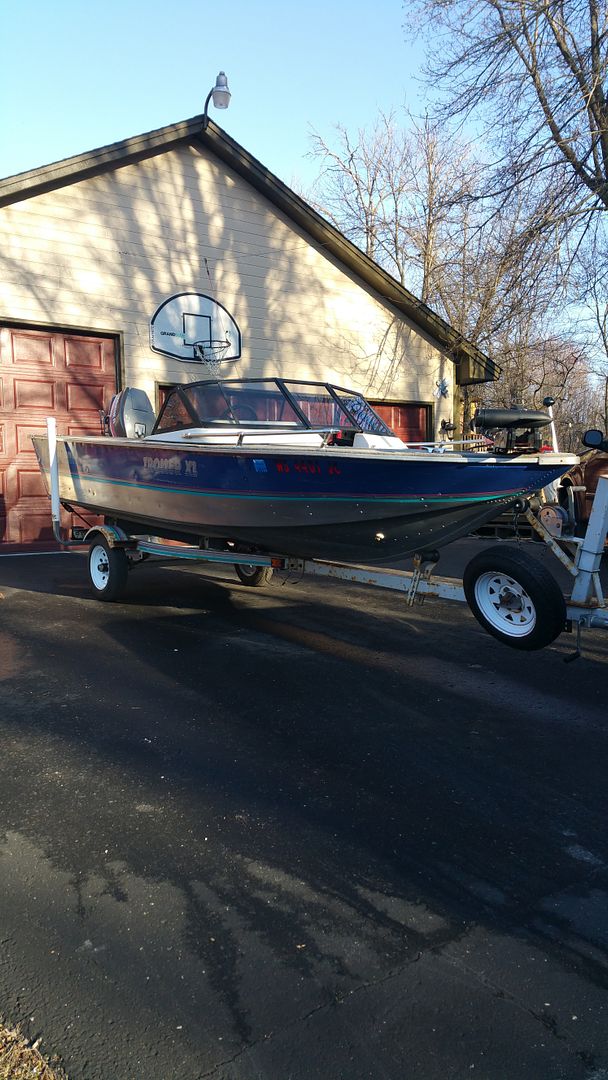
so without further ado, here is the 1991 Mirrocraft Troller XL:

20160403_181416.jpg
20160403_181301.jpg
[/SIZE][/FONT][/COLOR]
 
Last edited by a moderator:

Dignified09@gmail.com

Petty Officer 3rd Class
Joined
Apr 9, 2016
Messages
92
It all started with me not liking the 'soft spots' in the floor. there was only a couple spots that I was curious about. Also sitting in the captains chair was a bit wobbly as well as the passenger side. here are some pics. I unscrewed the chair base plates and this was what I came across:

Captains side:
20160408_202222.jpg


Passenger side:
20160408_202245.jpg


Last edited by a moderator:

Dignified09@gmail.com

Petty Officer 3rd Class
Joined
Apr 9, 2016
Messages
92
Time to rip up the carpet and further investigate it. Now in order to get to all of the carpet, I had a some work to do to reach that point alone. (a Friday,Saturday,and Sundays worth)

1) remove side panels (not quite sure what you call these) But in order to get to the cap, these had to be removed as there was 4-5 rivets connecting the cap to these panels

2) remove the cap of the boat. (which is a solid fiberglass piece.) It was also riveted to the hull. This was a pain in the butt which took me awhile to accomplish but I successfully removed the cap from the hull. I used a titanium drill bit to drill out the head of all the rivets. (I will need to determine the size of those rivets later to put her back together)

3) Dis connect the steering console from the cap.

here are some more pictures:


The cap was pop riveted to the hull and the sidewalls by 5-6 rivets:
20160410_212703.jpg
and attached to the sidewalls (gunwales?) :
20160410_212716.jpg

The carpet is out:
20160415_142157.jpg
20160415_142206.jpg

The Remaining carpet:
20160415_142223.jpg

I had to cut some of the carpet back to get to the rivets around the cap:
20160410_212506.jpg


Cap is off the hull:
20160415_142143.jpg
 
Last edited by a moderator:

Dignified09@gmail.com

Petty Officer 3rd Class
Joined
Apr 9, 2016
Messages
92
Ripped up the carpet, and heres what the wood looks like. Yeah..... I think its time for a new floor!! It was moist to the touch in some spots, and along the starboard side, I could easily push a needlenose pliers thru it.

heres some more pictures:


Not good wouldnt ya think??
20160408_232624.jpg

Needlenose right thru the starboard side:

20160408_232611.jpg


20160408_230752.jpg


20160408_232429.jpg


Last edited by a moderator:

Dignified09@gmail.com

Petty Officer 3rd Class
Joined
Apr 9, 2016
Messages
92
Before I ripped up the floor, I traced a template of the pieces with some paper that I taped together: :thumb:

20160415_175804.jpg


After removing all carpet/wood completely, I observed moisture from the front portion of flotation foam on the surface, I could push it with my fingers and water would ooze from the top (only from the front portion though).... I knew it had to be waterlogged, also... what looks to be some corrosion judging by the water and rivets.

heres some pics from this fun day job. I got a good tan removing the foam though. I used a small sheetrock hand saw to cut the foam into square chunks and a spade shovel (being careful) to pop up the sections and remove. (not as hard as I imagined it would be. But the chunks were deff full of water. (about half of the foam was holding water pretty well)

More pictures:

20160416_174610.jpg


Water after first section of moist foam removed:

20160416_174621.jpg


20160416_163420.jpg


20160417_131438.jpg


20160417_150504.jpg

All Cleared out: (will also be removing remaining foam seen in this picture)
20160417_150445.jpg


20160417_131451.jpg


20160417_150523.jpg


20160417_150539.jpg

Most of the pop rivets were rusted out, not even attached. Others were easily bendable and broke right off.
20160417_150600.jpg


20160417_150551.jpg


Nasty chunks of waterlogged foam:
20160417_143420.jpg


20160417_131215.jpg


3 garbage bags later and probably 300-400lbs of foam/water:
20160417_143720.jpg
 
Last edited by a moderator:

Dignified09@gmail.com

Petty Officer 3rd Class
Joined
Apr 9, 2016
Messages
92
That is all the work I have completed so far, I also have a video of my water leak test that I would like to post for you all, As I will need help on which methods I would want to use on how to fix the leaks. I have read about JB Weld, Gluvit, HTS-2000, but I really need suggestions here. As this is the point where I am puzzled on how to fix.

Thanks again for any input, and here is the video to my leak test :

 
Last edited by a moderator:

Dignified09@gmail.com

Petty Officer 3rd Class
Joined
Apr 9, 2016
Messages
92
P.S. I do understand that the hull is pitting, but no where besides the pointed out areas was any water leakage.
 

Dignified09@gmail.com

Petty Officer 3rd Class
Joined
Apr 9, 2016
Messages
92
could it be the transducer mounted to the back of the hull that caused the pitting? I really need some help in determining how to fix. Ive had my post up all weekend with almost 100 views and no comments at all. This is a project that will be finished completely with every intent to use the best possible materials that I can afford to fix the problems. I just need some experienced input and help PLEASE.
 

classiccat

"Captain" + Starmada Splash Of The Year 2020
Joined
Dec 20, 2010
Messages
3,405
could it be the transducer mounted to the back of the hull that caused the pitting? I really need some help in determining how to fix. Ive had my post up all weekend with almost 100 views and no comments at all. This is a project that will be finished completely with every intent to use the best possible materials that I can afford to fix the problems. I just need some experienced input and help PLEASE.

That looks like a single rivet seam in the video...leaking like a sieve.

I'm a fan of sealing from the outside if possible. I'd flip the boat, remove any paint/debris at the seam and fill it with G-Flex per the instructions. Then when you get it flipped-back-over, hit the inside of the seam with Gluv-it. Both are epoxy based and require UV protection therefore painting the GFlex on the exterior is needed.

The pin-hole leak in the video can be treated in variety of ways. Do you have access to the other side of the hole (i.e. is it in the open -or- under a rib?). If you have access to both sides, I'd try to seal it with a solid rivet although it looks like it's pretty close to the keel (or lift-strake?)

Is there addition pitting beyond what you showed us in the video? if so, which image(s) show the pitting?

side-note: putting the images in as attachments is probably why you won't get many (if any) replies. you have to click 1-by-1. Many of us use a photo-sharing app. At a minimum, insert them into the post. you can also insert the image address between "IMG" tags:
fetch
 

Dignified09@gmail.com

Petty Officer 3rd Class
Joined
Apr 9, 2016
Messages
92
Classiccat, thank you for the reply. I have tried to figure out the picture situation, and that was the only way I could get them to post into a post. I uploaded all of my current photos onto photobucket.com. it will not let me upload them from 'upload attachements' button as it gives me a message of 'invalid file data' every time.
When I use the 'upload from URL' button, that is how I get them to post. but its a pain in the butt because i can only do ONE image at a time....

I tried copying the IMG codes (for forum boards) on photobucket, It didnt let me post. I guess I will try again and go through my current posts trying to replace with the IMG codes again.

As far as flipping the boat and starting that process goes, I would like to know the following:

1) how difficult is it to remove/re install the engine to the transom?
2) will it effect the steering controls/throttle wiring if I separate it from the transom? (currently all wiring for steering and throttle is still attached to boat)
3) does the motor need to be on a stand while it is separated from the boat or can it be leaned up against something vertical / and / or layed down flat?

As far as the pinhole goes, I do have access to the other side. and it looks to be approx 3-4 inches from the first rib closest to the transom.

I will take some clearer pictures of the areas I found and post them when I can. I am currently trying to get the hull cleaned out a bit more (the excess foam left over, then I want to pressure wash the inside cleaner, so I can see clearer.

-Zach
 

Dignified09@gmail.com

Petty Officer 3rd Class
Joined
Apr 9, 2016
Messages
92
Looks like I cannot edit my previous posts anymore, I do not see an option for that. I was going to try and get the pictures to show up for everybody, is there a Moderator who could help me out with this, or no? I surely would like some more input on this project and I understand that people like to see pictures.

are my pictures not viewable for people?
 

Dignified09@gmail.com

Petty Officer 3rd Class
Joined
Apr 9, 2016
Messages
92
That looks like a single rivet seam in the video...leaking like a sieve.

I'm a fan of sealing from the outside if possible. I'd flip the boat, remove any paint/debris at the seam and fill it with G-Flex per the instructions. Then when you get it flipped-back-over, hit the inside of the seam with Gluv-it. Both are epoxy based and require UV protection therefore painting the GFlex on the exterior is needed.

The pin-hole leak in the video can be treated in variety of ways. Do you have access to the other side of the hole (i.e. is it in the open -or- under a rib?). If you have access to both sides, I'd try to seal it with a solid rivet although it looks like it's pretty close to the keel (or lift-strake?)

Is there addition pitting beyond what you showed us in the video? if so, which image(s) show the pitting?

side-note: putting the images in as attachments is probably why you won't get many (if any) replies. you have to click 1-by-1. Many of us use a photo-sharing app. At a minimum, insert them into the post. you can also insert the image address between "IMG" tags:


Classiccat, thank you for the reply. I have tried to figure out the picture situation, and that was the only way I could get them to post into a post. I uploaded all of my current photos onto photobucket.com. it will not let me upload them from 'upload attachements' button as it gives me a message of 'invalid file data' every time.
When I use the 'upload from URL' button, that is how I get them to post. but its a pain in the butt because i can only do ONE image at a time....

I tried copying the IMG codes (for forum boards) on photobucket, It didnt let me post. I guess I will try again and go through my current posts trying to replace with the IMG codes again.

As far as flipping the boat and starting that process goes, I would like to know the following:

1) how difficult is it to remove/re install the engine to the transom?
2) will it effect the steering controls/throttle wiring if I separate it from the transom? (currently all wiring for steering and throttle is still attached to boat)
3) does the motor need to be on a stand while it is separated from the boat or can it be leaned up against something vertical / and / or layed down flat?

As far as the pinhole goes, I do have access to the other side. and it looks to be approx 3-4 inches from the first rib closest to the transom.

I will take some clearer pictures of the areas I found and post them when I can. I am currently trying to get the hull cleaned out a bit more (the excess foam left over, then I want to pressure wash the inside cleaner, so I can see clearer.

-Zach
 

Frey0357

Petty Officer 1st Class
Joined
Mar 13, 2014
Messages
313
Hey there Dig. Nice boat ya got there! She's got good bones! While you are pulling out all of that nasty water logged foam, you need to suspect that transom as well. You already noticed in your video that you had a leak in one of the transom screws. Many or even most of the aluminum boats from that era do not have sealed transom boards, therefore the wood core sucks up moisture and with no place for the moisture to go becomes rotten. The rotten core delaminates and your beautiful transom becomes wood pulp! I know this because I dumped my transom in my wife's flower bed and could not tell a difference in the wood chips that were already there and the ones that I threw down! bad news!!

Keep the pics posted of your progress and we will keep reaching out and helping.....

Frey

Pic of my transom, after I removed the only big pieces. The rest of it I literally vacuumed it out with a shop vac! :
IMG_1827_zpsyozk2v9p.jpg
 

Tnstratofam

Commander
Joined
Aug 18, 2013
Messages
2,679
:welcome: Diginfield. Looks like you are well on your way. If you pm a mod such as jbcurt00 or Gaboater they can help you clear out or edit your original posts. You only have an hour to edit any posts you make in threads after that you have to contact a moderator ro help you.

I second Frey on thoroughly checking your transom board. It looks awfully dark and wet. As to removing the outboard so long as you mark your wires and cables to keep track of your connections removing them shouldn't be to big of a deal. If you run into problems post questions on your motor in it's manufacturers forum and people will gladly help.

I feel having the engine stood up on a secure stand is better than laying it down, and I definitely wouldn't recommend just leaning against something standing up. If it falls it could not only damage part of the motor or someone walking by, but having all that weight on the motor leg isn't good either.

As to the leaks you need to pinpoint the leaking rivets and pin holes first. Then see if the rivets can be tightened up through rebucking, or replace them outright if they're to far gone. Be sure to use a little 3m 5200 on any rivets you replace as it will ensure a watertight seal. For pin hole leaks sand and clean away any corrosion, then if there is pitting fill it with marine tex or jb weld and primer and paint. If it is a seam or pannel joint that is leaking you could use gluvit to fill the seam. Then do another water test to check for leaks.

Good luck and keep posting progress and questions. Pics too. We love pics.:hungry:
 
Last edited:

GA_Boater

Honorary Moderator Emeritus
Joined
May 24, 2011
Messages
49,038
Looks like I cannot edit my previous posts anymore, I do not see an option for that. I was going to try and get the pictures to show up for everybody, is there a Moderator who could help me out with this, or no? I surely would like some more input on this project and I understand that people like to see pictures.

are my pictures not viewable for people?

The thread is all cleaned up now, Dig.

All the pics are easily viewed for everyone.

I didn't see any mention of the transom wood. Often when the deck goes and foam is soaked, the transom wood mulches, as Frey's pic shows. How is your transom?
 

classiccat

"Captain" + Starmada Splash Of The Year 2020
Joined
Dec 20, 2010
Messages
3,405
1) how difficult is it to remove/re install the engine to the transom?
2) will it effect the steering controls/throttle wiring if I separate it from the transom? (currently all wiring for steering and throttle is still attached to boat)
3) does the motor need to be on a stand while it is separated from the boat or can it be leaned up against something vertical / and / or layed down flat?

As far as the pinhole goes, I do have access to the other side. and it looks to be approx 3-4 inches from the first rib closest to the transom.

I will take some clearer pictures of the areas I found and post them when I can. I am currently trying to get the hull cleaned out a bit more (the excess foam left over, then I want to pressure wash the inside cleaner, so I can see clearer.

-Zach

see! embed photos and they will come! :photo: :lol:

1.) removing the engine is usually pretty straightforward and necessary in your case since that transom wood is likely loooong gone. It's par for the course on a tinnie rebuild (see our large collection of StarCraft rebuilds..rotten transom is a common denominator). Guys get pretty creative in pulling them...I personally use an engine hoist. I also have a retired swingset that I use as a light-duty gantry in a pinch.

2.) Before breaking it down, take pictures of the linkages & mark every wire & control cable.

3.) There's a motor stand here on iboats that a gazilion members have made. I don't recommend leaning the engine on anything...as said by others, it can fall and/or bend the skeg. Stands with castors are awesome for wrenching on it & being able to move it around my garage & driveway.

4.) I've treated pinhole leaks in a variety of ways (see my signature). If possible, I'd try and use a single solid rivet coated with 3M5200. If the surrounding area is questionable (i.e. neighboring aluminum is compromised), i'd go with an external patch (coated with 5200) & fastened to the hull with solid rivets.
 

Dignified09@gmail.com

Petty Officer 3rd Class
Joined
Apr 9, 2016
Messages
92
Hello guys, wow what a great response from you all. I appreciate this very much. however I have a few questions that I need some more help with.

This weekend will be constructing a motor stand, pulling the motor off and inspecting the transom.

1. Will I need to disconnect all of the steering cables FROM the motor? or can I keep them connected for the duration of the motor being off the boat itself? I do not want to interfeere with anything that I do not have to if possible. seems like those cables for steering are pretty stiff as well as a bit of a tough to disconnect?

My other questions are about the transom:

1. How hard is it to pull that piece of wood from the back? How big of a job is it? from my observation it only seems to be screwed into by screws, I do not see any riveted wood or anything. Should I be prepared for it being glued to anything? I can see the wood inside the channel (looks to be 2x 3/4 inch pieces sandwitched together?) there is an aluminum cap covering the wood and that is where the motor sits in the channel. Will it be as easy as removing that cap and simply sliding the piece out?

2. Can I perform/should I perform a few drill tests into the transom BEFORE i decide to pull the motor? (have read that people drill in a few spots to check moisture levels and seal up holes with 3M5200??)

I will keep responding and replying when I can guys, getting close to the weekend and doing some work :joyous:

-Zach
 
Last edited:

Frey0357

Petty Officer 1st Class
Joined
Mar 13, 2014
Messages
313
Hello Dig here are my recommendations, I am sure others will chime in....

1.) It is not hard or difficult to remove the transom core, you do have to take your time, take photos, and do it right (in my opinion). If it were me and I had your boat, I would simply replace the transom core even if I didn't think that it needed it. The updates you are doing everywhere else will only leave the transom as the weak point eventually so you might as well replace it and have "piece of mind" that it wont fail any time in the near future.

2.) You will need to pull the motor off of the transom. You could try to leave it connected, but I would fully disconnect it from all wiring and steering components, again my opinion. take photos to help you when you are ready to re-install. I built the engine stand that many others have built and provided directions to and it works out great! Very likely there is no rivets holding your transom core in its place it is the bolts, washers, and nuts that do that job. You may have to remove a few rivets in the back splash, but that might not be needed, you will have to assess once you get into it. If so simply putting a dimple in the center of the rivet and then drilling it out will quickly remove it. The transom cap will become obvious once the motor is removed. The cap will (or should!!!) span the entire top of the transom covering the transom core. Some members have noted that the PO has changed the original design of the transom cap which led to water ingress and premature failure of the transom core (wood). Also I had found that my transom cap has become cracked and broken in half, you will want to check that for sure. If you have splash well drains you will have to crumple (or fold them) them into each other (with a hammer and screwdriver) to get them out, which must be done to remove the transom core. Once the bolts/nuts and drains are out the transom core should slide out.

3.) Personally you can check you transom by drilling, but I would not bother. It is very likely that your transom is damaged beyond what you think it is and likely needs replacement. Did you do any testing of the transom at all with the motor on? For example I knew my transom was trashed because I could grab my heavy outboard and push pull it and the transom would actually move! I knocked on the transom (on the back) and found what seemed to be like hollow sound compared to some areas that were solid. You may want to try some of these. There are vids on youtube that show boat owners doing this, not that you can believe everything you see/read on the internet, but some of it is legit.

4.) If you follow this recommendation and decide to replace your transom core, there are many options for replacement materials and sealing options. I believe it is very important to seal the replacement material thoroughly! My original transom was (2) 3/4" plywood boards that were cut to fit and slammed into the slot, bolted together and forgotten about, no sealant at all! I used (2) 3/4" plywood boards as replacement and fully sealed them prior to re-installing.

5.) Post pics here, many of them! We can better help you if we can see what you can see!

You have many members and friends that will help you here.. :)

Frey
 

Dignified09@gmail.com

Petty Officer 3rd Class
Joined
Apr 9, 2016
Messages
92
Heres some pictures of the motor more closely guys:
20160428_083111.jpg

20160428_083111.jpg


20160428_083136.jpg


20160428_083151.jpg


Heres the thickest cable connection for the steering, I am a bit worried about the message on the piece itself?

20160428_083228.jpg


20160428_083248.jpg


and while im posting pictures, could someone tell me what that long white hose/cable is connected from the top of the piece is? I have been wondering this, ha.

20160428_083325.jpg


If more pictures are needed to determine help, please ask me to take some more. I will be very active this weekend and able to post more frequently.

-Zach
 
Top