1964 MirroCraft Restoration

apprentiss

Seaman Apprentice
Joined
Dec 11, 2014
Messages
46
Hey jbcurt00,

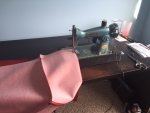
I'll have to give that a try to see how they feel. I designed it this way because I figured it would be a lot easier to cut the foam and sew the vinyl. But as you mention it, I probably should also make sure they are comfortable too. Thanks for the advice.
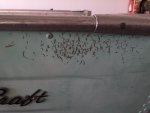
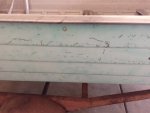
 

apprentiss

Seaman Apprentice
Joined
Dec 11, 2014
Messages
46
Just wanted to asked for a little advice. I'm finishing up on the seat build and upholstery and have started to thing about paint prep and painting. What's the process? i know I need to sand, wash/clean, prime then paint. But can anyone provide more details, especially with sanding and the different grit sand paper to use. The boat doesn't have any peeling paint, but have scratches in the paint (see photos in next post). Do I need to sand the entire boat or just the areas where the scratches are? Thanks in advance guys for any help you can offer and I'll be posting photos of the finished seats soon.
 
Last edited:

apprentiss

Seaman Apprentice
Joined
Dec 11, 2014
Messages
46
No Title

Photos of the scratches on the hull.
 

Attachments

  • photo216908.jpg
    photo216908.jpg
    63.9 KB · Views: 2
  • photo216909.jpg
    photo216909.jpg
    42.4 KB · Views: 2
  • photo216910.jpg
    photo216910.jpg
    66.7 KB · Views: 2

Scott Danforth

Grumpy Vintage Moderator still playing with boats
Staff member
Joined
Jul 23, 2011
Messages
47,562
the steps depend on the quality you are looking for.

assiming you are going for a good quality paint job, this is what I would do

power wash the entire boat, inside, outside, etc.
use a good quality wax and grease remover on the whole boat
use a scotchbright pad, scuff the whole boat. you need to sand down to bare metal, only where the scratches went thru the original paint and bare aluminum has had a chance to oxidize. for the most part you are only lightly sanding the good paint to use as a base for the new paint.
using a self-etching primer, spot prime the bare metal areas.
using a filler primer, go over the self etching primer. block sand the hull to an even consistency.
once you have smootly sanded primer and original paint feeling perfect to the touch, and looking perfect, then use wax and grease remover again and go over the entire boat again.
now using a tack cloth, go over the entire boat.
now you can paint your finish color
for the finish color, start reading this http://forums.iboats.com/forum/boat...r-flamingo-splashed-w-pics/page16#post5172021
 

ssdale

Starmada Splash of the Year 2016
Joined
Nov 4, 2011
Messages
285
Envious of that sewing machine! Of course i would probably end up in the emergency room.... Need to work some A shape into the backrest of the design, but I understand the need for simplicity, especially if I had to try upholstery.

Looks like Scott has given you good advice as to prep. Just take your time sanding as any blemish will be magnified 100% with the application of glossy paint, but remember, you only have to please yourself. Keep after it, as your MirroCraft is one of the nicest looking boats ever made IMHO and is similar in style to my '65 Cherokee. Cant wait to see her finished!

All the Best,
Dale
 

apprentiss

Seaman Apprentice
Joined
Dec 11, 2014
Messages
46
Thanks Scott for the tips. This will help a lot with the paint prep and painting. Just one question, when sanding, do I do it by hand or can I use and electric palm sander?
 

Scott Danforth

Grumpy Vintage Moderator still playing with boats
Staff member
Joined
Jul 23, 2011
Messages
47,562
I prefer a pneumatic DA, however electric or hand would work as well.

my last gelcoat repair was all done by hand because I was too lazy to get on the ladder to pull the bin down with my DA's
 

apprentiss

Seaman Apprentice
Joined
Dec 11, 2014
Messages
46
Hey Dale,

Thanks for the comments and the advice. The sewing machine is really nice. Glad I was able to find it. It did take a little getting use to because it would go with the lightest touch of the petal. I actually had to place my wallet under the pedal so I could have more control over it. I've been thinking about the seats too. I'm going to try them out this way first, but if they are uncomfortable I'm going to redesign them. I actually have enough material left over that it wouldn't cost me anymore money.

I'm hoping to have it done this summer, but I know once it warms up here in the Midwst, I also will have house projects that will compete with my available time. But hopefully I'll be able to get it done.
 

ssdale

Starmada Splash of the Year 2016
Joined
Nov 4, 2011
Messages
285
My Cherokee was an empty hull just like your MirroCraft. being as I have no way to upholster, I bought a couple of the white retro looking loungers off of e-bay when they were a deal. Do you know for sure what the original seat configuration looked like? I would find out and duplicate it if possible but I know you already have some time invested in your design,

After looking at your paint photos more closely, it will take a lot of sanding to feather those all out. I used semi-paste paint stripper on the entire exterior peeling off the majority of the paint with a plastic scraper. I didn't worry about getting it all off because anything left sanded smooth with just an electric palm sander and I didn't have to worry about adhesion-just about covered it all with thin coat of Zinc Chromate primer anyway. Just my opinion! ( I notice people really get uptight when discussing paint-it is an emotional topic:joyous:) If there is a marine store nearby, get the primer from them or order it here from i-boats. I bought some at a big box auto store and it caused me a lot of heartache-or it may have been too cold when i applied it. Pics are of the Cherokee that was in about in the same shape as your MirroCraft

Anyway stick with it. Ive been working on a 1959 Starcraft Constellation for a long time for a long time. Never sure whether to be proud or ashamed:facepalm:
All the Best,
Dale
100_4614.jpg 100_4616.jpg 100_4631.jpg 100_4647.jpg
 

apprentiss

Seaman Apprentice
Joined
Dec 11, 2014
Messages
46
Just wanted to post an update on the upholstery.

This Morse sewing machine was great. It was easy to learn to use and sewed through the vinyl with ease. I highly recommend getting one if you're planning to do your own upholstery.

IMG_1762.JPG


The benches are finished.

IMG_1764.JPG


The complete finished product. I may go back next winter and redesign the back if I find it too uncomfortable this summer. But so far, I'm happy with how it all turned out, especially having never sewn anything before.

IMG_1769.JPG IMG_1768.JPG

IMG_1770.JPG
 

Attachments

  • IMG_1762.JPG
    IMG_1762.JPG
    77.8 KB · Views: 3

apprentiss

Seaman Apprentice
Joined
Dec 11, 2014
Messages
46
Hey Dale,

Your Cherokee looks really nice. I hope mine turns out half as good.

I've been going back and forth with stripping vs. sanding. I saw this video of a guy who strip his boat and the product he used made it easy, but the product is only available in Canada. What's the name of the stripper you used? If I can find it, I'll give it a try.

Thanks for the advice and for posting the photos. They are a good inspiration to keep moving forward.
 

Woodonglass

Supreme Mariner
Joined
Dec 29, 2009
Messages
25,924
I recently was talking to a friend who is re-painting his Cessna airplane. I asked him what he used to strip the paint off with and he said he used Eldorado PR-2002. Said a lot of the aircraft people used it and it works great on aluminum. Very aggressive remover. I think he said it's a PPG product. Don't know where he got it.
 

ssdale

Starmada Splash of the Year 2016
Joined
Nov 4, 2011
Messages
285
Finally had a chance to look at the can of stripper that I used. It is called Zip Strip Commercial. It has a picture of a boat and a pickup on the can and is made in Canada. I bought it my local small town lumberyard. Its a skull and crossbones :painkiller: product and you need lots of ventilation. Did I mention that it will melt your skin-just kidding, but do wear the gloves they make for stripping furniture. I use a plastic scrapper and catch the removed material with an old paint tray. Any semi paste product Whatever doesn't come off feathers out nicely. Wipe it down good with degreaser and buy high quality zinc chromate in a rattle can and you're ready to top coat. Just my opinion.
Nice work with that upholstery! The red will really set her off. Do you have a paint scheme/color picked out?
Keep after it,
Dale
 

apprentiss

Seaman Apprentice
Joined
Dec 11, 2014
Messages
46
Thanks Dale for the info. I recently tried this environmentally friendly and safe to use inside paint remover called CitriStrip. I tested iron the topside of bow and it worked well. It actually turn the paint back to its liquid state. I'm going to test it again on the bottom and see how it turns out.

I haven't finalized the color scheme yet, but will be doing it soon. My wife choose the color for the upholstery and I think it's going to look nice too.

Thanks once again for your advice and comments.
 

apprentiss

Seaman Apprentice
Joined
Dec 11, 2014
Messages
46
Had a chance to work on the boat a little tonight. Got it flipped over and started some of the paint stripping.

IMG_1840.JPG FullSizeRender.jpg
 

jbcurt00

Moderator
Staff member
Joined
Oct 25, 2011
Messages
24,871
Jbuxton, please don't hijack another member's topic to discuss yours. Start a topic about yours, post some pix of your's when you get it, and the guys hanging around in the dry dock will help you any way they can. Thanks John
 

ssdale

Starmada Splash of the Year 2016
Joined
Nov 4, 2011
Messages
285
Looking good so far! My advice would be not to agonize over the bottom, save your effort for the top half of the boat. Just get the bottom relatively smooth and use a light coat of zinc chromate. Do check for loose rivets etc...The bottom is just hardly seen and can get you bogged down. IMHO. Hoping to see you glide through the prep and on to paint!
Dale
 

jvanhees

Petty Officer 1st Class
Joined
Mar 20, 2013
Messages
284
That boat is in pretty nice shape for its age, and I think will be a sweet looker when restored. And you make sewing look easy...nice work so far!
 
Top