1963 Starcraft Jet restoration

Coach Dave

Petty Officer 2nd Class
Joined
Apr 3, 2014
Messages
117
Yep - It's all 2" - 2" C channel for the body of the trailer, and 2" square tube for the tongue. It seems pretty solid, and the boat is light. I didn't think a 1 7/8" ball would matter either - I guess I just wanted reassurance. The current coupler is all rusty, and if I'm gonna redo the trailer I may replace it with a nice shiny new one.
 

Coach Dave

Petty Officer 2nd Class
Joined
Apr 3, 2014
Messages
117
No Title

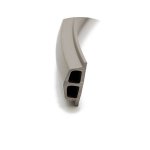
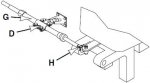
SCORE! I had completely removed the Fred Flintstone pulley and cable steering system with plans to upgrade to a modern rotary NFB single cable system. But my motor doesn't have a tilt tube to connect it to. Seastar/Teleflex makes a Transom or Splashwell mount mechanical steering connector to solve this problem. For an aluminum one they run around $175 - $200, and for stainless steel around $250. I stumbled across one, the COMPLETE KIT with tube and clevis, on closeout in Maine for $51 delivered to my door! And it's stainless steel! Just google if you need one, you'll need to register, then enter TEL-300611 in their serach box. And my new rubrail arrived! It is OEM in "taupe" color. They sold it in 10' increments only, and it appeared as if you got 10' individual pieces when you ordered. The original I removed was seamed on the gunwales, so I didn't worry about it. I ordered 5 10' sections - enough to do gunwales and freeboards. I received a 50' long continuous piece - SWEET!
 

Attachments

  • photo262241.jpg
    photo262241.jpg
    13.3 KB · Views: 2
  • photo262698.jpg
    photo262698.jpg
    11.3 KB · Views: 2
Last edited by a moderator:

Watermann

Starmada Splash of the Year 2014
Joined
Jan 12, 2013
Messages
13,753
One of my favorite parts of the restoration is shopping and getting boxes off the brown truck. Nice work, you won;t regret updating to that new NFB helm.
 

Coach Dave

Petty Officer 2nd Class
Joined
Apr 3, 2014
Messages
117
Thanks wman. It is exciting 'til you realize how this thing can 50 dollar you to death. Anyway, I started tearing into the trailer in earnest this weekend. First tip from this rookie if you plan on tearing apart a 54 year old trailer - MAKE SURE YOUR TETANUS SHOT IS UP TO DATE! If I removed 50 bolts, 40 had to be cut off. I REALLY had to DRAG myself out their this weekend, but I promised the boy I'd get 'er done. That, and the bite is starting around here.
  • Completely stripped the tongue 'cause that will be highly visible at all times - no rust at all under the paint. Good start. The last layer of paint appeared to match the last layer of paint I took off the boat bottom. So.....I'm thinking this trailer may be original to the boat. Maybe thinking the original boat dealer manufactured their own trailers for the new boats they sold. There is about a 18' - 24" extension on the back of the trailer - so a 14' boat would fit it without the extension, but if they sold a 15-16' boat they added the extension? Maybe. You have a lotta time to think when cutting off bolts, removing trailer parts, & stripping & sanding paint.
    • IMG_20170415_130852_zps2ik4dmma.jpg
  • The rest of the trailer I just sanded and/or wire wheeled the existing paint to a feather edge, blew off the dust and wiped clean with thinner.
    • IMG_20170416_164903_zps99jxatc5.jpg IMG_20170416_164846_zpsq5yb18ni.jpg IMG_20170415_160726_zps6npmilne.jpg
  • Then on the inside of the C channel on the body of the trailer I sprayed it with Rustoleum Truck Bed Liner, as I NEVER want to have to touch the insides of those C channels again! Prepping those was a real PITA. I did tape off the tops of the C channel so as not to get liner on the areas I'm painting.
  • Removed all the tape and gonna let her sit a day or 2 before finish painting the outside of the trailer C channels and tongue. I'm using white Rustoleum Gloss Hammered Finish spray paint. Went with the hammered finish since I didn't go down to bare metal, and it will disguise any areas that maybe aren't as smooth.
  • I have about 16 hours in this trailer. But while prepping it, I was able to inspect every inch of it, and it is actually still very solid. I did wire wheel all the bolts that remained in place, their heads, and exposed threads to bare metal so they'll only have my finish paint on them in case they need removed/replaced/tightened later.
  • I also got my 2X4s (NOT pressure treated) for the new bunks cut and sealed with 2 part epoxy. I did cut the back ends at a 45 where the boat will slide on. The old bunks were in BAD shape, but I saved them for a template for the mounting holes.
    • IMG_20170415_132816_zpskgqrvijh.jpg
 
Last edited:

Coach Dave

Petty Officer 2nd Class
Joined
Apr 3, 2014
Messages
117
I gotta question I'm sure someone can help me with. This boat had a splashwell and a 15-16" transom for the short shaft motor.
63jetjohnson_zpsjqyfyyis.jpg

I don't want to put the splashwell back in - too much lost real estate. I DO want to put my motor on a jackplate to set it back for better performance. I imagine I could mount a jackplate like below upside down from what is pictured to accommodate a short shaft motor on a 20" transom.
jackplate_zps1ifoux9w.gif

Can or should I replace my transom with a 20 incher? I figure the taller transom will keep it drier inside the boat, and the jackplate can be mounted at the correct height for my short shaft engine. And, if and when I decide to get a larger HP engine, I'll have the transom to shop long or short shaft engines. Am I twisted? Would there be any complications with a set up like this?
 

Watermann

Starmada Splash of the Year 2014
Joined
Jan 12, 2013
Messages
13,753
The splashwell is an integral part of the boats stern structure that ties in the transom and gunnels. Removing the SW without replacing the structure isn't a good idea.
 

Coach Dave

Petty Officer 2nd Class
Joined
Apr 3, 2014
Messages
117
How could I replace the structure and save the at least 12" of usable floor space length that the transom takes up? With the beam width back there, that'd be about 6-7 sq. ft. I could pick up. Is it too involved/not possible/never done/unsafe/not cost effective? I envisioned having a flat floor with floor hatches on either side - 1 for removable fuel tank, and 1 for a battery compartment. Kinda like this:
rearplatform2.0_zps5erbre2w.jpg
Or this:
Crestliner-FishHawk1850SC-floor_zpsakyel6gy.jpg
If I tied the floor decking into the gunnels and to the transom on either side of the motor with heavy 1/8" aluminum angle and stainless bolts or rivets, would that suffice? It aint the end of the world if I gotta put the splashwell back in, but on a boat that's just short of 15', every square inch of real estate is valuable.

Thanks in advance!
 
Last edited:

Watermann

Starmada Splash of the Year 2014
Joined
Jan 12, 2013
Messages
13,753
Sure you can add some structure, that's been done before and the SW reworked. Take a look at the thread by Candutch
 

Coach Dave

Petty Officer 2nd Class
Joined
Apr 3, 2014
Messages
117
Thanks again! Got another one: I've been checking out other Starcraft Jet/Jetsar posts - lately concerning their trailers. It is VERY clear that I have much more hardware on mine than others. Namely the rollers down the center of the trailer body. I have 2 bunks already - 7 foot long 2X4s that pretty much match up to the flat part of the hull bottom on the back half of the boat. Then of course the bow guard at the front of the trailer. Most Jet/Jetstar trailers I've seen have just the bunks and bow guard. I think I'm gonna ditch the rollers - overkill. Good idea? Bad idea? The boat is only 14 3/4' long and 410 lbs.

Untitled drawing.jpg
 

Woodonglass

Supreme Mariner
Joined
Dec 29, 2009
Messages
25,924
The rollers can/will act as quides for the keel and help center the boat on the trailer. You don't HAVE to use em but they can be helpful at times.;)
 

Coach Dave

Petty Officer 2nd Class
Joined
Apr 3, 2014
Messages
117
Yeah, you're right WOG. I'm just tired of working on this trailer. Looking for short cuts that I've so far been able to avoid. And thanks for the Tractor Paint formula - my bottom paint is HARD. And thanks for the link Wman - gave me ideas on keeping my transom structurally sound if I do nix the splashwell. I think I've convinced myself to put in a 20" transom though. I only want to do it once. It's much easier to mount an engine lower on a taller transom than to run out of transom trying to mount a motor higher.
 

Woodonglass

Supreme Mariner
Joined
Dec 29, 2009
Messages
25,924
I've seen several Tin Boats where the owner replaced the 15" transom with a 20". If you take your time and fabricate well, no one will ever know it was modified. My glass boat only has a 6" wide x 4" deep splash well on her. Made from aluminum. You might wanna consider this. Splashwells can come in handy if you ever get caught in Heavy Water!!!!;)
 

Watermann

Starmada Splash of the Year 2014
Joined
Jan 12, 2013
Messages
13,753
I'm not sure how well mounting the jack plate lower to run the short shaft on a 20" transom, how will you be able to rig it for steering, cables and tilt the motor up?

Trailer keel rollers, at least keep the very back one so the bow V won't hit the cross member and those motor toters like to rest on that too.
 

Coach Dave

Petty Officer 2nd Class
Joined
Apr 3, 2014
Messages
117
Yeah, the steering and control connections were a concern of mine if I went to a 20" transom with the short shaft motor. This outboard boat stuff is new to me. My first boat was a I/O cuddy cabin waaaaaaaaaay back in the day (I think Reagan was President) when I was an unencumbered single guy with no responsibilities other than staying alive and having a good time:rofl:
I may just stay with the short transom for now. Can you add height to a short transom after the fact? Or would I need to replace the whole thing again? I ask 'cause it seems most motors out there are long shaft if and when I do upgrade my HP.
 

Watermann

Starmada Splash of the Year 2014
Joined
Jan 12, 2013
Messages
13,753
Yeah you can't just add on 5" of transom wood to the top of it, way too much stress is involved in the transom area, you'd have to replace the entire transom to increase size.

The best way is to find the new long shaft OB, increase the transom height, re-adjust the splashwell and make new drain holes.or add an OB pod to the back of the new transom which is very expensive.
 

Coach Dave

Petty Officer 2nd Class
Joined
Apr 3, 2014
Messages
117
All this transom talk has got me considering upgrading my 15 HP now instead of waiting. My marine mechanic has an early - mid 70's Merc 35 HP long shaft with controls for $650. He said it's a '72 - '74 year, wasn't sure when I talked to him on phone. Is that a deal? And what's the scoop on that era of Mercs? Good? Bad? My boat is rated to 50 HP, but DAMN - that thing gotta get prit near air borne with that much HP. I'm thinking 35 HP push it plenty fast enough.
 

ezmobee

Supreme Mariner
Joined
Mar 26, 2007
Messages
23,767
Parts support isn't as good for old Mercs as it is for Johnson/Evinrudes. I wouldn't pay that much for a really old Merc.
 

Coach Dave

Petty Officer 2nd Class
Joined
Apr 3, 2014
Messages
117
That's what I've read and heard about old Mercs. - hence my question. The guy that used to run Mercury was a little, how do you say, experimental? But the Johnson/Evinrudes were much more consistent in design and engineering.
 

Watermann

Starmada Splash of the Year 2014
Joined
Jan 12, 2013
Messages
13,753
You're going to see 3 letters often when trying to use older OB motors... NLA.

but there are still plenty of after market Sierra and NOS OEM parts for the old Mercs
 

jbcurt00

Moderator
Staff member
Joined
Oct 25, 2011
Messages
24,871
If you're going to upgrade the motor, upgrade it to something less then 35yrs old. That puts you in prop rated motors.

IMO, $650 is high unless its running great, has already got a current year impeller installed and comes w the wiring harness, controls and remote.

Look for 40hp 1982+ motor and expect to pay 1K+ running, more w all the cables, harness and remote, esp if its got TandT.
 
Top