19' CC Rebuild/Refresh

SBTOM

Petty Officer 1st Class
Joined
Jul 22, 2009
Messages
275
Re: 19' CC Rebuild/Refresh

That will be awesome if that is what it is. I'll pull it out tonight and take it home to clean it up and test it... By the way, I've been keeping up on that CC build, you are really moving... that thing will be quite a machine!
 

jspano

Senior Chief Petty Officer
Joined
Oct 30, 2009
Messages
790
Re: 19' CC Rebuild/Refresh

the only thing that could go bad is that electric pump... tractor supply sells them cheap. just look for the most GPM, usually 2-3 gpm
 

SBTOM

Petty Officer 1st Class
Joined
Jul 22, 2009
Messages
275
Re: 19' CC Rebuild/Refresh

I decided that it would be easier to glass up an entire sheet of of 1/2" marine ply before cutting it up and installing it in the boat so I got that taken care of yesterday. The idea is that I will sand it down and have a nice sheet of pre-finished material to cut all of my components out of. The main reason that I wanted to do it this way is that I can do a coat of glass followed by a sprayed coat of polyester, and then run it through the time saver with 120 grit so I have a nice smooth surface for gel coat. I thought about setting up flange to do light RTM but decided that it wasn't worth the extra effort.... It might have saved me some resin though.

On a side note, I feel like I got a pretty good resin to glass ratio using a bondo spreader. Here are a couple of pictures before sanding:

Closeup of the weave after squeegee:
Weaveclose-up.jpg


Sheet showing difference between squeegee'd and not:

4x8sheet.jpg
 

SBTOM

Petty Officer 1st Class
Joined
Jul 22, 2009
Messages
275
Re: 19' CC Rebuild/Refresh

Here are a couple of pics of what I've been working on with the transom... these will make a lot more sense when I get the splash-well and access hatch glassed in.

Before:

Before.jpg


During- that is polished SST sheet that is held on with VHB tape to keep the profile nice and even.

During.jpg


2 out of the 3 layers:

During2.jpg


After, and ready for the cap. I have to leave it open for a while though, because I need that top surface as a reference fort the splash well

After.jpg


The reason that it looks white is that I tinted the resin to act as a guide coat when I'm sanding everything down for gel. I'll do another post with a detail shot of how I handled the overlap and the kerf cuts.
 

SBTOM

Petty Officer 1st Class
Joined
Jul 22, 2009
Messages
275
Re: 19' CC Rebuild/Refresh

In the lower left, you'll see where I overlapped the sheets and just about that you can see the kerf cuts. I offset them slightly and used luan shims soked in resin to take up the difference. The top looks like it doesnt have resin on it because I ended up having to sand everything down a bit to get the surface nice and even.

Close-up2.jpg
 

SBTOM

Petty Officer 1st Class
Joined
Jul 22, 2009
Messages
275
Re: 19' CC Rebuild/Refresh

Haven't posted in a while, but I have been plugging away at little projects. I spent a good long while trying to figure out a solution to the back end, and this is what I came up with. The idea is that the splash well will be one piece and does not have any access hatches, drains, etc, that could be a potential source of rot/leaks. The access hatch to the bilge will be considerably larger, and double as a built in bait prep table when it is closed (stainless steel piano hinge). It still needs glass and body work, but this is what it looked like as of saturday...

Backhatchmockup1.jpg


and this is with the hatch removed. I had to add a 1.5x1.5 reinforcement beam because I want to be able to stand on it. Eventually it will hinge toward the outboard.

backhatchmockup2.jpg


I'm also toying with the idea of adding some sort of drop in storage containers so I can use all of that open space when I don't need access to the bilge. It would have to be something that was light and easily removable in the event of an emergency... I was almost thinking of some sort of dry bag or something. Anyone have any ideas?
 

SBTOM

Petty Officer 1st Class
Joined
Jul 22, 2009
Messages
275
Re: 19' CC Rebuild/Refresh

I started repairing the busted out sections of the flange between the hull and the cap last night. Also did a bit of body work and got a marker coat of tinted poly on the back end of her. This first pic is of the material that I used to patch in the cap side of the flange last night. Its black because the face coat is a tooling gel coat. I only used it, because a dude I work with laid up a bunch of extra material for a project he was working on and he was chucking the scraps.

Flangerepairmaterial.jpg


I bedded it on with an extra layer of 4 oz csm, and then just held it in place with masking tape

flangerepair1.jpg


Then I roughed out the profile. The marks that you see were areas where I was intending to cut and fill the fiberglass.

Flangerepair2.jpg


This last shot shows the marker coat. I painted it on by hand so I am going to have a fun couple of hours of sanding in my future before this section will be ready for gel coat. Speaking of which, I guess I should break out the pressure pot do some tests! Good news is I have a buddy who has sprayed a bunch of gel in the past and he said he would help me do it. Plan is to set up two 1gallon pressure pots so that we can get the whole thing sprayed before the gel will kick.

1stmarkercoat.jpg


Man, I was way off when I thought that I was going to finish this in a month!
 

jonesg

Admiral
Joined
Feb 22, 2008
Messages
7,174
Re: 19' CC Rebuild/Refresh

Looks like you are moving right along regardless.
Doesn't hurt that the PO did all the dirty work though.:)

Are you planning to install a folding T top, you can make it telescope down for clearance.

Nice miller welder.! woohoo.
 

SBTOM

Petty Officer 1st Class
Joined
Jul 22, 2009
Messages
275
Re: 19' CC Rebuild/Refresh

Haha, yeah I'm really glad I didn't have to pull the stringers. The PO did a good job with a lot of stuff and then other things just kind of make me scratch my head. Ohhh well! I can't complain, and when this is all over I'll have solid little fishing boat. Plus you never know, he might be an iboater! if he is "why did you have to use housewire?!" :mad:

Not sure what I'm going to do for the t-top yet... I'm leaning towards refurbishing the one that I have and modding it to have a section for a couple of speakers, the radios, and the antenna for the GPS. If I end up building one from scratch, I am going to do the whole thing out of aluminum and build in some surf board racks.
 

jonesg

Admiral
Joined
Feb 22, 2008
Messages
7,174
Re: 19' CC Rebuild/Refresh

The problem is the T top stops it from going in your garage.!

I'd just knock the house down but thats me.:)
 

SBTOM

Petty Officer 1st Class
Joined
Jul 22, 2009
Messages
275
Re: 19' CC Rebuild/Refresh

True, but thats the least of my garage space problems. My brother and I have pretty much all of the inside space filled out with project motorcycles. Plus he's got my whole shop bench cluttered up with parts for a WWII era Southbend Lathe that he's restoring. Can't even really work in there! Here's a shot of when I mistakenly took my seats home for re-upholstering. My workbench ended up being the seat of my enduro:

SeatsBefore.jpg


I think I might have to just have a nice cover made for her and keep her out on the lot :( So sad to think of her out there in the cold.
 

SBTOM

Petty Officer 1st Class
Joined
Jul 22, 2009
Messages
275
Re: 19' CC Rebuild/Refresh

Just ordered most of the supplies that I will need to finish this project out (knocking on wood). I decided that I really don't want to re-spray the gel coat on the whole boat, partly because of the cost/time, but mostly because of the weight and because the original gel coat is still pretty nice. I am going to spray the stern though, and I am going to re-coat the deck as well, but I will tint that and apply with texture and roller. I'm hoping that 2 gallons will do the trick.
One thing that I haven't ordered yet is the rub rail. I was going to salvage the original stuff, but now I am thinking that I might buy something... still have a couple of weeks to figure that one out. In the mean time, I have probably 10-20 hours of repair work on the bad sections of the flange.
Hopefully I can get into the finishing stages by the end of the month! (still in denial)
 

jonesg

Admiral
Joined
Feb 22, 2008
Messages
7,174
Re: 19' CC Rebuild/Refresh

I bought and restored a 10x24 south bend Model A precision lathe this winter, you'll appreciate the ability to make parts at some point.
My lathe has a war dept sticker, it was used for mfging WW2 weapons.
Poor cellphone pic of my newly painted south bend.

Other pic is what can happen with gel repairs if they don't match, the guy brushed it on and it looks hilarious. It turned yellow.
The transom was gelled the same way and I ground it all off and went back with interlux, awesome stuff. I'll do the bow next week.
 

Attachments

  • lathe2.jpg
    lathe2.jpg
    11.1 KB · Views: 0
  • done.jpg
    done.jpg
    11.7 KB · Views: 0

SBTOM

Petty Officer 1st Class
Joined
Jul 22, 2009
Messages
275
Re: 19' CC Rebuild/Refresh

Yeah, that lathe looks really similar actually, but a lot nicer! Also, his didn't have the original stand when he bought it. It will be nice to have one in the garage, and as you know, they are really nice once you get them dialed in. We have a more modern jet lathe in our R&D shop and I can tell you that the quality sucks compared to the rigidity on a vintage south bend. I guess nothing beats solid, heavy, castings. I'm hoping his next purchase will be a nice Bridgeport from the same era. Did you find a source for the original style leather belts? I know that he wants to keep everything period-correct...

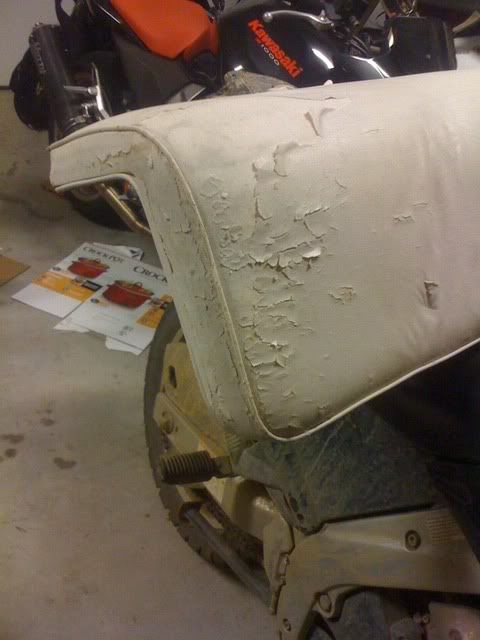
I'm not going to just patch the gel coat and call it a day I'll spray it on all of the parts that are bare fiberglass, sand it to 220 with the rest of the boat, blend it into the existing gel coat, prime as whole and then I'll spray the entire boat gloss white. The textured gel coat will go on last for deck surfaces and in a few places along the rails. I'm thinking about tinting that to roughly a "colonial yellow- fighting lady yellow."
 

jonesg

Admiral
Joined
Feb 22, 2008
Messages
7,174
Re: 19' CC Rebuild/Refresh

Practical machinst has its own south bend forum, mine came with a new drive belt, everything else was rusty but a wire wheel in an angle grinder took it all off, then a degrase followed with grey machine paint.
http://www.practicalmachinist.com/vb/south-bend-lathes/
The restored lathes are spectacular.!
http://www.practicalmachinist.com/vb/south-bend-lathes/show-us-your-south-bend-153748/

I highly recommend Interluxe paint with teflon, not cheap but very high quality, I brushed mine on with a $2 brush and it looks like it was sprayed.
 

SBTOM

Petty Officer 1st Class
Joined
Jul 22, 2009
Messages
275
Re: 19' CC Rebuild/Refresh

Thanks for the info, he's going to appreciate it. Plus I get to benefit from it as well! maybe you'll see him pop up on the forum over there, I think he will need some help getting it back together...

On a separate note, hopefully you aren't in the flood zone over there in MA. My buddy from Walpole said his parent's house is partially flooded. I went to school in Rhode Island, and the department that I was in had an amazing machine shop right ground level in front of the Providence river. I really hope it didn't flood either, because they have the most beautiful group of vintage Southbend lathes, Bridgeports, Finger breaks etc.. that I have ever seen. It would be a bummer to see that all get ruined.
 

SBTOM

Petty Officer 1st Class
Joined
Jul 22, 2009
Messages
275
Re: 19' CC Rebuild/Refresh

bilge hatch reinforcement, routed and ready for glass:

backhatchreadyforglass.jpg


glassed and ready for body work and hardware. waiting on stainless steel hinges from McMaster:

backhatchglassed.jpg


test fit for body work:

backhatchrefit.jpg


I'm up against the 4 photo limit, but I'll start another post where I replace all of the flange sections that looked like this:

damagetoflange.jpg
 

SBTOM

Petty Officer 1st Class
Joined
Jul 22, 2009
Messages
275
Re: 19' CC Rebuild/Refresh

On the sections where I was able to salvage one of the two layers of glass, I did a partial cut, heated, and split the layers:

patchcut.jpg


then I cut a patch and sanded it to the correct thickness:

replacementfit.jpg


I'll have photos of that area after body work by tomorrow. On the sections where the flange was totally shot, I cut it out altogether and installed a temporary backer (waxed aluminum)

patch2backerin.jpg


Then I did cut a similar patch which I later glassed in over the metal backer:

patch2dryfit.jpg


Again, finished photos sometime tomorrow.
 

SBTOM

Petty Officer 1st Class
Joined
Jul 22, 2009
Messages
275
Re: 19' CC Rebuild/Refresh

Front end with holes:

frontendbefore.jpg


Front end after holes were filled with homemade polyster peanut butter, ground down, and covered with RageExtreme body filler. Still needs to get sanded, but that should go pretty quickly.

frontendbodyfilled.jpg


I have a new favorite toy! I'm sure that most of you have heard of these or use one, but they are new to me. Its a silica impregnated cup brush from 3M. They make them in a couple different grits, and I have to say these things are awesome. They work on their rotoloc system and the cool thing is that they change shape depending on how fast your are running your die grinder. I tried to show it in these photos, but this thing is amazing for sanding fillets in hard to reach places.

This is the shape when is moving slowly:

cupbrush.jpg


And this is at about 10,000 RPM's

cupbrushmoving.jpg


best 4$ ever spent.
 

jonesg

Admiral
Joined
Feb 22, 2008
Messages
7,174
Re: 19' CC Rebuild/Refresh

Where d'ya get those sanding brushes?

The rear corners of my boat were loose at the cap to hull joint, I injected PL adhesive from inside, fixed it good. The glass was like yours, rivets had pulled loose.
 
Top