77 Starcraft Holiday 18 i/o - rebuild with pics galore

North Beach

Commander
Joined
Sep 29, 2008
Messages
2,022
Re: 77 Starcraft Holiday 18 i/o - rebuild with pics galore

I may try 1 inch solid oak for the piece above the engine. I may also use the same 1 inch thick oak on the rear piece that spans the lower rear seats. I'll probably laminate 2x2 oak on the backside to give it some additional strength and to give the hardware something to bolt to.

I know the many plys in marine plywood will probably hold up better but damn if they wouldn't look good in solid oak though. Man did Starcraft ever like covering everything up in vinyl.

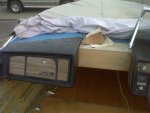
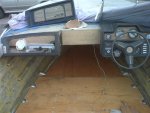
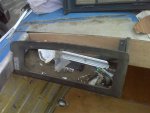
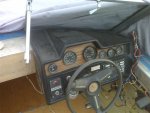
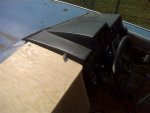
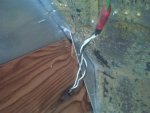
Man, you got that right. We redid the dash and transome peice with solid wood and the originals were mahogany covered with vinly.

And I don't see any reason why you couldn't use solid wood for the side panels.
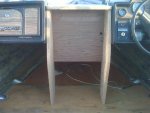
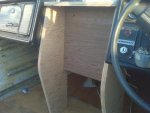
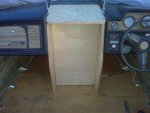
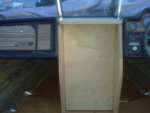
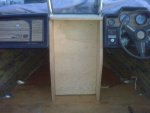
 

sprintst

Commander
Joined
Apr 18, 2009
Messages
2,066
Re: 77 Starcraft Holiday 18 i/o - rebuild with pics galore

I'm on vacation in FLA but still working on the boat in a round about way...

So far I've picked up a new bilge pump, bilge pump switch, bilge hose, ss bolts and screws 328 pc, 4200 silicone, Attwood stern light and plug in light base, Johnny Ray accessories terminals, 2" Reese coupler and waterproof stereo housing. I also bought a 4 D cell Maglight flashlight and mount for the suv and boat...both for lighting and for cracking heads in the event of an event

I picked all the stuff up at a combination of Basspro and Walmart for now. I'm going to check out Boaters World and Fore and Aft marine in Maderia Beach for other odds and ends.

I may also pickup the Moeller gas tank installation kit as well as anything else I can get back in luggage. Apparently I can get a Moeller 19 gal tank for 118 bucks in the BassPro catalog...at least 50 bucks cheaper than I've found most places.

I'll also order other odds and ends from iboats to suppost the forum.

I also stopped at West Marine in Orlando and bought a collection of lock nuts with vinyl in the threading well as another tube of 4200, SS bimini eye staps, and 1 inch Ancor cable straps to mount the cables under the gunnel wall.

I'm stimulating the economy all by myself...
__________________
 

Rickairmedic

Commander
Joined
Apr 24, 2009
Messages
2,576
Re: 77 Starcraft Holiday 18 i/o - rebuild with pics galore

I just used a sharp Razor knife on the seam seler on the bow before I started painting . I will be using gluvit on the inside as well and didnt figure removing the extra sealer outside would hurt anything.


Rick
 

sprintst

Commander
Joined
Apr 18, 2009
Messages
2,066
Re: 77 Starcraft Holiday 18 i/o - rebuild with pics galore

I was thinking of using a razor blade as well to pick some of that old crud, since it's now soft from the stripper, and fill with an extra quart of Gluvit as well.

Whoever gets this boat after me is going to shake his head at all the extra work I've done. Hopefully it will be appreciated...by one of my boys.

Picked up an Attwood wiring kit with odds and ends and shrink wrap cable, etc. I also picked up some more ss screws today. I should start doing a tab on the toal costs. It's like mosquito bites so far but I'm sure it will all add up.
 

Rickairmedic

Commander
Joined
Apr 24, 2009
Messages
2,576
Re: 77 Starcraft Holiday 18 i/o - rebuild with pics galore

Be carefully you wont be able to get those suit cases back to the plne :D.


Rick
 

sprintst

Commander
Joined
Apr 18, 2009
Messages
2,066
Re: 77 Starcraft Holiday 18 i/o - rebuild with pics galore

I'm buying extra duffle bags and may have to ship some separately :)
 

sprintst

Commander
Joined
Apr 18, 2009
Messages
2,066
Re: 77 Starcraft Holiday 18 i/o - rebuild with pics galore

Slowly back at it again. Did a bit more stripping and contact cement removal.

Next time I'll use MEK to remove the contact cement as it took waaay to long with this environmental junk.

I also replaced my winch with a new one that uses a strap. Most the nuts and bolts on the front half of the trailer have been replaced with stainless steel. I'll have some updated pics later this week.
 

Attachments

  • Aug 12 - 1 (Small).jpg
    Aug 12 - 1 (Small).jpg
    41.7 KB · Views: 2
  • Aug 12 - 2(Small).jpg
    Aug 12 - 2(Small).jpg
    48.5 KB · Views: 2
  • Aug 12-3 (Small).jpg
    Aug 12-3 (Small).jpg
    38 KB · Views: 2

sprintst

Commander
Joined
Apr 18, 2009
Messages
2,066
Re: 77 Starcraft Holiday 18 i/o - rebuild with pics galore

Here's some of my console area being rebuilt. I'll have to order some flange bolts to hold the windshield down. I may see if I can find someome locally to fabricate the dash and glovebox or I'll fix up what I have and see what I can do.

Here's a shot of the floor that been glassed with cloth and epoxied down. There's some epoxy that needs to be sanded flat before painting but it was my first shot at it it's ok I guess.
 

Attachments

  • Aug 12-4(Small).jpg
    Aug 12-4(Small).jpg
    37.3 KB · Views: 6
  • Aug 12-5(Small).jpg
    Aug 12-5(Small).jpg
    43.7 KB · Views: 6
  • Aug 12-6(Small).jpg
    Aug 12-6(Small).jpg
    42.3 KB · Views: 6
  • Aug 12-7(Small).jpg
    Aug 12-7(Small).jpg
    41 KB · Views: 6
  • Aug 12-8 (Small).jpg
    Aug 12-8 (Small).jpg
    28.6 KB · Views: 6

Rickairmedic

Commander
Joined
Apr 24, 2009
Messages
2,576
Re: 77 Starcraft Holiday 18 i/o - rebuild with pics galore

Sprintst good to see you back at it after your vacation :D.


Rick
 

sprintst

Commander
Joined
Apr 18, 2009
Messages
2,066
Re: 77 Starcraft Holiday 18 i/o - rebuild with pics galore

Just getting caught up on my reading for all the posts I've been following.

I'm buying by primer and bottom paint tomorrow...
 

sprintst

Commander
Joined
Apr 18, 2009
Messages
2,066
Re: 77 Starcraft Holiday 18 i/o - rebuild with pics galore

I'm going to pick the back end up with a forklift using some straps. The only part left to strip is the area under the bunks.

It's not all that heavy minus the engine but for the time being I'll putz with it with the engine in.

Cool boat dude... You are progressing at a crazy pace...
 

Andy in NY

Commander
Joined
Oct 25, 2007
Messages
2,109
Re: 77 Starcraft Holiday 18 i/o - rebuild with pics galore

I'm going to pick the back end up with a forklift using some straps. The only part left to strip is the area under the bunks.

It's not all that heavy minus the engine but for the time being I'll putz with it with the engine in.

Cool boat dude... You are progressing at a crazy pace...

so are you not doing the transom then?
 

JimbC

Chief Petty Officer
Joined
Jun 30, 2009
Messages
456
Re: 77 Starcraft Holiday 18 i/o - rebuild with pics galore

Man some of you guy's are going at these resto's like a full time job. :D I wish I had all the motivation y'all have. I can only last and hr or so, but it is hot and humid as hell here. Sprintst how much did that stripper stuff run you, that looks like the way I need to go. The heck with spending hours sanding.:eek: Also great job looks like you are right up top with the amount of detail you are putting into this rebuild, great work keep at it.
 

sprintst

Commander
Joined
Apr 18, 2009
Messages
2,066
Re: 77 Starcraft Holiday 18 i/o - rebuild with pics galore

Thanks for the kudos you crazy kids but I'm a lazy a** compared to some of you.

The stripper was about $60 a gallon shipped to me but I'll only need a 3 gallons. I sold 2 gallons to another dude at work stripping car panels. The might be an alternate product that washes with water like this one which I'll post for you which they sell at NAPA.

I used a 2.5 gallon per minute power washer but the 4 gallon would have got it first crack as it took multiple passes.

Here's some picks of the new stainless bolts, hitch and test fitting wood work.

I need to get at it... I've got my bottom paint and self etching primer but I'm waiting for the 2000 Interlux primer. Tomorrow I'll try to finish the stripping of the bow deck...or come close.
 

Attachments

  • IMG00182 (Small).jpg
    IMG00182 (Small).jpg
    37.5 KB · Views: 4
  • IMG00183 (Small).jpg
    IMG00183 (Small).jpg
    39.6 KB · Views: 4
  • IMG00184 (Small).jpg
    IMG00184 (Small).jpg
    42.8 KB · Views: 4
  • IMG00185 (Small).jpg
    IMG00185 (Small).jpg
    43.4 KB · Views: 4
  • IMG00186 (Small).jpg
    IMG00186 (Small).jpg
    45.2 KB · Views: 4

sprintst

Commander
Joined
Apr 18, 2009
Messages
2,066
Re: 77 Starcraft Holiday 18 i/o - rebuild with pics galore

Hey Andy... I'll be doing the transom too but I'm going to try to do as much as I can before it. I'll pull the engine after I have bottom paint, most of the topside and front deck and interior done. I'll save the rear end as another paint job as I'm trying to paint it bite size portions as epoxies want another coating in a very short period.

Notice the cloudy epoxy on the deck only after a few drops of rains. It's all sealed and will get another coat after sanding and washing but it will be under Interdeck or something at some point so no one will see it. :) It pi**ses me off to know it's there though. :)

When I finish this thing I'm driving to hang out with you guys and staying drunk for a week.
 

Attachments

  • IMG00181 (Small).jpg
    IMG00181 (Small).jpg
    34.2 KB · Views: 5
  • IMG00188 (Small).jpg
    IMG00188 (Small).jpg
    34.7 KB · Views: 5
  • IMG00189 (Small).jpg
    IMG00189 (Small).jpg
    29.6 KB · Views: 5
  • IMG00190 (Small).jpg
    IMG00190 (Small).jpg
    31.4 KB · Views: 5

sprintst

Commander
Joined
Apr 18, 2009
Messages
2,066
Re: 77 Starcraft Holiday 18 i/o - rebuild with pics galore

I took all the front bow hardware off including the windshield, horn, bow light, railings, etc.

I removed the rub rail insert and rub rail all the way to the bow cap but I can't get the bow cap off. Is there a trick to it or do I have to cut the bow cap off? There were 2 pop rivits on the bottom that I drilled out and the bow cap overlaps the aluminum rub rail guide.

I'm kind of at a standstill now until I can get the rub rails out.
 

Attachments

  • IMG00198 (Small).jpg
    IMG00198 (Small).jpg
    30 KB · Views: 3
  • IMG00197 (Small).jpg
    IMG00197 (Small).jpg
    39.2 KB · Views: 3
  • IMG00196 (Small).jpg
    IMG00196 (Small).jpg
    23.7 KB · Views: 3
  • IMG00200 (Small).jpg
    IMG00200 (Small).jpg
    37.4 KB · Views: 3
  • IMG00199 (Small).jpg
    IMG00199 (Small).jpg
    31.7 KB · Views: 3

wrfalpacas

Chief Petty Officer
Joined
May 1, 2009
Messages
486
Re: 77 Starcraft Holiday 18 i/o - rebuild with pics galore

The only way I know is to pry the upper surface up a little toget the tabs to slide over the top of the rubrail. I then bent it back by compressing it in a vice with soft jaws
 

sprintst

Commander
Joined
Apr 18, 2009
Messages
2,066
Re: 77 Starcraft Holiday 18 i/o - rebuild with pics galore

That's where I chickened out as I was scared to mash up the fore deck. I was doing to take a crack at cutting it off with a dremel wheel.

I was hoping to pull the innner rub rail out from under the cap but it won't budge.

Is there any more bolts in the inner rub rail under the bow cap? I can't see from the inside tip of the boat as there are wood supports there.
 

Attachments

  • IMG00193 (Small).jpg
    IMG00193 (Small).jpg
    36 KB · Views: 5

vegasphotoman

Lieutenant
Joined
Jul 13, 2009
Messages
1,411
Re: 77 Starcraft Holiday 18 i/o - rebuild with pics galore

TOOLS NEEDED to remove top half =

Hammer
Giant Prybar
Angle Grinder with cut off wheel (my favorite tool)
:eek:
LOL
Im sure there is something else holding it! in my experience if it is too hard to come off ya missed arivet or bolt somewhere, is it loose anywhere? if not it may have been glued or caulked together, maybye a heat gun to loosen it? shot in the dark.

I know with fiberglass boats there is usually a coating of fiberglass helping to keep the halves together (on the inside) that covers the holes made by the rub rail rivets as well.
 
Top