Volvo Penta 4.3 GL-J/SX-A Power Steering Actuator Leak Repair Tips and Advice

Aar0n

Cadet
Joined
Mar 24, 2016
Messages
24
Noobie here. I just bought my first boat, a used--but new to me :)--2008 Four Winns Horizon 180 from a local dealership. The boat is in excellent condition—nice and clean, including the motor, bilge, etc. Being in Utah and with winter just starting to loosen its grip, I haven’t even had it out of the garage yet. The boat has a Volvo Penta 4.3 GL-J and SX-A outdrive (I can provide more info if it's needed, I'm just not sure what exactly more might be needed).

Well, I finished reading the Volvo Penta owner’s manual about a week and just got around to checking all the fluids and walking through the other routine maintenance checks. The only thing that seemed amiss was the fact that the power steering reservoir was a little low—about a half an inch below the minimum marker. I got to thinking about it and came to the conclusion that there must be a leak somewhere, otherwise, why else would it be low? I checked the hoses and related connections running from the reservoir to the pump: clean. The pump itself: clean. The hose running from the pump to the actuator and related connections: clean. The return line to the cooler, the cooler itself and related connections: clean. The return line running from the cooler to the reservoir and connections: clean.

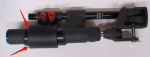
Then I checked actuator more thoroughly, including the cylinder on the left side near where the hoses connect. Sure enough, after running my fingers on the underside right where the cylinder goes into the housing, they came up with oil on them. So, I know where my leak is. Just to give you a better idea of where I'm talking about, this post by ThreeMileBayWaker here on iboats has images of what appears to be the same actuator I have with a leak in the same area as mine: http://forums.iboats.com/forum/engin...mal-pic-inside.

Interestingly enough, there is no oil residue on my hull underneath the area where the leak is at, nor anywhere else in the bilge. And it’s not like someone wiped it up to try to hide it, because there’s a layer of dust right under there that also would have been cleaned up had they done a wipe down. I find that a little baffling.

Anyways, I plan to try the repair myself.

I should mention that I’'m certainly no mechanic, but I’'m not exactly a stranger to getting my hands dirty, either--—I’'ve owned multiple Jeeps that I’'ve maintained and “built up” myself (e.g. suspension, steering some body work, axles and some driveline repair).

I found the following write-up, if you can call it that, on the removal and replacement:

http://www.justanswer.com/boat/86q14...-cylinder.html

I plan to use it as my main guide.

OK, here are the specific questions I’d be thrilled if you much more experienced folks than me would consider kindly helping me out with:

- Do you have any advice/tips/pointers/things to be mindful about the removal and installation of the actuator that you can share?

- Does the system need to be bled, like you would with a car braking system? If so, how would one go about doing that?

- Is this the correct part number: 21910902?

- This thing is pricey! My local authorized Four Winns dealer quoted me $750 for just the part. I found it online for about $620 with free shipping. Do any of you have any hot tips on where I can perhaps pick one up for less?

- I know the actuator isn'’t supposed to be serviceable, but I found this write-up here on iboats that intrigues me and there are a few hydraulics shops near me: http://forums.iboats.com/forum/engin...a-steering-ram. Have any of you others ever heard of this being done? Would you recommend taking the whole actuator into a local shop and seeing of they’ll give it a shot? Daleg70, if you’'re still around here on the forum and happen to see this, maybe you might share how it’'s worked out for you long term.

Thank you very much in advance for any insight or opinions you can offer a recovering landlubber.
 
Last edited:

Augoose

Lieutenant Junior Grade
Joined
Mar 21, 2010
Messages
1,220
I'm in the middle of the same repair. I wouldn't mess with leak stop solve-it-quick schemes....don't waste your money.
I ttied to find a rebuild kit on i boats but they are not available. With that said, there is a seller on ebay who carries a actuator rebuild kit for about $80.
I rebuilt mine last season and I'm waiting to reinstall in the next weekend or so.
The actuator removal is easy and so is the rebuild. As far as bleeding the system, you will absolutely need to bleed it after reinstall. I'll try to relocate instructions and post them later but essentially you are filling the system back up via the reservoir and then turning the wheel lock to lock several times in both directions. That should push the air through the lines and into the reservoir. It's a long process but when you no longer see bubbles in the reservoir you should be good to go.
 

Aar0n

Cadet
Joined
Mar 24, 2016
Messages
24
Thanks, Augoose. Good info. My actuator appears to be a little different from yours in appearance--I'm guessing it's a newer model--but I would imagine the basic design and function are pretty much the same. My leak also seems to be in a different spot--right where the cylinder passes through the housing on the left side. I can't figure out how to post a pic otherwise I would.

Your info on the aftermarket rebuild kits is intriguing. This actuator pictured for this kit looks like mine, but my part number isn't listed: https://www.freewebstore.org/VP-Outd..._11025887.aspx. Either way, the guy specifically points out that the kit won't repair a leak in the location of mine (his very bottom text in the picture).

I'm glad to hear the removal and install of the actuator is pretty smooth. It sounds like the only thing that might give me some trouble is the steering cable, as mr_carman007 experienced. In his pictures, it looks like once the large hex is undone, the actual cable is still somehow pressed into the actuator. You mentioned it took some force to get that out. I guess I just figured it was the hex that was attaching the cable to the actuator. Did you just grab onto the cable and pull it out or did you have to use pliers, vise grips, etc.? I don't want to damage anything. Also any trick to reinstalling that?

Lastly thanks for confirming the bleeding issue. If you have some instructions on that, that'd just be great.

Thanks again!
 
Last edited:

Aar0n

Cadet
Joined
Mar 24, 2016
Messages
24
Also, I'm assuming the answer is no since the motor and hence the pump won't be running, but fluid isn't going to come shooting out of the hoses when I break them, right?
 

Bondo

Moderator
Staff member
Joined
Apr 17, 2002
Messages
70,525
Ayuh,.... Welcome Aboard,.... There'll be some oil dripage, but not much,.....

The cable is Supposed to move freely inside the tube,...

Grease it well, when ya put it back together,....
 

Aar0n

Cadet
Joined
Mar 24, 2016
Messages
24
Thanks, Bondo. Just a standard marine grease or something special? Also, should I use loctite on the bolts when I reinstall?
 
Last edited:

Augoose

Lieutenant Junior Grade
Joined
Mar 21, 2010
Messages
1,220
Also, I'm assuming the answer is no since the motor and hence the pump won't be running, but fluid isn't going to come shooting out of the hoses when I break them, right?

No, fluid won't come shooting out - however be prepared with some rags and a bucket to let the system drain for a bit. Now when you move the piston AT ALL, fluid will shoot out - hence the glasses.
 

Aar0n

Cadet
Joined
Mar 24, 2016
Messages
24
No, fluid won't come shooting out - however be prepared with some rags and a bucket to let the system drain for a bit. Now when you move the piston AT ALL, fluid will shoot out - hence the glasses.

Got it. Thanks for the advice.
 

Augoose

Lieutenant Junior Grade
Joined
Mar 21, 2010
Messages
1,220
Aar0n,

Finally got around to installing the steering actuator. Since I could not locate a service manual which would provide any notes or instructions for install, please consider this as my disclaimer.....

So the rebuild kit came in from ebay over the winter and I installed it following his directions- here is a link -http://www.ebay.com/itm/Actuator-Repair-kit-Volvo-Penta-Power-Steering-3860726-3858128-3856716-/321818105948?hash=item4aedda985c. I know this isn't the kit you need necessarily, however the directions are likely the same.

The directions were pretty straight forward and it took about an hour or so. Beyond cleaning the heck out of the actuator inside and out, there was nothing else special I did. This kit did not come with the two O-rings you need for the high pressure and return lines back to the power steering pump! Be sure you order those separately!

First, I coated the steering cable with marine grease and slid it inside the steering actuator. The far end of the steering cable pushes all the way through the actuator and then locks into the clevis via a pin and cotter pin. I then put a couple of turns on the nut which holds the steering cable to the actuator just to keep it in place but didn't lock it down until later steps.

I then installed the actuator to the steering anchor. The actuator had two hard plastic bushings, top and bottom and those were the anchor points that the steering anchor mounting bolts screw into. The ebay kit also did not come with these - order them separately if you need them. The anchor bolts install from top and bottom and screw into the reservoir made by the bushings. I didn't not use any Loctite on my bolts since there were cotter pins, and not having the benefit of an installation manual to confirm, I thought it best not to use it since I didn't see any evidence of Loctite on the threads when I removed them.

Next I installed the pin which locks the steering arm to the clevis. This is the larger of the two pins. One end of the steering arm connects to the lower unit while the other end connects to the actuator via the clevis. Don't forget the cotter pin. I'd bring a couple extra in the boat with you when you drop the first two down inside the bilge.....

Now connect the high pressure and return lines on the left side of the actuator - careful not to cross thread....Be sure to use new O-rings for both lines.

Lock down the nut which holds the steering cable to the actuator and you are done with install and ready for bleeding.

With the engine off, fill up the power steering reservoir and have a helper slowly turn the steering wheel lock to lock time after time until ALL the air has worked its way out of the system. If you see what looks like foam, you still have air. Mine took about 7-10 minutes of turning the wheel back and forth. As the level drops, add more fluid. If the level drops significantly, have your helper stop turning the wheel while you fill it back up so you don't introduce more air into the system. Once you think you've got all the air out, cap the reservoir and start the engine. After it warms up a bit, slowly uncap the reservoir and check the level. If its good, keep turning the wheel lock to lock with the engine running - it should turn nice and smooth and you don't want any air bubbles. If you still have bubbles that won't go away, start looking around the system for leaks.
 

Aar0n

Cadet
Joined
Mar 24, 2016
Messages
24
Thanks, Augoose. Great info. Yesterday, I topped off the reservoir with VP power trim/steering fluid, pulled the boat out, hooked the hose up and started it in the driveway to get a better feel for the leak. I let it run for 20-30 minutes at about 1000RPM (as my VP manual says to do for an engine flush) turning the wheel lock to lock frequently. I don't think the leak is too bad after all. In fact, I discovered that as everything heated up, the leak seemed to all but eventually go away. I can only assume the normal operating heat is causing the seal to expand. (Does that seem logical to anyone else?) After I shut her down and let it sit for an hour or so, I noticed a small accumulation of oil again, which again, I assume seeped out as things cooled. After all that, the oil didn't seem to be down at all. Now I know my little driveway test isn't a great simulation of being out on the water, but it was encouraging enough that I may hold off on the repair until I get out on the water for a day (with a spare bottle of fluid or two) to see how much it leaks under normal use. If it's similar go my driveway test--primarily just seeping a little when the engine is running but cool and at cool down--I may see if I can get by without repairing this season and do it in a year or so. Now just to get some warmer weather...

Oh, I noticed that as I was turning the wheel lock to lock and watching the actuator, the whole unit moved slightly up and down+side to side a bit--maybe 1/2 an inch in total--like there was some play in the mount, however, it's solid enough that I can't just grab it and replicate the movement. I'm guessing this is by design, but does anyone know if that's normal or could I have something loose?
 
Last edited:

Augoose

Lieutenant Junior Grade
Joined
Mar 21, 2010
Messages
1,220
I would not wait on it for several reasons....the torn o-ring or cup seal that is allowing the leak will continue to fall apart until it no longer holds in any fluid at all- and that will happen at the most inopportune time. Also as it leaks, you have to deal with the oil in your bilge and that oil making it into the waterways. You are also potentially allowing air into the system when it leaks out.
Lastly, and most significantly, when it does fail completely you will be stranded unless you limp your boat back into the dock or you get towed. When mine failed, it was completely unexpected and went from no leak whatsoever to a full loss of steering and the power steering pump whining like it was dying. I couldn't remove the belt feeding the power steering unit and I didn't want to pay Seatow a kabillion dollars to tow me in, so I poured in a bottle of engine oil into the reservoir and hauled butt back to the dock. When I trailered my boat I then had to deal with the mess of oil and old ATF in the bilge.
Its rare you can control when your boat breaks down - however in this instance, you can prevent it by rebuilding your actuator now.
And yes, my actuator moves back and forth a bit as well when I turn.
 
Last edited:

Aar0n

Cadet
Joined
Mar 24, 2016
Messages
24
All good points. I wish a rebuild for mine in particular were simpler--I've contacted the seller of this (https://www.freewebstore.org/VP-Outdrives/Power_Steering_Actuator_Repair_Kit/p2086777_11025887.aspx) rebuild kit, and while he tried to make seals to replace those where my leak is coming from, he said they just didn't work right (usually got destroyed when putting it all back together). So, it's either tear it a part and hunt all over for some seals that *might* work, buy a used one (I don't think I dare), or shell out the $650 for a new one. Decisions, decisions.

Edit: I just realized the guy you bought from on eBay says he also has a kit for the newer style. There's a another good option. Thanks again for that link. I've reached out to see if his kit replaces the seal I need. You've been a great help. Thanks again.

Have you tested your rebuilt unit? Is it working out so far.
 
Last edited:

Aar0n

Cadet
Joined
Mar 24, 2016
Messages
24
No Title

I just figured out how to upload pictures--either I'm going blind or the add picture button just suddenly started showing up for me. Anyways, here's an image of my style actuator (not actually mine) with arrows indicating where my leak is at.
 

Attachments

  • photo240482.png
    photo240482.png
    425.6 KB · Views: 6

Aar0n

Cadet
Joined
Mar 24, 2016
Messages
24
Just a quick update: Nobody seems to make a fix for leaks in the area I'm dealing with. I figure there's got to be a reason. I've got one more avenue I'm trying, then I think it's back to considering the three options I listed above.
 

Bondo

Moderator
Staff member
Joined
Apr 17, 2002
Messages
70,525
Ayuh,.... I'd go for good used,.... or new,....

Those are listed everywhere ya look as "Non-serviceable" units,....

www.baumhydraulics.com will sell ya any seal for anything you can imagine,.... good folks,..... if ya wanta try the impossible,....
 

Augoose

Lieutenant Junior Grade
Joined
Mar 21, 2010
Messages
1,220
I'd pull the actuator and disassemble it to find the culprit seal. Like Bondo said, I'm sure somebody will carry the seals and O-rings you need.
 

Aar0n

Cadet
Joined
Mar 24, 2016
Messages
24
Just an update here for anyone who may be reading this thread searching for an answer to a similar problem they may be having--I ran the boat all summer with the existing power steering actuator and everything worked out fine. I kept a super close eye on my power steering fluid level and it didn't go down one bit. While there is still a light coating of oil on the shaft near the seal, it never built up enough to drip (I made a catch out of some bailing wire and a cleaned tuna can, which is as dry as it was when I attached it. I'll continue to keep a close eye on it and update this thread if anything changes. Thanks again, everyone, for your advice.
 

mikeneal

Senior Chief Petty Officer
Joined
Jan 28, 2004
Messages
710
I also have a sx and I had a slight leak, maybe a oz every oil change. My cylinder is in a terrible spot so limped it along. Then one day, when we had boated to destination for weekend it became giant gushing leak and it took uber ride to auto parts store and 3 gallons of ATF to get back home. That was fun to clean up. Just saying, your slight leak can change quickly. I was going to rebuild mine as Augoose did but my shaft was not pristine and that's what took seals out. Since I did t want to so it twice bite the bullet and got a decent deal on a nos one at marine surplus place.
 
Top