Steering cylinder leak- SX-M

Status
Not open for further replies.

Augoose

Lieutenant Junior Grade
Joined
Mar 21, 2010
Messages
1,220
All,
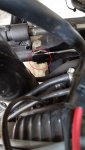
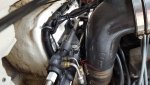
while out on the water last week, I determined that my 1999 VP 5.0 GL with SX-M developed a power steering fluid leak. The leak is originating from the bottom of the steering cylinder, I suspect due to a faulty rod seal. With the engine running, the leak is large enough where it has a pretty good stream or trickle to it - not just a drip.

Attached are photos of where the leak is coming from. Best I can tell, its coming directly from below the split pin beneath the bolt (see photo).

Leak 2.jpgLeak 1.jpg


Can anyone confirm the following for me?

1) Considering that it is a trickle/stream vs a slow drip, am I correct in assuming the rod seal has failed?
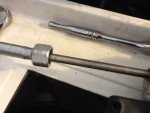
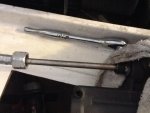
2) I'm considering purchasing a power steering actuator repair kit (3812269 3860883 3862210 386251). Anyone have experience with this kit?

Thanks!
 

Attachments

  • Leak 1.jpg
    Leak 1.jpg
    355.4 KB · Views: 36
  • Leak 2.jpg
    Leak 2.jpg
    215.4 KB · Views: 35
Last edited:

Augoose

Lieutenant Junior Grade
Joined
Mar 21, 2010
Messages
1,220
Update: So I decided it can't be any more "broke", so why not pull the cylinder actuator and see what its all about....

To remove the cylinder, I took the following steps:
1) Wear glasses and gloves and disconnect the battery from the starter
2) Remove the two high pressure hoses from the left side of the actuator- once removed place a rag over the ports to keep it from spraying you in the face when you move the cylinder
3) Drain the remaining power steering fluid from the cylinder actuator
4) Remove the split pin and connecting pin connecting the steering cable to the cylinder actuator
5) Remove the split pin and connecting pin connecting the actuator to the steering linkage which goes to the lower unit
6) Remove the steering cable from the left side of the actuator and pull it out
7) Remove the two split pins from the two main bolts which mounts the actuator to the transom assembly, then remove the bolts.

At this point the cylinder actuator will pull right out.

Working from the bench, I removed the smaller end of the actuator (on the right side of the photo above the broken u-seal) which housed the steering cable pin and the pin which connected the steering linkage from the outdrive. This part is threaded onto the cylinder rod and just unscrews. It needs to come off to get the washer, snap ring, nylon bushing and hydraulic U-seal off.

I don't know if it was the ONLY problem, but regardless, it was a problem - my u-seal was torn to bits and falling apart.

Question - does anyone know where to find a replacement u-seal and bushing? A search on the volvopentastore yielded nothing.

Thanks!
actuator cylinder.jpg Actuator cylinder 2.jpg
 
Last edited:

Fun Times

Moderator
Staff member
Joined
May 16, 2009
Messages
8,809
I recall another member has somewhat recently done the same as you with opening up the steering ram and was able repair it successfully with photos like yours.

As for finding new parts/seals, Volvo unfortunately doesn't offer them so either you'll have to look around and find something on your own or I just noticed this guy seems to have put a kit together and trying to sell them either in the link or on eBay too. http://www.freewebstore.org/VP-Outdrives/Power_Steering_Actuator_Repair_Kit/p2086777_11025887.aspx

Let us know, good luck.:)
 

Augoose

Lieutenant Junior Grade
Joined
Mar 21, 2010
Messages
1,220
Thanks Fun Times for the info- that thread was indeed helpful.

I discovered that my '99 SX-M has cylinder actuator part # 3858128. I had gotten stuck on another casting number on my actuator which threw me off for a bit. My actuator is an older version (1998 through 2005) of the one in the link you sent above.

Based on some searches, I believe I need this kit - Actuator Repair kit Volvo Penta Power Steering 3860726, 3858128, 3856716 which includes the rod seal and wiper seal.

I'll post an update once I have everything back together.
Thanks again
 

mr_carman007

Seaman Apprentice
Joined
Aug 9, 2015
Messages
30
I recall another member has somewhat recently done the same as you with opening up the steering ram and was able repair it successfully with photos like yours.

As for finding new parts/seals, Volvo unfortunately doesn't offer them so either you'll have to look around and find something on your own or I just noticed this guy seems to have put a kit together and trying to sell them either in the link or on eBay too. http://www.freewebstore.org/VP-Outdrives/Power_Steering_Actuator_Repair_Kit/p2086777_11025887.aspx

Let us know, good luck.:)


I just read the post you're talking about a couple days ago, that guy ended up going to a local hydraulic shop and they measured the piston and fitted a new seal on it for him. He put the pump back in and everything worked. Here is the post http://forums.iboats.com/forum/engi...rives/644451-leaking-volvo-penta-steering-ram
 

Augoose

Lieutenant Junior Grade
Joined
Mar 21, 2010
Messages
1,220
Thanks all. I found a seller on Ebay who, I think, has the correct kit for my project. I'm waiting on it to arrive and we'll see if it works for me.
Thanks!
 

mr_carman007

Seaman Apprentice
Joined
Aug 9, 2015
Messages
30
No Title

Augoose did you have any problems getting the steering rod cable off the cylinder? The exact same thing happened to me however my boat is sitting in my garage with the steering cylinder completely removed minus the steering rod cable which I can't get to disconnect
 

Attachments

  • photo232764.jpg
    photo232764.jpg
    213.2 KB · Views: 11
  • photo232765.jpg
    photo232765.jpg
    207 KB · Views: 11

Augoose

Lieutenant Junior Grade
Joined
Mar 21, 2010
Messages
1,220
I'm sorry Carman, I've been away from the forum for awhile. As best I can recall, the cable just pulled out, but it did take some force.
 

Augoose

Lieutenant Junior Grade
Joined
Mar 21, 2010
Messages
1,220
Finally got around to installing the steering actuator. Since I could not locate a service manual which would provide any notes or instructions for install, please consider this as my disclaimer.....

So the rebuild kit came in from ebay over the winter and I installed it following his directions- the link for that kit is posted above. The directions were pretty straight forward and it took about an hour or so. Beyond cleaning the heck out of the actuator inside and out, there was nothing else special I did. This kit did not come with the two O-rings you need for the high pressure and return lines back to the power steering pump! Be sure you order those separately!

First, I coated the steering cable with marine grease and slid it inside the steering actuator. The far end of the steering cable pushes all the way through the actuator and then locks into the clevis via a pin and cotter pin. I then put a couple of turns on the nut which holds the steering cable to the actuator just to keep it in place but didn't lock it down until later steps.

I then installed the actuator to the steering anchor. The actuator had two hard plastic bushings, top and bottom and those were the anchor points that the steering anchor mounting bolts screw into. The ebay kit also did not come with these - order them separately if you need them. The anchor bolts install from top and bottom and screw into the reservoir made by the bushings. I didn't not use any Loctite on my bolts since there were cotter pins, and not having the benefit of an installation manual to confirm, I thought it best not to use it since I didn't see any evidence of Loctite on the threads when I removed them.

Next I installed the pin which locks the steering arm to the clevis. This is the larger of the two pins. One end of the steering arm connects to the lower unit while the other end connects to the actuator via the clevis. Don't forget the cotter pin. I'd bring a couple extra in the boat with you when you drop the first two down inside the bilge.....

Now connect the high pressure and return lines on the left side of the actuator - careful not to cross thread....Be sure to use new O-rings for both lines.

Lock down the nut which holds the steering cable to the actuator and you are done with install and ready for bleeding.

With the engine off, fill up the power steering reservoir and have a helper slowly turn the steering wheel lock to lock time after time until ALL the air has worked its way out of the system. If you see what looks like foam, you still have air. Mine took about 7-10 minutes of turning the wheel back and forth. As the level drops, add more fluid. If the level drops significantly, have your helper stop turning the wheel while you fill it back up so you don't introduce more air into the system. Once you think you've got all the air out, cap the reservoir and start the engine. After it warms up a bit, slowly uncap the reservoir and check the level. If its good, keep turning the wheel lock to lock with the engine running - it should turn nice and smooth and you don't want any air bubbles. If you still have bubbles that won't go away, start looking around the system for leaks.

Augoose
 
Last edited:

mikeneal

Senior Chief Petty Officer
Joined
Jan 28, 2004
Messages
710
Augoose, I have the same boat and drive as you and recently got a steering ram leak, leaking rod seal. I removed the riser from both sides and still having terrible time getting to main pivot pin (larger one) out. Did you do it from the port side?
 

Augoose

Lieutenant Junior Grade
Joined
Mar 21, 2010
Messages
1,220
I removed the plastic cover and flame suppressor and reached over the top of the engine for the top (smaller) pin. For the larger one, I removed the fiberglass compartment dividers and laid down with my head, shoulders and arms passing through the port side (side opposite of pilot) storage opening. In other words, my head was next to the trim pump and my legs were somewhat sticking up in the air over the bench seat. I put a couple of dock bumpers on the floor in there to lay on.
Its very uncomfortable but you can get in there with your hands without having to remove the risers on either side. I recommend using some long hemostats to help your reach.
I ran my boat on muffs in the driveway for several minutes and had no leaks with the kit mentioned above off of Ebay. I plan on putting it in the water over the next couple of weeks to verify the seals hold under full stress. I did notice that the steering is MUCH smoother though.
Its funny (and unfortunate!) that whatever happens to my boat seems to happen to yours. The broken sun deck before and now the leaking steering actuator. Hopefully we don't experience anything else. How are your dash panels holding up? I did this to mine a year or two ago - http://forums.iboats.com/forum/boat...657719-dashboard-restoration-1999-chris-craft

Good luck!
 
Last edited:

boothkicker

Recruit
Joined
Jun 11, 2018
Messages
1
Good morning! Reviving an old thread here to see if I can get some guidance.

I have successfully removed my old steering actuator unit. I have the new one to install and can't get the steering cable rod to go through the guide tube. It seems that the guide collar/bushing on the end is too small for the end of the rod to push through. Any guidance on this? Thanks in advance!
 

GA_Boater

Honorary Moderator Emeritus
Joined
May 24, 2011
Messages
49,038
Good morning! Reviving an old thread here to see if I can get some guidance.

I have successfully removed my old steering actuator unit. I have the new one to install and can't get the steering cable rod to go through the guide tube. It seems that the guide collar/bushing on the end is too small for the end of the rod to push through. Any guidance on this? Thanks in advance!

Revivals are against our rules - You should read them. Start a new thread.
 
Status
Not open for further replies.
Top