88 Bayliner Trophy 1710 - wet foam and ...?

Status
Not open for further replies.

Arawak

Chief Petty Officer
Joined
Aug 27, 2010
Messages
486
Actually, I do have a photo. My buddy Steve has been following this thread and sounded a little disappointed that I hadn't updated recently. So, here is a shot of the current state of destruction, with one of the new transom layers sitting in place:

sean%2Bboat%2Bnew%2Btransom%2Bdesign.jpg
 

Corjen1

Lieutenant Junior Grade
Joined
Aug 24, 2013
Messages
1,237
Arawak, be careful making your transom thicker than what was there, if you do, make sure it will still fit between the hull and the aft wall of your splash well. I made mine too thick and it caused mine top to not fit like it should...
 
Last edited:

Arawak

Chief Petty Officer
Joined
Aug 27, 2010
Messages
486
That's good advice. I already made that particular mistake on my first rebuild project. :)

In this case the thickness will still be 1.5"; it's the width that I am increasing. Compare the photo above with the one in post #95 and you'll see what I mean.
 

Arawak

Chief Petty Officer
Joined
Aug 27, 2010
Messages
486
Welcome! Not sure I'm up for going out in the middle of Erie in a 17 footer, but maybe we can catch up at Long Point or Point Pelee :)
 

Arawak

Chief Petty Officer
Joined
Aug 27, 2010
Messages
486
Today was a grinding day. And we went to the dump. 350lbs of stringers and glass... the foam already went out.

I was hoping that I'd get all the grinding/sanding done, but the back gave out mid afternoon. I'd guess I have about 2-3 hours left. Then the transom will go it.

Dad and my daughter glued up the stringers with Titebond3 after school on Wednesday:

IMG_20141112_164845.jpg
 

Arawak

Chief Petty Officer
Joined
Aug 27, 2010
Messages
486
Been too busy to post this past week, but I did get the hull ground out and sanded. Yesterday Isabel and I went over and put in the first layer of the transom. As I mentioned earlier, there is a slight curve to the transom so I decided to put it in one 1/2" layer at a time rather than glue it up separately and hope i get it right. It's a bit more work, but gets the curve right and makes the first layer nice and tight to the hull.

IMG_2568.JPG


My 12yr old daughter Isabel was part of the whole exercise:

IMG_2548.JPG
 
Last edited:

Arawak

Chief Petty Officer
Joined
Aug 27, 2010
Messages
486
Here's a shot with the main stringers resting in place...

IMG_2563.JPG


Once we get all three layers of transom in place, the stringers will get bedded in place.
 
Last edited:

Arawak

Chief Petty Officer
Joined
Aug 27, 2010
Messages
486
Just got a reply from Nauticus, unfortunately there's no way to mount the Smart Tabs on my wonky transom :(

Unfortunately based on how the transom is configured they wont fit. The tab and the top bracket need to mount on the same surface.


Ah well. Asked for a return through Amazon which was quickly granted, so I'm only out the return shipping. So I need to decide whether I'm going to install trim tabs fairly soon, before I box the mount points back in.
 

fisheymikey

Chief Petty Officer
Joined
Jul 30, 2012
Messages
450
Looks great Arawak!!

is it 1/2 inch for the stringers or3/4 you are using?

im getting ready to attempt the build also your way ahead so im glad I have a fellow trophy guy doing the steps befor

keep on the good work
 

Arawak

Chief Petty Officer
Joined
Aug 27, 2010
Messages
486
is it 1/2 inch for the stringers or3/4 you are using?

The original stringers were 1" solid wood, so I'm using two layers of 1/2" fir ply. Should be stronger than before.

You may or may not want to extend your transom as I have. Honestly, it's probably fine the way it was before, but I just didn't like it. :)
 

fisheymikey

Chief Petty Officer
Joined
Jul 30, 2012
Messages
450
I hear ya!! I would have done the same! maybe ill send you some$$ for the template...lol

when you say FIR Plywood from homedepot is that the standard one.

my backround is carpentry and laminate is absolutely stronger. barely any flex
 

Arawak

Chief Petty Officer
Joined
Aug 27, 2010
Messages
486
I'd be happy to cut out the template on some paper and mail it, but I think yours will be slightly different in size.

For stringers and transom, IMO exterior douglas fir plywood G1S is fine. Look for 5 plies in 1/2" or 7 plies in 3/4". I usually pick through the sheets and find ones with fewest voids. Any voids on the bad side I fill. The Home Depot here in London Ontario tends to have decent quality plywood, not sure if it's the same nationwide.
 

fisheymikey

Chief Petty Officer
Joined
Jul 30, 2012
Messages
450
awesome! im pretty sure its the same. ill take some exterior dimensions to confirm...

why did you buy the 3/4... for the transom?

how much gallons of resin you are looking at... I know ur going with epoxy but I have a guy close by that is also willing to help me out.
he is offering me 200$ for 5 gallons iso poly resin.
 
Last edited:

Arawak

Chief Petty Officer
Joined
Aug 27, 2010
Messages
486
why did you buy the 3/4... for the transom?

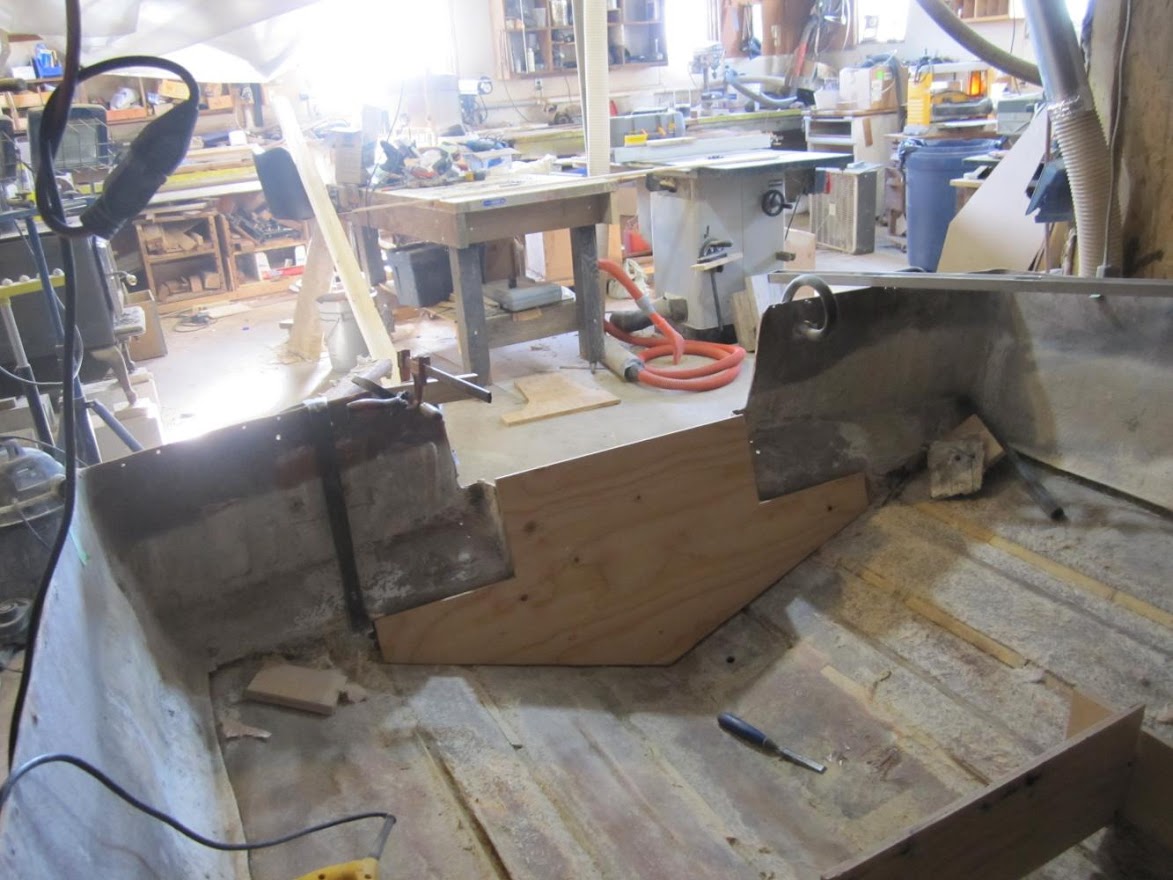
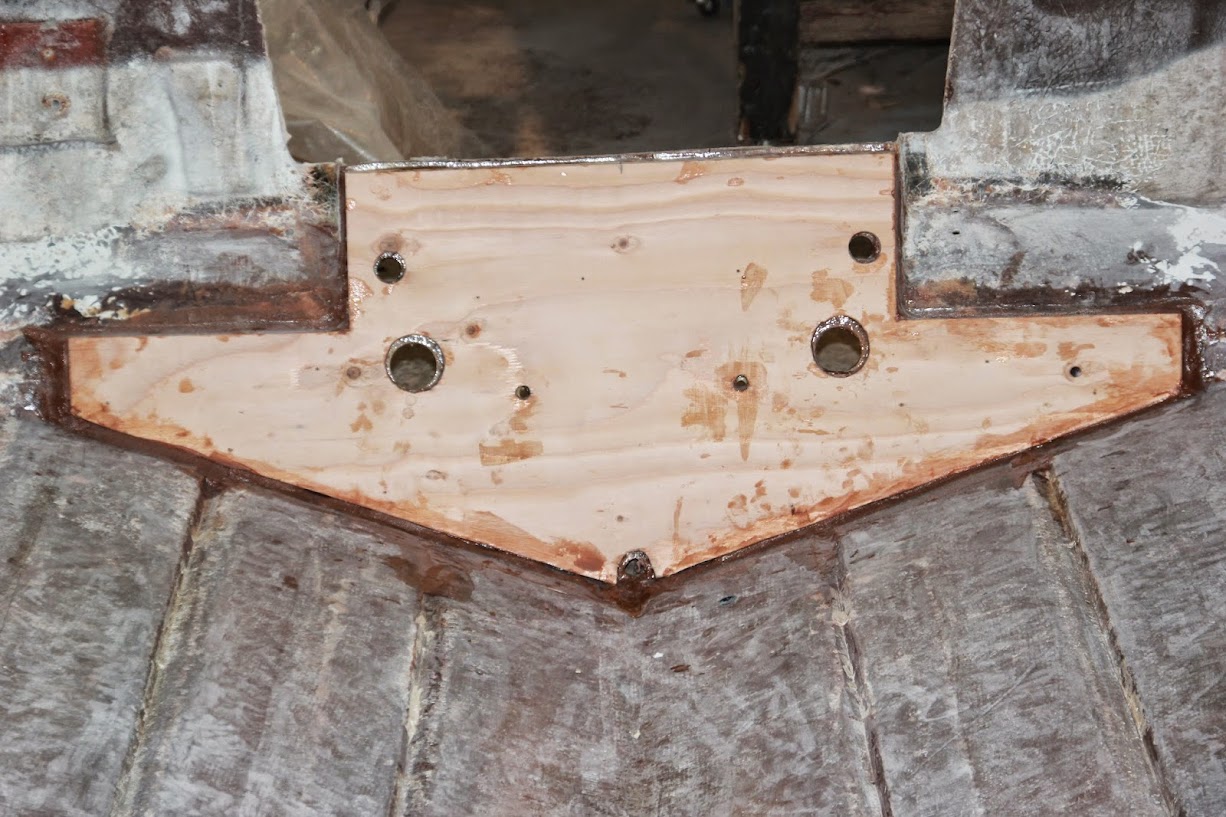
Originally I was going to just replace the transom as it was, so we made the new one with 2 layers of 3/4". Later, when I decided I wanted to make it wider, I had to go with 3 layers of 1/2" so I could bend it it. Anyone in the market for a 2'x3' piece of 1.5" plywood? :)

how much gallons of resin you are looking at... I know ur going with epoxy but I have a guy close by that is also willing to help me out.
he is offering me 200$ for 5 gallons iso poly resin.

$200 taxes included is okay. Plus tax is a bit expensive. I doubt that will be enough for you. I'd guess more like 10 gallons, but others here might have a better handle on that. I think you will need a little more resin than me if you use polyester, due to the CSM. Also your boat is bigger.

You'll also need to get some waxed resin for the final layer, or gelcoat it. Your laminating resin will be unwaxed and won't cure (good thing) until you put the final coat of waxed resin which will protect it from the air and allow it to cure.

I had 1.5 gallons of epoxy kicking around from last year, and I bought another 5.5 gallons from Noah's in Toronto. That *might* do it, depending on how good a job I do and how much glass I decide to put down on the hull. I did a *lot* of grinding and might build up the hull thickness a little. Glass, resin, wood flour, pigment, shipping, taxes all came to $725 CAD. I'm mostly using 8" 12oz double bias 45/45 tape without mat but you will want 1708. I still have some 1708 on hand which I will likely use on the transom and possibly on the hull to build up thickness.
 

Arawak

Chief Petty Officer
Joined
Aug 27, 2010
Messages
486
Yesterday I got the third and final layer of the transom in.

29PHm014RwdkfXHyzSTdWoqQK-owXfw1xx-Ezc0T154=w1283-h853-no


ol1s7AdZP0yP-PMtlZSHTpRguiivspSu6GErQJGJYu8=w1313-h675-no


zQtZ7JHKoA2gH_lknRM6fLdJoTEwEGvdsFPIoJxHgzo=w882-h580-no
 

Arawak

Chief Petty Officer
Joined
Aug 27, 2010
Messages
486
I have several small holes drilled through the transom, each with a wood screw pulling the new layer in tight to the previous layer. I use pieces of polyethylene vapour barrier between the hull and the bits of plywood that act as washers for the 3" wood screws. Epoxy doesn't stick to polyethylene, so any squeeze out is separated from the wood.

I find that the green coated deck screws are easy to remove from cured epoxy, but we (Dad) had trouble removing a couple of the brass coated ones we had kicking around for this project.

Wood stove has been keeping the shop at 20 degrees or above... I think that's around 70 degrees in old units. :) We got another face cord of hardwood delivered last week, which should see us through this project. Last year it set up fine in much cooler temps, so the only part I'm really concerned about heatwise is the foam pouring.

Tune in next week when our hero uses a hole saw to overdrill the transom holes and fill them with thickened epoxy prior to the glassing over.
 
Status
Not open for further replies.
Top