Aluminum 1977 Crestliner Rebuild Finally Underway

Status
Not open for further replies.

Patfromny

Lieutenant Junior Grade
Joined
Dec 2, 2012
Messages
1,197
Hello Guys
I brought my boat home from upstate in October to fix the transom and planned on it being a winter project. Well the hurricane and then the freezing cold winter pushed the task to an early spring redo. Instead of working on the boat I decided to do research on line as well as reading some of your threads here on iboats. I was amazed at what you all have accomplished as well as the stories and friendships that evolve during these threads. I also learned alot while reading them so it was a win win for me. I hope I get half the advice some of you have recieved.
Well the story behind my boat is that it was purchased new by my father and used on a small lake in the adirondakes. it was cared for and stored at the lake by their small marina. my father and I (I was about 12) replaced the floors a few years after we bought it. all wood on this boat was coated flake board if you can believe it. Aside from that the boat has been great.
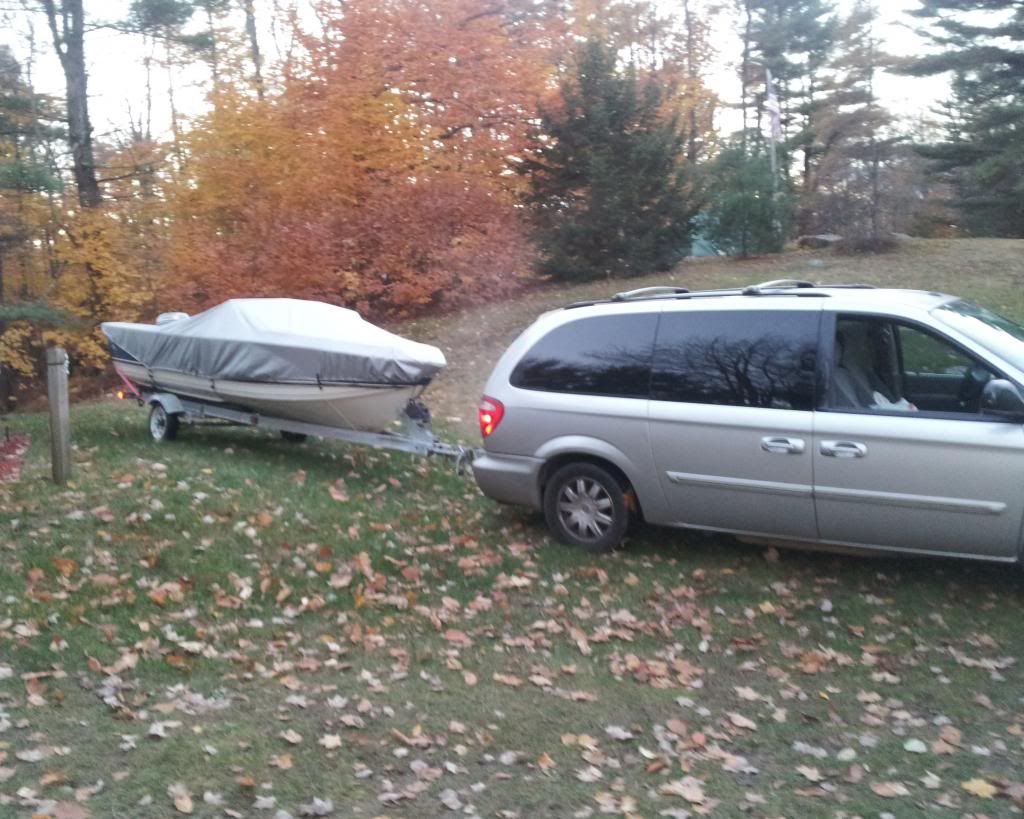
The boat is a 16' aluminum v-hull with a too small 35 hp on her. here is a pic of me picking here up


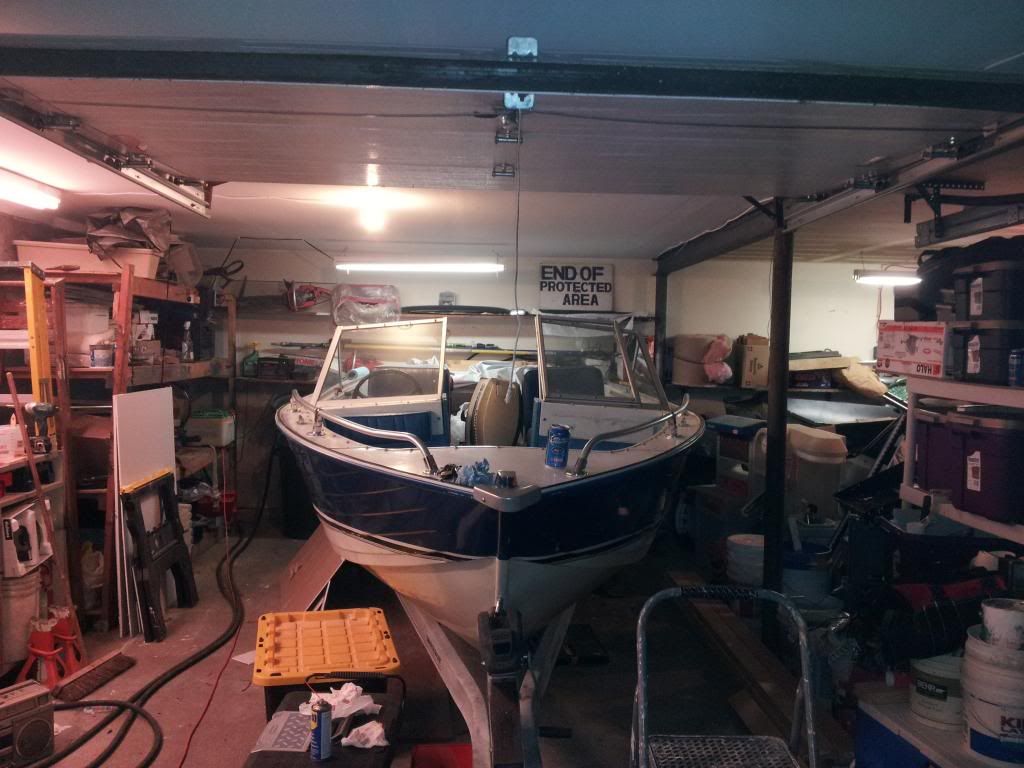
And me putting her away when I got home


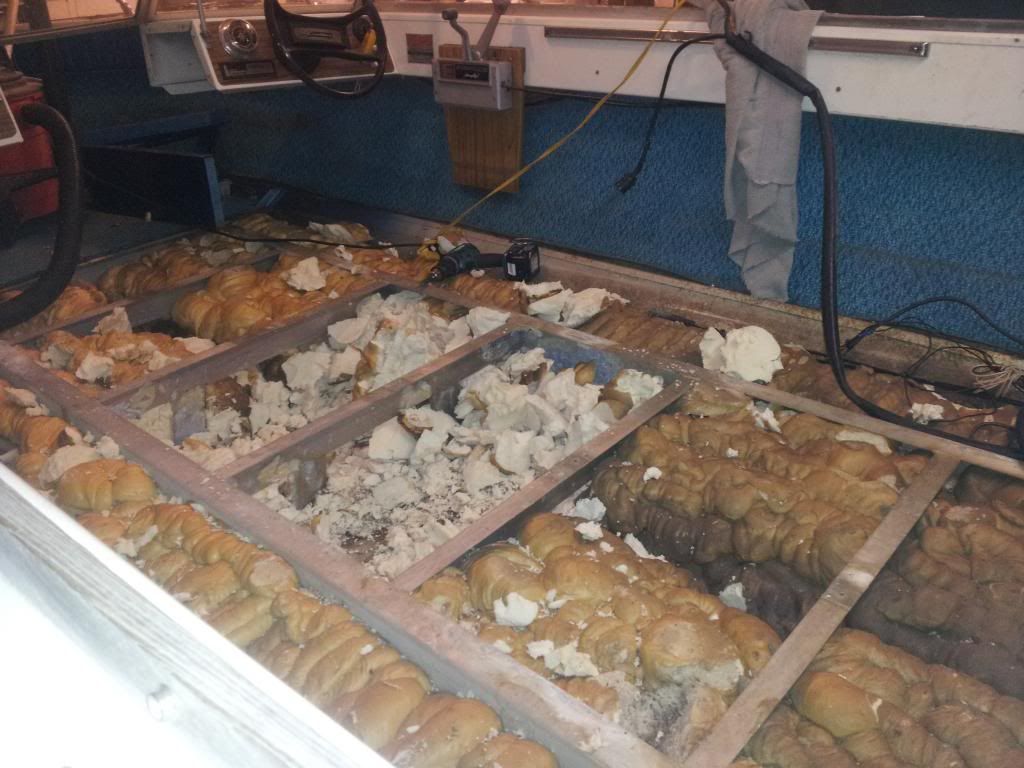
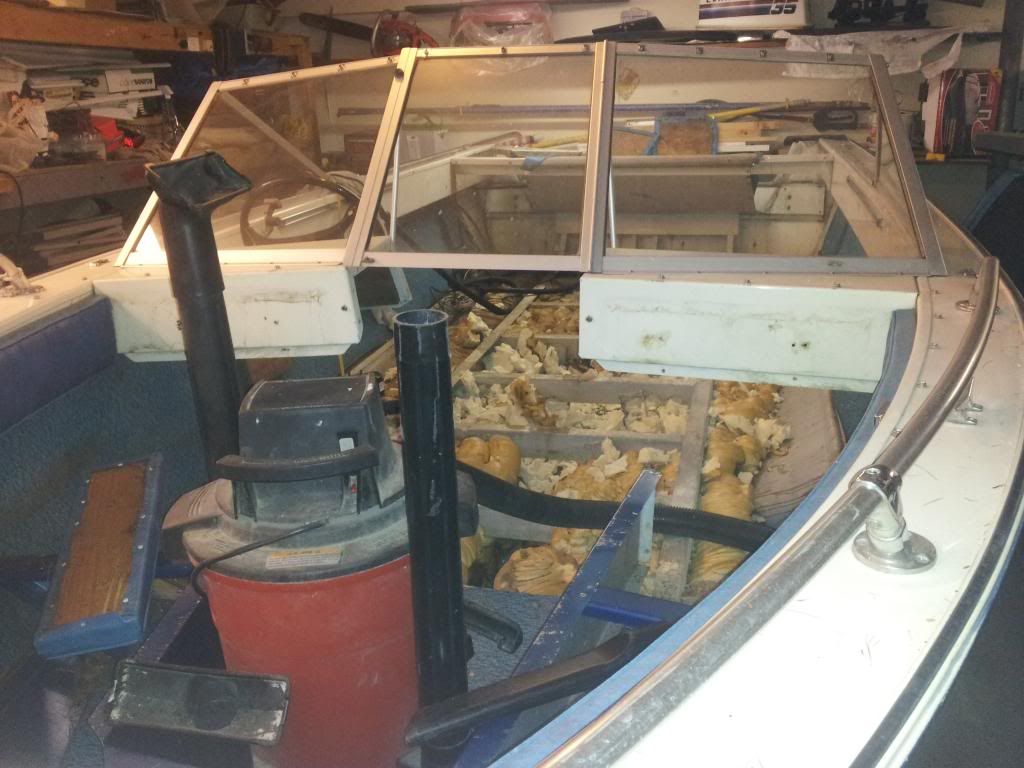
I decided to do the floors over and pull the water logged floatation out while it was torn apart. I also wanted to paint it but I think I'm running out of time for that so maybe next year. I have torn her apart and started on the rebuild process. I have the marine ply; lowes blue 1" isulation for floatation; Nautolex flooring; and I have already installed a new water pump; rebuilt the carb; and replaced the engine fuel lines and vacuum hoses (recirculating lines?). I'm sorry about the semi colon but my Laptop still has no coma button. My computor guy has flown the coop with my lap top and I'm using a loaner.

Here are som pics of my progess


[URL="http://s1297
[URL=http://s1297.photobucket.com/user/Patfromny/media/20130401_090529_zps365b691c.jpg.html"][IMG]http://i1297.photobucket.com/albums/ag37/Patfromny/20130401_090529_zps365b691c.jpg[/URL]

I hope these pics will show on my post. I'm a noob with this stuff. anyway. I have had some decent progress but have several questions of course.
I put the cart before the horse by starting the floatation without checking for leaks so I pullled it all out and filled her with water. I found one leak at the drain plug which brings me to my first few questions. I think this post is long enough so I will let you guys injest this first one and write a new post in a few hours. I have a rare day off and want to make some progress on the boat. thanks guys
 
Last edited by a moderator:

boatnut74

Lieutenant Commander
Joined
Aug 29, 2010
Messages
1,835
Re: 77 Crestliner Rebuild Finally Underway

Re: 77 Crestliner Rebuild Finally Underway

I see you have the dreaded pour in foam. Smart thinking putting the foam board back in. It sounds like you have most of the supplies you need already so you should be back on the water in no time.
 

Patfromny

Lieutenant Junior Grade
Joined
Dec 2, 2012
Messages
1,197
Re: 77 Crestliner Rebuild Finally Underway

Re: 77 Crestliner Rebuild Finally Underway

Yep Boatnut "had" the pour foam. Now the town has it via 7 leaf bags lol.
OK here goes. Took a break to start the questions guys. I filled the boat with water and found one leak as I said earlier. The leak is at the drain plug here

The flange on the bottom of the boat prevented me from seeing which rivit is leaking but I think it is one of the two circled in red or the one circled in blue

I was wondering if I should change all six rivits or if I should just relocate the plug to here using a tension style plug

The present plug is hard to get to when the floor is in and is a screw in type making matters worse. The spot I want to relocate is only one sheet thick so do I need to weld a tube in as well? I have a friend who owns a machine shop who could do this for me no problem. I just don"t know if it is advisable.
Lastly for now...Should I use Gluvit on the hull even though it didn't leak and appears to be in good shape? If so; how clean do I need to get the hull? I scrubbed it but you can still see the outline of the old pour foam

Thanks in advance. I truly appreciate any and all advice you guys can give
 

Patfromny

Lieutenant Junior Grade
Joined
Dec 2, 2012
Messages
1,197
Re: 77 Crestliner Rebuild Finally Underway

Re: 77 Crestliner Rebuild Finally Underway

Smart thinking putting the foam board back in. It sounds like you have most of the supplies you need already so you should be back on the water in no time.
I stole the Idea from one of Jas' rebuilds I think. Even stole the layout standing them up like he did Thanks Jas.


Patfromny

Lieutenant Junior Grade
Joined
Dec 2, 2012
Messages
1,197
Re: 77 Crestliner Rebuild Finally Underway

Re: 77 Crestliner Rebuild Finally Underway

Any ideas...suggestions guys?
 

Patfromny

Lieutenant Junior Grade
Joined
Dec 2, 2012
Messages
1,197
Hi all. I started this thread a few years back when I first started working on my boat. I had planned on posting after I was done working on her each night and document this whole build. Well, the winter was too cold for me to build through and I started in late april, as you can see above. We then invited friends up to the lake in early June. This gave me a bit more than a month to put her back together. No time for posting when you work till the weekend hours of the night. I got her done and we had a blast with her the whole summer. I did the rebuild in stages over the last couple of years. Structure and interior in 2013, Paint and body in 2014, and some engine work last year. This year is loose ends like rewiring, decals, and pinstripping as well as some trailer work. I put her back together much the same way as she was when new. I did take pics of the whole process in hopes of getting back to finishing this thread. I will attempt to present the build chronologically as best as I can. Here is what she looks like today
 

Patfromny

Lieutenant Junior Grade
Joined
Dec 2, 2012
Messages
1,197
Does anyone know how to change the name of the thread or if that'sounds even possible? I want to reflect that it is aluminium.
 

Patfromny

Lieutenant Junior Grade
Joined
Dec 2, 2012
Messages
1,197
Ok, so I kinda jumped to the flotation because I found the leak there and freaked out. Turned out to be nothing. The plug had a rubber gasket which I replaced and tightened it down. Apparently, the gasket wasn't really enough to form a water tight seal. A friend of mine suggested plumbers tape on the threads of the plug and the leak went away. Three seasons now and not a drop of water. Here are a few pics of the old transom before and after I took it out


It was a bear to remove. I had to cut 140 or so rivets and take out both side panels that are the sides of the splash well. There was also a cap below the anodized transom molding that was 3 pieces of heavy guage aluminum C channel welded together in the shape of the transom dip. I had to break the weld on one side to remove, then I cut 4 inches of the gunnel (gunwale?) And bent it back to get the soggy, multi piece transom out.
 
Last edited:

Patfromny

Lieutenant Junior Grade
Joined
Dec 2, 2012
Messages
1,197
The transom was 1 1/4" thick so AMF decided that 2 half inch pieces of ply with a quarter inch piece thrown in front of them (1/4" wasn't glued) would be good enough. Geez, really? I also found the main reason for the transom rotting. The gunnel ends about a half inch before the transom track and outer skin. The gunnel acts like a gutter since, for some reason my rub rail is on top of the gunnel, and channels all the water down to the stern. It exits the gunnel and pours into the back of the boat and right onto the transom. Here is a sideways pic of the gunnel, rub rail, gutter configuration.

You can see the end cap there that covered the gap but it doesn't fit perfectly so it didn't stop any water from entering the boat.
This happened for most of the boats life. We had a three piece cover that snapped around the interior but left the gunnel exposed. I have since gone with a one piece cover to stop this from happening.
 

Patfromny

Lieutenant Junior Grade
Joined
Dec 2, 2012
Messages
1,197
Here are some reference photos of the splash well area. You can see the funky c channel in the second pick laying in the splash well. It was thicker on one side and I was afraid I screwed myself when I broke the weld. I luckily broke it clean enough that we were able to reweld. Also in the same photo you can see the superior wiring job complete with wire nuts. You can see two about six inches apart on the same wire. If memory serves, there were 2 more within a foot of these two up under the gunnel. What you can't see is the 3 feet of extra wire spooled up just below the lower wire nut. Amazing but it never gave us a problem. Not sure if it was the small marina or possibly my dad who did the pro type work. Lol.


Patfromny

Lieutenant Junior Grade
Joined
Dec 2, 2012
Messages
1,197
Thanks ondarvr, I guess I was typing when you posted and missed it. I hate not finishing things and this thread always ate at me while I was lurking here reading others progress. I am really happy with the way she turned out and want a record of my work that I can reread in a few years.
 

Patfromny

Lieutenant Junior Grade
Joined
Dec 2, 2012
Messages
1,197
Throughout the tear down I was amazed at how well the boat was built. The transom alone had the anodized trim, then an alum. Cap, then the C channel (which was also welded to the outer transom skin on each side), then the transom wood. That's why it shocked me to find the 2 half inch plus one quarter inch configuration for the transom. Everything wood was 2nd rate work imo. Everything wood except for the transom and a bow bulkhead was made of flake board coated on one side and the transom was not laminated. The flake board floor lasted 3 yrs if that. The console supports did last 30 years but they were falling apart and the boat had been out of the water and stored inside for 3 yrs prior to the rebuild. Still doesn't sound like a good idea even if they did last.
 

Patfromny

Lieutenant Junior Grade
Joined
Dec 2, 2012
Messages
1,197
I built an engine stand from the plans I found here on iboats and if anyone in the future is doing so I would recommend you buy 4 Castors that swivel. As you can see I have a stuffed full garage with work stuff and my abandoned firebird project (can't afford to finish right now). I have a space about as big as the stand to stuff it into and is really too much work maneuvering it into place without the four swivels. Sometimes you should pay the extra two dollars to get it right. I am a real thrifty type and sometimes I over do it. I would definitely get four swivels and make two locking so it will remain relatively in place while working on the engine.


Patfromny

Lieutenant Junior Grade
Joined
Dec 2, 2012
Messages
1,197
I then started on ripping out the spray in flotation. The bottom two inches or so were saturated. The boat hadn't seen water of any kind in 3 yrs. It was stored in a boat storage building. Wondering if there was any evaporation? I figure there had to be some. Makes me wonder how much more water was trapped in the foam while we were using the boat.


There were also several mouse condominiums in the foam. The last few years of use, the shavings from the mice digging clogged the bilge pump constantly. I always thought it was just the foam breaking apart from age. No mice were inside the boat while I dug out the foam. I guess they ditched sometime during the 4 hrs trip home. Pretty happy about that. I had an escape plan ready if one popped out while I was demoing their home. I also placed several traps around the garage in case they might have escaped after the trip. Needless to say, the mouse occupation of the late 90's early 00's made for an extra special odor when combined with the soggy foam. I refer to this stage of the rebuild as The Dark Times.
 

Patfromny

Lieutenant Junior Grade
Joined
Dec 2, 2012
Messages
1,197
The foam came out easier than I thought it would. Not easy, but easier than expected. I used a five in one tool and a wonder bar. I would stab a 3 inch section with the five in one tool the length of each support box and then down the sides of each box. I would then come back with the wonder bar and pry. Pop, the section would for the most part pop out. Sometimes it would be a struggle but I found the 3 to 4 inch thick section was the right size so that I was making progress without losing any teeth from prying too hard. I had a ton of leaf bags that my town used to supply. I have a landscaper now so the bags had been serving no real purpose other than taking up space on a shelf. They were perfect for throwing away the foam. Larger than a contractor bag and thin enough to tie easily. The only problem was that they are clear so I couldn't put them on the curb. I had to bring them to the dump and pay to throw away water. I thought that was funny.3/4 of the weight had to have been water.
 

Patfromny

Lieutenant Junior Grade
Joined
Dec 2, 2012
Messages
1,197
Things started looking up once the foam was gone and the hull was scrubbed out. The one thing noone mentioned in these build threads was how long that foam sticks around. I am still finding little pieces in my garage. So after washing out the hull in some really cold weather I put the space heater inside and let it dry for the day, checking every few hours to make sure nothing was burning. I also cleaned the transom channel at the same time. I started on the foam and realized I hadn't done a leak test. Pull out all the foam. Rewet the dried hull. Found the leak I mentioned. This was April 22nd and it is about then that we made our early June plans to bring friends and the boat up. I was confident I had plenty of time to finish this. I mean, the tear down only took a few days. Yeah, right.
 

Patfromny

Lieutenant Junior Grade
Joined
Dec 2, 2012
Messages
1,197
So I start with the flotation, again. I started in the bow thinking it was late by the time the hull was dry and the bow section is small so I can get it done quick. Two nights later it was done. Lol. The measurements to stand up the sheets were too drastic and hard to measure down into the bottom of the hull. I scratched my head and decided that laying them down would be easier to figure out. I think it came out nice.


Status
Not open for further replies.
Top