1989 Chaparral Transom Repair

rad1026

Chief Petty Officer
Joined
May 1, 2006
Messages
443
No Title

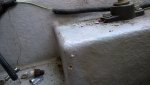
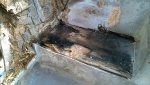
What I am calling a stringer is not really a stringer is it? Because it does not continue from the front of the engine mount through to the bulkhead.

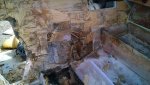
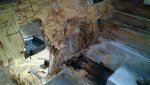
The boat had carpet glued down to the floor which I have removed. I don't think I want to put carpet back down. I think I would rather do some type of two part epoxy non-skid paint. If anyone has any suggestions on that I would welcome the information.

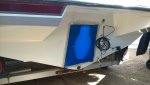
I also took a picture of the back of the boat so you can see how it is designed. Any thoughts are appreciated. Woodonglass is saying Polyester resin will be more then adequate for the transom repair. Can you expand on that a little please. Tell me more about the structure and the design and why the polyester will be adequate. Thanks for the help. If you all agree with my initial cutting assessment I will get to work on that and get back with results.
 

Attachments

  • photo238416.jpg
    photo238416.jpg
    184.3 KB · Views: 7
  • photo238417.jpg
    photo238417.jpg
    191.7 KB · Views: 6

JASinIL2006

Vice Admiral
Joined
Feb 10, 2012
Messages
5,548
I don't want to put words in Wood's mouth, but I think he is saying polyester resin is probably sufficient because it looks like your boat probably was built using poly resin and fiberglass. There are advantages to using vinylester or epoxy, but there is a decent jump in cost. I'm not sure it makes a lot of sense to spend the extra money when most of the boat is polyester fiberglass already.
 

tpenfield

Moderator
Staff member
Joined
Jul 18, 2011
Messages
17,711
A few comments based on what you have so far . . .

The engine 'pads' are probably made from many layers of plywood glue together. sometimes a boat builder will also use 2x4 lumber or similar along with plywood to make bigger shapes. you won't exactly know until you dog into it.

Often the wood components of a boat are fastened together and then fiberglassed into the hull. This means that if the wood gets wet in one area, it can spread to other areas through wood's water absorbing abilities. Bulkheads and transoms are a common source of problems as that is often where stringers are joined. So, if you have water (wet wood) in one area, you may want to check the things that are connected to it. You may also find that areas low in the structure are the most wet, as water will settle that way.

You may be able to see what type of resin was used in your boat by checking the Internet or even Chaparral's web site directly for legacy information on their boats construction. sometimes there is enough information in old product brochures, etc. that can give you an idea of the materials used.

As far as resins, you have 3 basic choices Polyester, Vinyl Ester, Epoxy. Polyester sets up fairly quickly, is the least expensive. Epoxy is the most expensive and really best for bonding applications and not structural strength. Vinyl ester is similar to Polyester, but has a longer open time and better adhesion than poly resin. I have used vinyl ester resin on my past repair projects because it gives you more time to work before it sets. VE has the worst fumes by far, so a respirator is necessary. VE is about 50% more $$$ than poly, and epoxy is about 5X poly.

The best thing to do is figure out all the areas that have high moisture and plan out your work from there.
 
Last edited:

rad1026

Chief Petty Officer
Joined
May 1, 2006
Messages
443
Thanks for the replies. Are there any thoughts on how I should go about the engine mount and how I should go about determining the extent of water damage?
 

alldodge

Moderator
Staff member
Joined
Mar 8, 2009
Messages
40,756
Suggest measuring the dimensions of the current engine support, as far as height, width and location. Then start digging and cutting into the wood and glass, keep digging until you reach dry wood. It could stay right with the engine mount, but could continue on throughout the hull. As tpenfiled said, you just got to dig in and look.

One of the best tools I used was a oscillating tool with a bi-metal blade
 

tpenfield

Moderator
Staff member
Joined
Jul 18, 2011
Messages
17,711
Google "fiberglassatlanta 1988 Chaparral 210" . . .

They have a bunch of photos about a 'rear end' repair on a boat similar to yours. Based on some of the pictures, you might get a big surprise when you cut into the transom. Looks like it may be 2 layers of plywood , one layer extends to the outer edge of the transom and the inner layer only extends out near where the stringers meet the transom.
 
Last edited:

tpenfield

Moderator
Staff member
Joined
Jul 18, 2011
Messages
17,711
oh wow, that is exactly how my boat is constructed. Ouch.

Yes, but at least you have some pictorial on how the back end is constructed. That is more help than many folks get. :thumb:
 

rad1026

Chief Petty Officer
Joined
May 1, 2006
Messages
443
Yeah, I will get over the shock. It looks like the flooring has to be stripped back to allow access to the full width of the transom. I'm sure I will have a ton of questions as I dig in to it.
 

rad1026

Chief Petty Officer
Joined
May 1, 2006
Messages
443
No Title

I got back in to it this weekend. I had to pull up the decking to get to the bottom of the transom. I think its time to get the oscillating tool and cut the transom wood in to squares. It is slow going with a chisel. Bad news is, looks like both engine mounts will need to be replaced. Good news is, as far as I can tell on the port side, looks like I only need to go back to the bulkhead. Can I encapsulate the new engine mounts so they are not wood on wood to the stringer? WOG I'm still a little confused about what you said in post #19 that my transom is only the centralized portion and does Not run the entire width of the boat. On the fiberglassatlanta web site tpenfield directed me to they removed all wood out to the edge of the transom.
 

Attachments

  • photo238802.jpg
    photo238802.jpg
    279.1 KB · Views: 16
  • photo238803.jpg
    photo238803.jpg
    271.2 KB · Views: 10
  • photo238804.jpg
    photo238804.jpg
    264.3 KB · Views: 10

alldodge

Moderator
Staff member
Joined
Mar 8, 2009
Messages
40,756
Your making good progress. The oscillating tool is slow going, I used the half moons most the time. There is a guy on OSO (Glass Dave) that has two of them and loads one with a half moon and the other with a straight blade. But Dave does this for a living. Ever think about a skill saw? Just need to make sure the depth is set correctly.

fetch
 

tpenfield

Moderator
Staff member
Joined
Jul 18, 2011
Messages
17,711
I got back in to it this weekend. I had to pull up the decking to get to the bottom of the transom. I think its time to get the oscillating tool and cut the transom wood in to squares. It is slow going with a chisel. Bad news is, looks like both engine mounts will need to be replaced. Good news is, as far as I can tell on the port side, looks like I only need to go back to the bulkhead. Can I encapsulate the new engine mounts so they are not wood on wood to the stringer? WOG I'm still a little confused about what you said in post #19 that my transom is only the centralized portion and does Not run the entire width of the boat. On the fiberglassatlanta web site tpenfield directed me to they removed all wood out to the edge of the transom.

I think WoG's comment was nullified by the discovery made on the 'Atlanta' site. Prior to that it sure looked like the transom was localized and did not span the width of the boat.
 

rad1026

Chief Petty Officer
Joined
May 1, 2006
Messages
443
I tried the skill saw but I had chiseled so many pieces out prior to trying that I didn't have a very even surface to work with and so I went back to my die grinder with a little 4" wood blade on it. That has actually worked pretty well for getting back in the corners.

I was hoping you would say that tpenfield. I would hate to think I'm doing more then I need to. I spent a lot of time Saturday still poking around and not really getting serious. I was still convinced my port side engine mount was good and I just did not want to cut the decking back. When I finally got serious on Sunday I made pretty good progress. That was about 3 hours of work. I'm hoping I can get the rest of it out this weekend.

I'm kind of anxious to see how the motor mounts are built up. I haven't torn back the taller structure yet. Are they typically solid wood or just framed in? I'm wondering if I should leave the outside shell and use it to poor Arjay or Seacast for new motor mounts. Any thoughts there?
 

drewm3i

Petty Officer 1st Class
Joined
Dec 31, 1969
Messages
280
I'm kind of anxious to see how the motor mounts are built up. I haven't torn back the taller structure yet. Are they typically solid wood or just framed in? I'm wondering if I should leave the outside shell and use it to poor Arjay or Seacast for new motor mounts. Any thoughts there?

That would work just fine, but Chap doesn't use thick skins, so you may want to build them up a little bit more.
 

rad1026

Chief Petty Officer
Joined
May 1, 2006
Messages
443
I have been reading a lot and watching videos from firscoboater and I have a couple questions. When firscoboater laminated the plywood together he used LP construction glue. I noticed in my demolition that my transom has a layer of fiberglass between the plywood layers. After he laminated the layers together he waterproofed with polyester resin then encased in CSM and polyester resin. I am seeing a combination that some people recommend here called the old timers wood seal method using linseed oil, mineral spirits and varnish. Do you use the old timers seal and then encase in CSM and resin?
 

JASinIL2006

Vice Admiral
Joined
Feb 10, 2012
Messages
5,548
You don't need to use anything before you encapsulate with resin and fiberglass. Indeed, if you do, it might interfere with the bonding between the resin/fiberglass and the wood. You should coat the wood with resin before glassing it, and allow the resin to really soak in. That should be good enough.

As for gluing together the two pieces, you can use resin and a layer of CSM, you can use PL construction adhesive, or you can use Titebond III or some other water resistant glue. If you use PL, you have to allow the adhesive to cure at least 72 hours before you glass, or the outgassing of the adhesive can cause bubbles in the fiberglass. I used Titebond III and it worked great.

Good luck!
 

alldodge

Moderator
Staff member
Joined
Mar 8, 2009
Messages
40,756
I would not use anything with oil in it and then attempt to cover with glass. I used CSM and resin between two layers of 3/4 plywood. Wanted to use corebond between outer skin and plywood but corebond indicated it should not be used with vinyl ester resin (what I was using), so I mixed up some PB and used it. Then covered with 1708 and vinyl and finished with 1708 and epoxy resin which included the stringers.
 

rad1026

Chief Petty Officer
Joined
May 1, 2006
Messages
443
yeah, okay that's why I asked. I saw that waterproofing formula and I was wondering what the application was. So Alldodge, you did put CSM between your two layers, what made you decide to do that instead of just gluing together? And are you saying you covered your transom in 1708 and vinyl before finishing it with another layer of 1708 and epoxy? Or did you use epoxy for only the fillet? Give me a little more detail on that if you could please and why you decided to mix the vinyl and the epoxy layers.
 

alldodge

Moderator
Staff member
Joined
Mar 8, 2009
Messages
40,756
I used CSM and vinyl ester (VE) resin between the plys. Reason was the resin would penetrate better then adhesive, both iboats and OSO agreed

Was using VE resin with caposil and CSM chopped up to make PB to install the wood to hull

Once dried, removed clamps mixed more PB to fill edges around the wood and transom sides/bottom.

Laid a couple layers of 1708 using VE resin.

Finished using 1708 and epoxy resin on transom and stringers.

Epoxy will stick to VE or PE but they will not stick to epoxy. Used epoxy to make it stronger, in hind sight I kind of wished I used all epoxy. Issues are longer drying times and if it gets fully dry it will blush and that needs to be removed to add another coat
 

Woodonglass

Supreme Mariner
Joined
Dec 29, 2009
Messages
25,924
Ok based on your new pics of the transom demolition it appears that the stern was constructed by a full sheet of 3/4" plywood running the full width of the stern and then they built up the central portion of the transom at the keyhole to accommodate the requirements for the mounting of the outdrive. Is this correct? If so the sections to the right and left of the center portion are there to support the stern and for structural purposes (Tow Eyes, Boarding Ladders etc...) but again the Main Structure IS the center section.. You should round then corners of this section to facilitate the laying of the glass over the corners making for much stonger tabbing. Or you could leave them square an use PB to cove the edges. Either way will work. I use TiteBond III wood glue to glue the plywood together. It's waterproof once cured and won't delaminate. You can use all of the above mentioned methods. No sealer required or recommended. The resin and glass will do the job. Just make sure to always pre-drill and coat the holes and screws/bolts with sealant when attaching hardware to the transom in the future.
 
Last edited:
Top