Underskining toon ?

Jeep Man

Commander
Joined
Oct 17, 2008
Messages
2,803
Re: Underskining toon ?

question: I get the sheating for under the deck, but do you have to also Sheat the angle between the toons and the deck? that is where it gets tricky, making htat angle. maybe you could opt out of that part, if your not too mechanically inclined??

Make a template out of cardboard and transfer the size to the finish sheet.
 

seldomseen

Cadet
Joined
May 15, 2006
Messages
29
Re: Underskining toon ?

IMUSS53 when you start fastning the skin start at the rear and overlap as you go forward
 

chasmo

Seaman Apprentice
Joined
Aug 29, 2011
Messages
32
Re: Underskining toon ?

That 1/8" fiberglass sheeting is very, very strong and does not like drill bits or saw blades. We used it for large generator coil slot insulation. If i were sheathing the underside I would use large dia flanged pop rivets. More work but thats how airplanes are build. Get deming drills used for fiberglass work, pre-drill the panels including your overlap.
 

ressless1

Cadet
Joined
Aug 16, 2011
Messages
12
Re: Underskining toon ?

What I did:

I used two sheets of 4 feet by 10 feet 5052 aluminum. I choose 5052 because I understand it is more resistant to corrosion and is stiffer than the readily available 3003. I called several local shops and got a three prices from $115 a sheet to $195 a sheet, with the best price from the smallest shop.

Cost:

2 sheets .063 thickness, 5052 4 x 10 aluminum $230 plus tx.

The shop charged me $16 for 8 cuts.

100 screws at $35. They are stainless steel, with a washer, a neoprene washer and they are coated with a coating to resist seizing and corrosion. Tot 1 ? inches with about 5/8 of threads. I like the coating because I found research showing stainless steel, into aluminum, can promote corrosion especially in salt water, and a coating will help resist it. http://www.finishing.com/271/67.shtml

I ended up with 3 sheets 57? x 48?, 1 sheet 48? x 32?, 2 side pieces 48? x 6?, and 4 side pieces 57? x 4?. I used a jig saw to cut 2" off the two 6" pieces, so all side pieces are 4" tall.

I weighed the aluminum, total 68 pounds, and the 98 screws, less than two pounds. So total weight increase 70 pounds.

I cut a 2? x 2? stringer to fit between the toons and used a couple blocks to hold the sheets in place while I used the drill to put the screws in place. I have not decided about under skinning the final two front feet.

Before putting the side pieces up, I have decided to have a 1 inch 75 degree bend put in them, so the ? gap at each side will be covered up. I have watched the water under the boat at speed, and the water hits in the center, but then is deflected to the sides, so I want the gap filled.

I took 4 hours, by myself, taking my time, with a 30 minute break along the way. Nursing a bad back and knee surgery 3 months ago.

I know you guys like pictures, so here you go.
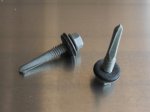
US-screws.jpg
Screws, 1 1/4", coated, stainless, washer and neoprene washer


us-2wood.jpg
First sheet being held in place by a board and couple pieces of 2x4


US-5final.jpg
All four underskin pieces up. I'm not doing the first two feet at this time.

-------------------------------------------------------------------------------------------------------
Installing the side pieces.

The original skin was 57? x 48?. That 57? left a gap of ? to ? inch at each side.

The side pieces measure 57? x 4?. I decided to get a one inch bend of 75 degree on the side pieces to cover up that gap, and make the side pieces stronger. I choose 75 degrees instead of 90 degrees so the side piece would snug up to the top better, and any pressure would snug it up more. The shop charged me their minimum shop time, $16, to make the bends. If I had thought ahead, I think that would have been included in the origional purchase, because it only took them 5 minutes.

I left the ? gap at the bottom for quick, easy draining.
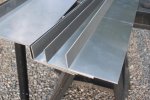
side02.jpg
The 75 degree bend.


side05.jpg
Finished for now
 

ressless1

Cadet
Joined
Aug 16, 2011
Messages
12
Re: Underskining toon ?

One more thing.
In case you have never looked, a lot of water hits the underside of the boat.
I made this 20 second video of the underside of my boat at about 15 mph, on the first trip after underskinning.


luckyjr

Petty Officer 2nd Class
Joined
Oct 2, 2010
Messages
169
Re: Underskining toon ?

One more thing.
In case you have never looked, a lot of water hits the underside of the boat.
I made this 20 second video of the underside of my boat at about 15 mph, on the first trip after underskinning.

Really like this video. I did some checking here in Houston and came up with the same Alumin but 5' x 12' for $122ea.
Would that have worked better for you? All the admirals seem concerned about tearing and the fasteners used. What about just putting some 2" thick Styrofoam 2' x 5' behind the 1/16 Alum and between the cross members. Using galv screws or bolts will not effect anything, no electrolyze will occur.
 

ressless1

Cadet
Joined
Aug 16, 2011
Messages
12
Re: Underskining toon ?

Really like this video. I did some checking here in Houston and came up with the same Alumin but 5' x 12' for $122ea.
Would that have worked better for you? All the admirals seem concerned about tearing and the fasteners used. What about just putting some 2" thick Styrofoam 2' x 5' behind the 1/16 Alum and between the cross members. Using galv screws or bolts will not effect anything, no electrolyze will occur.

That price sounds very good. the shops I talked to had nothing larger than the 4 x 10 sheet I used. In retrospect, I would not have been able to manuver a large single sheet in place with the boat on the trailer. My smaller sheets worked out well for me, working by myself, by overlapping them.

I elected to not put anything above the aluminum or between the underskin and crossmembers because I wanted any water that got there to drain as easy as possible, and the wood have a chance to dry. I also like that the side panels can be removed easily to get at the wiring if I need to.

The video really shows the underskinning channeling the water straight back and out the rear, just like it should. Without the underskin, on my boat the water hit the crossmembers and deflected to the sides, over the pontoons, and some even came back toward the front to get thrown at the boat again. If I get a chance I'll video a friends boat without underskin for comparison. It is a real mess under there.
 

luckyjr

Petty Officer 2nd Class
Joined
Oct 2, 2010
Messages
169
Re: Underskining toon ?

That price sounds very good. the shops I talked to had nothing larger than the 4 x 10 sheet I used. In retrospect, I would not have been able to manuver a large single sheet in place with the boat on the trailer. My smaller sheets worked out well for me, working by myself, by overlapping them.

I elected to not put anything above the aluminum or between the underskin and crossmembers because I wanted any water that got there to drain as easy as possible, and the wood have a chance to dry. I also like that the side panels can be removed easily to get at the wiring if I need to.

The video really shows the underskinning channeling the water straight back and out the rear, just like it should. Without the underskin, on my boat the water hit the crossmembers and deflected to the sides, over the pontoons, and some even came back toward the front to get thrown at the boat again. If I get a chance I'll video a friends boat without underskin for comparison. It is a real mess under there.

Thanks, That answers alot of questions for me, Why I don't feel or experience any resistance with my new floor. The action of the water is being Directed and flowing down the channel between the legs of the channel. The cross members on my boat are 2 @1/2" steel channels legs facing up. They are 1 @1/2 tall. Once the water action hits the floor, it is being directed over the cross members down 17 channels formed by the floor to the motor. This will make my patent really stronger.
 
Top