Thermostat replacement on 86 Force 125

fmt2bx

Petty Officer 1st Class
Joined
May 27, 2015
Messages
217
Hi,
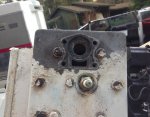
Don't know when that thermostat had been replaced last (if ever) but it must have been many many moons ago. I had the help of my neighbor and took us a while to remove the top 2 screws using an impact driver. We couldn't get the 2 bottom screws off, lots of corrosion on the heads and we had to cut them off eventually.
The thermostat was busted (see pics) and now we have to remove the studs. Soaked with PB blaster and DeepCreek, we'll see what we can do tomorrow with some vice grip plier. Hopefully we'll be able to get them off.
Should I use heat if necessary?
Any suggestions?

Thanks.

Cheers

Frederic
Screen Shot 2016-03-26 at 8.23.15 PM.jpg Screen Shot 2016-03-26 at 8.23.30 PM.jpg Screen Shot 2016-03-26 at 8.24.02 PM.jpg Screen Shot 2016-03-26 at 8.23.44 PM.jpg
 

Justinde

Chief Petty Officer
Joined
Dec 11, 2010
Messages
431
Hi mate

Looks UGLY ..... I replaced my 1988/125 exhaust plate and only broke 1 bolt...... It took a lot of time and patience. Use heat- it won't hurt- but PLENTY of lube like WD40 or similar and try mive them i little at a time...... Good luck. If your patient you'll be 👌
 

jerryjerry05

Supreme Mariner
Joined
May 7, 2008
Messages
17,931
Heat the studs and then put an ice cube on it.
​Expansion/contraction.
PB Blaster or WD-40 I think PB is better.
Spray heat and spray and heat.
Then do the ice thing.
Then tap gently with a hammer.
The idea is to loosen the corrosion.

I did the same job on a 125 and it took about 3 hrs. to get 1 of them out.

One good thing if you hurt the head, there are LOTS of heads that will fit.
 

fmt2bx

Petty Officer 1st Class
Joined
May 27, 2015
Messages
217
Heat the studs and then put an ice cube on it.
​Expansion/contraction.
PB Blaster or WD-40 I think PB is better.
Spray heat and spray and heat.
Then do the ice thing.
Then tap gently with a hammer.
The idea is to loosen the corrosion.

I did the same job on a 125 and it took about 3 hrs. to get 1 of them out.

One good thing if you hurt the head, there are LOTS of heads that will fit.

Ok, thanks jerry. Did you use a vice grip? I saw some other technics on youtube but it usually is for larger size stud.
 

fmt2bx

Petty Officer 1st Class
Joined
May 27, 2015
Messages
217
Hi mate

Looks UGLY ..... I replaced my 1988/125 exhaust plate and only broke 1 bolt...... It took a lot of time and patience. Use heat- it won't hurt- but PLENTY of lube like WD40 or similar and try mive them i little at a time...... Good luck. If your patient you'll be 👌

Thanks, Justin. Looks like patience is the trick here. ;)
 

Jiggz

Captain
Joined
Oct 23, 2009
Messages
3,817
Personally from the look of the corrosion, I'll go ahead and just cut the bolts flush and just re-drill new holes. Just make sure you start with a pilot drill bit with a good center punch to center the holes. T-stat are easily available from this site. As for replacement bolts, I recommend allen head steel screws. Just make sure you use anti-seize to prevent future problem.
 

tommarvin

Ensign
Joined
Nov 22, 2015
Messages
999
1. Heating could damage the head gasket, I would do Jiggz idea, cuts the bolts flush, center punch an indent in the center of bolt, get a 10 pack of 1/8 carbide drill bits you drill on both ends, On E-Bay. drill larger and larger until you get to helicoil drill bit size then use the tap in the Heli coil kit on e-bay to tap for helicoil.
You-tube explains it well.I-Boats has the stat, gasket, make sure the stat is notch side up,it's small and hard to see the notch.
If the stats that bad, better do the water pump/impeller, drain/fill gear lube, clean/rebuild carbs, etc...
 

fmt2bx

Petty Officer 1st Class
Joined
May 27, 2015
Messages
217
Personally from the look of the corrosion, I'll go ahead and just cut the bolts flush and just re-drill new holes. Just make sure you start with a pilot drill bit with a good center punch to center the holes. T-stat are easily available from this site. As for replacement bolts, I recommend allen head steel screws. Just make sure you use anti-seize to prevent future problem.

Hey Jiggz, I ll spend some time trying to get them out first but if I drill them out, should I start with a 1/8 or 1/16 bit then work my way up?
When done ill definitively use anti-seize and different type screws.
Got the thermostat already, foolishly thought that it was a 30min job. ;)

Thanks
 

fmt2bx

Petty Officer 1st Class
Joined
May 27, 2015
Messages
217
1. Heating could damage the head gasket, I would do Jiggz idea, cuts the bolts flush, center punch an indent in the center of bolt, get a 10 pack of 1/8 carbide drill bits you drill on both ends, On E-Bay. drill larger and larger until you get to helicoil drill bit size then use the tap in the Heli coil kit on e-bay to tap for helicoil.
You-tube explains it well.I-Boats has the stat, gasket, make sure the stat is notch side up,it's small and hard to see the notch.
If the stats that bad, better do the water pump/impeller, drain/fill gear lube, clean/rebuild carbs, etc...

Thanks Tommarvin,

Is that the notch you are referring to? Install the thermostat with notch at the 12 o'clock position?

Cheers Screen Shot 2016-03-27 at 5.42.22 PM.jpg
 

tommarvin

Ensign
Joined
Nov 22, 2015
Messages
999
Yes sir, 12 o'clock, there's supposed to be a rubber grommet around the flange.
I can't tell by picture, I have seen grommets a home depot a variety pack, and you need the gasket, I-boats has them.
 

Jiggz

Captain
Joined
Oct 23, 2009
Messages
3,817
Hey Jiggz, I ll spend some time trying to get them out first but if I drill them out, should I start with a 1/8 or 1/16 bit then work my way up?
When done ill definitively use anti-seize and different type screws.
Got the thermostat already, foolishly thought that it was a 30min job. ;)

Thanks


I'll start with an 1/8" drill bit. Starting with anything smaller might complicate matter if it breaks off. I believe the original bolts are 1/4"-20. Hence the proper drill bit size for the hole before tapping should be 13/64" or 0.2010" or #7 drill bit. If you have cobalt drill bits you would be better off than using titanium coated ones.
 

fmt2bx

Petty Officer 1st Class
Joined
May 27, 2015
Messages
217
Yes sir, 12 o'clock, there's supposed to be a rubber grommet around the flange.
I can't tell by picture, I have seen grommets a home depot a variety pack, and you need the gasket, I-boats has them.

Thanks.
 

fmt2bx

Petty Officer 1st Class
Joined
May 27, 2015
Messages
217
I'll start with an 1/8" drill bit. Starting with anything smaller might complicate matter if it breaks off. I believe the original bolts are 1/4"-20. Hence the proper drill bit size for the hole before tapping should be 13/64" or 0.2010" or #7 drill bit. If you have cobalt drill bits you would be better off than using titanium coated ones.

Yes it is a 1/4 20. #7 is what my book says. Thanks for all the info. I'll see how it goes tomorrow.
Cheers.
 

jerryjerry05

Supreme Mariner
Joined
May 7, 2008
Messages
17,931
With my procedures I never needed to drill out the screws.

​Yes vice grips.
You might save time drilling and using an easy out.
​I have used the drill and easy outs when the studs break off too short.
 
Last edited:

fmt2bx

Petty Officer 1st Class
Joined
May 27, 2015
Messages
217
I spent about an hour yesterday, no blaster, heat, ice cube, vise grip and no luck so far. I ll try some more, I understand took you 3 hrs just to get one stud out. So I'm not giving up yet and will drill them out if I have to.
 

Jiggz

Captain
Joined
Oct 23, 2009
Messages
3,817
From experience, 1/4" and smaller bolts have a tendency to break off rather than break loose when badly corroded. Even if you decide to apply heat, the remaining stud is just not large enough to withstand the heat without weakening it and worse yet easily breaking off. The advantage of making the earlier decision to cut it flush is to have an even surface to work with to re-drill and re-tap the hole. If the stud ever break off while trying to loosen it, most of the time the remaining stud will either be to rough to center a hole or might cut off under the surface with uneven surface making it even harder to center a hole. And the worse thing that can happen if you break it off is to drill it and use an EZ out and break it. A broken EZ out is a serious PITA to remove! Of course, with bigger bolts or studs it is totally a different approach.
 

fmt2bx

Petty Officer 1st Class
Joined
May 27, 2015
Messages
217
Done! I had the help of a local garage ( great guys) and finally got the thermostat back on.


Screen Shot 2016-03-28 at 7.16.26 PM.jpg


Screen Shot 2016-03-28 at 7.16.40 PM.jpg
 

Attachments

  • Screen Shot 2016-03-28 at 7.16.26 PM.jpg
    Screen Shot 2016-03-28 at 7.16.26 PM.jpg
    89.4 KB · Views: 2

tommarvin

Ensign
Joined
Nov 22, 2015
Messages
999
1. what did the garage do to get the bolts out?
2.Where is you overheat sender to the horn/buzzer. I see the orange wire coming out the hole,what does it go to?
3. Are those BUHX plugs?
4.Do all the maintance, go through everything before you fire it up.
 

fmt2bx

Petty Officer 1st Class
Joined
May 27, 2015
Messages
217
1. what did the garage do to get the bolts out?
2.Where is you overheat sender to the horn/buzzer. I see the orange wire coming out the hole,what does it go to?
3. Are those BUHX plugs?
4.Do all the maintance, go through everything before you fire it up.

1-The guys at the garage had better vise grip pliers, they didn't use any heat. One stud came off, the other had to be drilled out.
2- The overheat sensor is under a rubber boot. Working, checked it by grounding it. Horn is good.
3- Yes BUHX plugs
4- All the maintenance had been done, the thermostat was the last thing needing replacement. Impeller/pump housing replaced.

Thanks I'll fire it up tomorrow.

PS: Got the thermostat with notch at 12 o'clock position, thanks for pointing that out I would have never noticed that small notch/hole.
 

Mo1

Petty Officer 3rd Class
Joined
Dec 11, 2015
Messages
76
Have you tried removing the bolt on top of the thermostat housing that folks use to tap in a pee hole?
 
Top