stern drive is s.t.u.c.k.

grady86

Seaman Apprentice
Joined
Feb 19, 2014
Messages
32
1989 3.7L Alpha One.

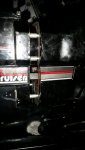
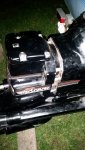
It's been a frustrating weekend. After installing a new transom repair kit (bellows, gimbal bearing, gaskets, o rings, water hose), I tried putting the stern drive back in. I lightly greased the shaft splines, put it in forward gear, and got the stern drive to go until it had about 2 inches, and now it's s.t.u.c.k. Tried giving it some love, but no luck. So, I thought maybe I should pull it back out and see what's up. Well, the thing won't budge. I had an extra helping hand, still nothing. I attached two pictures. Some tribal knowledge would be much appreciated.

Here's some amplifying information as to what types of measures I've taken.
  • The drive moves freely with a couple centimeters of slack up, down, left, and right. It is not stuck on any of the 6 threaded lugs whatsoever.
  • The male and female ends of the shift mechanism under the bell housing are not making contact with one another yet, the drive still isn't close enough, so I know it's not binding up there.
  • I lightly greased the splines with all purpose marine grease before trying to install it.
  • I engaged the drive into forward gear manually and then tried tapping the prop with a rubber mallet.
  • I also attempted to crank the motor slightly to see if it would maybe jar the splines loose if they were jammed.
  • I used a rubber mallet liberally on the drive to see if I could jar something loose that way...
  • Finally, I slid a rope between the gap of the drive and the bell housing, and used a come-along to apply good amount of pressure to see if that would pop it loose. This just seemed to cant the drive against the studs, since it wasn't a directly straight line-of-pull...
  • And, of course, I have spent hours just trying to man-handle the thing off of there.

Once I started contemplating anchoring the drive to a tree and yanking it out, I decided, "You know what, self, maybe it's time to go post this in the forums before I break something." You guys are great and have never failed me before. Thanks again, I already owe so much beer to this site!

-Grady
 

Attachments

  • photo223690.jpg
    photo223690.jpg
    120.2 KB · Views: 2
  • photo223691.jpg
    photo223691.jpg
    184.2 KB · Views: 2

Bt Doctur

Supreme Mariner
Joined
Aug 29, 2004
Messages
19,120
install the trim cylinders , use wood spacing between the top of the drive and the transom.
CAREFULLY USE THE TRAILER BUTYTON TO WORK THE DRIVE OFF ADDING SPACERS AS NEEDED
 

998cc

Petty Officer 2nd Class
Joined
Mar 30, 2013
Messages
159
When you had the out-drive off, is there any chance the drive shaft splines could have gotten damaged--even slightly?
 

boater364

Cadet
Joined
Apr 28, 2015
Messages
27
What he said ^^^^^. I had the same issue. I could tell by greasing the end/ face of spline shaft, putting in, n you could see where the coupler was not lined up and making contact. I had to purchase the alignment tool and then pivot the bearing in its race, to get it to line up. my engine alignment was perfect when I took the drive off with the original gimbal bearing, so I thought I would not need the tool. Turns out I did. Where are you in PA, if you local you can borrow mine.
 

grady86

Seaman Apprentice
Joined
Feb 19, 2014
Messages
32
When you had the out-drive off, is there any chance the drive shaft splines could have gotten damaged--even slightly?

It's possible. I didn't notice anything that jumped out at me, but the drive was separated from my boat for a LONG time, and was transported by a moving company. I had wrapped cardboard around the splines for protection, but it's possible it still could have been rough handled along the way and damaged.
 

grady86

Seaman Apprentice
Joined
Feb 19, 2014
Messages
32
What he said ^^^^^. I had the same issue. I could tell by greasing the end/ face of spline shaft, putting in, n you could see where the coupler was not lined up and making contact. I had to purchase the alignment tool and then pivot the bearing in its race, to get it to line up. my engine alignment was perfect when I took the drive off with the original gimbal bearing, so I thought I would not need the tool. Turns out I did. Where are you in PA, if you local you can borrow mine.

Thank you so much for the advice and the offer; Ironically I had the foresight to purchase an alignment tool before I started the bellows repair, but somehow completely forgot to use it once it was all said and done. :confused:
 

boater364

Cadet
Joined
Apr 28, 2015
Messages
27
it easier to use the alignment tool to figure out where its hitting, then just put it a few inch's, slap it up, down, left and right, (twss) and try again.
 

boater364

Cadet
Joined
Apr 28, 2015
Messages
27
Also, once you get the alignment tool in, and the drive still does not slide in, you might have to rotate the propeller to get the splines to line up.
 

grady86

Seaman Apprentice
Joined
Feb 19, 2014
Messages
32
Alright well my course of action today will be (1) Try using the wood plank spacer with trim tab assist method (2) If successful, use the alignment tool and adjust the bearing if needed. I will post the results. Thanks for the advice.
 

grady86

Seaman Apprentice
Joined
Feb 19, 2014
Messages
32
So, in conclusion, here is how I resolved my issues.
  1. I took the advice of Bt Doctur and used a 2x4 wedged between my drive and the transom. After attaching the trim cylinders, I slowly brought the trim upwards, and it worked like a champ. I couldn't have been more pleased with this method. Wish I would have not been so stubborn and figured this out way before I got to this point.
  2. After successfully popping the stern drive out of the transom, I checked the alignment as Eric and Boater364 suggested, and realized that this was , absolutely, 100% of my issue. In fact, I couldn't even get the alignment tool to enter the coupler, it was so far off. So, by stubbornly trying to force the drive shaft into place, I effectively canted the shaft against the gimbal bearing, causing a no-go situation no matter how hard I pushed.
  3. Once I had carefully adjusted the alignment of the bearing, the drive went into place first try, and you can imagine how good that felt.
Thanks again guys, what a long process, but man did I learn a lot. Next time, and I'm sure there will be a next time, this will definitely be easier.
 
Top