Project Fuggly - No Longer Fuggly And Splashed!!!!!!

Baylinerchuck

Commander
Joined
Jul 29, 2016
Messages
2,726
opps did some research and guess who ordered the wrong water pump :facepalm: Oh well given the pit of money, what is another 25$!

Don’t feel bad, I did the same exact thing. The only difference is I didn’t know enough to realize what I had done until half a bottle of outdrive gear lube was draining out on the floor. Lol.
 

archbuilder

Vice Admiral
Joined
Sep 12, 2009
Messages
5,697
Chuck the worst smelling substance know to man is gear oil....also the biggest pain to clean up!

Tonight I pulled out the gimble / bell-housing assemblies....should slide right back together right? :bounce:

You might want to get some :pop2: and enjoy the struggle lol.

I did visually verify what I could in terms of parts for the gimble, so far they seem correct. I did realize I need to get the gasket that goes between it and the hull. I also want to order new hydraulic lines....speaking of things that make a mess! I think I will also replace the bushings the rams are mounted on, they seem somewhat fossilized.
 

Attachments

  • photo286365.jpg
    photo286365.jpg
    641.3 KB · Views: 1

archbuilder

Vice Admiral
Joined
Sep 12, 2009
Messages
5,697
So after looking around some, I am remembering that the hull to gimble seal on most alpha's is a o-ring, not a gasket like mine. The old one is in ok shape, guess if push comes to shove I will just cut one out of some gasket material.
 

archbuilder

Vice Admiral
Joined
Sep 12, 2009
Messages
5,697
Micky I suspect that is what the 45 year old original is made of! Good suggestion because it has held up well!

I spent tonight going down memory lane, looking at picks and researching. Maybe I knew this and forgot, but the drive is actually a late 60's even though it is in an early 70's hull. Anyhow, I was sorting through what I need in terms of hydraulic parts. I am thinking most of the pressure hoses should be replaced while I have it apart. Seems like the tilt trim on this one, including the pump, were predecessors to the dinosaurs....as in the last parts rolled off the line in 76'.....but thanks to the internet, I think I now know what part numbers I need and just need to get things ordered here and there. Hope the pump works :facepalm: Well if not I know someone who owns part of a company that specializes in rebuilding out of stock aircraft pumps, this one should be a snap for them! now back to sorting out what plugs into what on this reverse lockout thing........
 

archbuilder

Vice Admiral
Joined
Sep 12, 2009
Messages
5,697
I took last night off and entertained a possible admiral.....which is slightly more expensive than ordering boat parts :D but very rewarding!
Tonight I dinged the bank again and ordered all the ancient parts I think I need in terms of hydraulic hoses and the gimble to hull seal.

While I was poking around and comparing parts to pics / part numbers, I took a pick of the hinge pins. These of course are the dinosaur style. If I remember correctly they are just a strait shaft pin, without any threads like the new ones. If you look closely you will see a "stainless nail" that is driven part way out. Way back in this thread someone told me its the retaining pin. Think maybe JB, IDK? Anyhow I bent the end over fairly easily and started pulling it out. I pushed it in for now, but will be pulling them out this weekend. Hopefully the hinge pin comes out as easy....doubt it! It looks like the center is threaded for a fine thread bolt. I'm assuming that is used to pull it out. I can see making a puller in my future for some reason :D

I was out of town today, but the new water pump showed up at the office. Hopefully this one will fit and I can get the two halves of the drive back together tomorrow. After that it should be pressure test and paint for that part.

I also ordered the mounting bushings for the rams tonight. All the hardware still looks good so I am keeping it.
 

Attachments

  • 20180315_185313.jpg
    20180315_185313.jpg
    681 KB · Views: 1

archbuilder

Vice Admiral
Joined
Sep 12, 2009
Messages
5,697
I installed the new water pump today and it fit nicely. After that I put the uppper and lower units together and pressure tested. Everything checked, so I greased the u-joints and she is ready for paint and going back on the boat. Tomorrow I am going to work in the gimble assembly. If I can get that knocked out this weekend, it won't be long until I can drop the motor in the boat!
 

Attachments

  • 20180316_164702.jpg
    20180316_164702.jpg
    682.4 KB · Views: 0

archbuilder

Vice Admiral
Joined
Sep 12, 2009
Messages
5,697
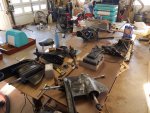
So today was um.....interesting :D 
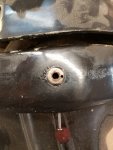
I started out by pulling the hinge pins, which came right out. I just screwed an 1/4x28 bolt in them and pulled them out by hand. I really thought they would fight when I started this, but really super easy.

20180317_102450.jpg

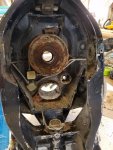
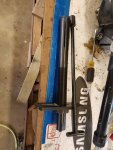
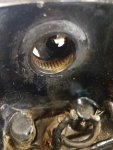
I got the bellows and pick-up tube loose. I figured out I have the wrong shift cable, back to having a drive that was older than I thought. Anyhow I can use the one I have according to the manual, but I have to tap some threads. So I am just going to order the older style cable. Bearing was a mess by the way

20180317_150404.jpg
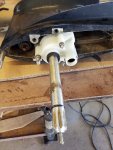
The slots on the end of the tube allow you to push the tube through the bearing, after which it expands and the teeth hook on the back side of the bearing. I couldn't figure out the odd t-handled deal with the big rod on the end. It actually slides down into the tube, and keeps the tube from coloapsing and releasing the teeth during pulling. It has a plate that threads on to the other end, once it is toghether it pulls the bearing out with the help of a large wrench. No hammering, pulling, yanking etc. took maybe 15 seconds to get the bearing out.
 

Attachments

  • 20180317_104131.jpg
    20180317_104131.jpg
    625.1 KB · Views: 2
  • 20180317_150400.jpg
    20180317_150400.jpg
    658.6 KB · Views: 2

archbuilder

Vice Admiral
Joined
Sep 12, 2009
Messages
5,697
Here is a pic of it assembled and ready to go.

20180317_150927.jpg

If you looked closely above you will note a super rusty snap ring I had to get out. That was my first clue the bearing wasn't the typical one. Took a little cursing but I got it out an then the puller just sucked out the bearing.

20180317_151452.jpg
So the bearing is also particualr to the old old old units. I finished up the day by figuring out what the odd looking thing was next to the upper steering pin.

20180317_161858.jpg
The stainless plate with the wear mark covers a broken switch that limits the tilt. It didn't seem like a big deal till I figured out I have to pull the steering pins to replace it! Oh well I am going to do that tomorrow....complete my parts list and get things headed this way. I think in the mean time I will clean up all of the housings and get a good coat of paint on them.
 

archbuilder

Vice Admiral
Joined
Sep 12, 2009
Messages
5,697
One other thing. removing the shift cable requires Mercruy special tool Blah-blah-blah. Archbuilder special tool Arch-socket-mig seemed to work just fine.

20180317_141915.jpg
 

archbuilder

Vice Admiral
Joined
Sep 12, 2009
Messages
5,697
Today I got the steering hing pins out. The lower was easy, the top one required some heat on one bolt....think it had lock tight on it. But I finally got it apart.

Click image for larger version  Name:	20180318_143443.jpg Views:	2 Size:	631.5 KB ID:	10547746

The lower roller bearing was in ok shape, but the upper was froze and more or less toast. I just ordered another truck load of parts....more or less this thing will be new when I get done with it.....trying not to think about what it cost lol!

I did get the switch out, which you can sort of see it and the corroded wires in the pic. I almost laughed, the last bolt I took out had to be ground off! It fought the entire way!
 

Attachments

  • 20180318_143443.jpg
    20180318_143443.jpg
    631.5 KB · Views: 1

GA_Boater

Honorary Moderator Emeritus
Joined
May 24, 2011
Messages
49,038
Now ya gotta buy a new 9/16 deep socket, Arch. :blue:

Ingenuity at it's finest! :D
 

Woodonglass

Supreme Mariner
Joined
Dec 29, 2009
Messages
25,924
I REALLY like the Custom Tool. factory Stuff is WAY overrated AND Overpriced!!!
images

thumbs-up-emoji.png
 

Lowcountry26

Cadet
Joined
Mar 4, 2018
Messages
11
My opinion on tallying the total costs: don’t do it! Haha but I still do, oh well.

I appreciate how detailed your motor rebuild is turning out. Eventually there will be no lore parts to replace/order/modify and you’ll have other special tools to build according to the next step in the process! What a journey
 
Top