O'Day Mariner Sailboat Restoration

tpenfield

Moderator
Staff member
Joined
Jul 18, 2011
Messages
17,711
What a unique boat! Coming aboard to tag along if you don't mind...

Welcome aboard the thread. This is one of O'Day's more successful boats and it lives on, now being made by Stuart Marine. O'Day made a total of around 3,800 of these boats over a span of about 15 years. I' not sure how many Stuart currently make a year.
 

tpenfield

Moderator
Staff member
Joined
Jul 18, 2011
Messages
17,711
Quick Update:

I think I have the transom bonding figured out to a point where I should be able to finally separate the boat 'halves'

After scouring the Mariner Web site, I found a couple of pictures that I believe show the area of bonding between the cockpit and the transom internals.

There are two pieces of plywood bonded to the transom during the layup of the hull (red arrows). It looks like that during the assembly of the deck/cockpit to the hull some 'putty' (more like what we call peanut butter, 'PB') is slabbed onto the back facing part of the cockpit seat and the putty meets the plywood as the boat halves are joined and then sets to create the bond. In the picture below, the yellow arrows point to what appears to be the putty (PB).
Mariner-transon-internalsB.jpg


I made a line drawing of what this probably looks like from a cross-section view. PB is shown by yellow arrow, plywood is shown by red arrow.
MarinerTranson.png


I am sure that there was a bit of technique to doing this in order to get the putty/PB to stay in place while the boat halves were being joined.

I have also noticed that Stuart Marine, the current manufacturer of these boats, does not bond the boat halves at the stern in this manner. Instead, they run the sandwich joint all the way across the transom, in the same way that the sides are joined. This makes for a rubrail extension that goes fully across the transom, whereas the O'Day boats were cut flush at the transom, because of the internal bonding. Stuart Marine also places 3/4" offsets at the rudder gudgeons so that the rudder clears the rubrail, whereas the O'Day boats did not need the offsets.

Anyway, I think my best bet is to see if I can fracture the plywood that is bonded to the transom with a chisel, given the limited amount of space in that area of the boat, versus trying to cut through the PB.
 

Attachments

  • Mariner-transon-internals-2.jpeg
    Mariner-transon-internals-2.jpeg
    30.6 KB · Views: 2

tpenfield

Moderator
Staff member
Joined
Jul 18, 2011
Messages
17,711
I am hoping the wood is pretty well deteriorated and it would be a couple of whacks with hammer and chisel. But we will have to see.

I certainly won't put the boat back together the same way. I'll probably glass in a board higher up on the transom where the boat halves meet and use that as surface area for an adhesive.

Not sure if I should plan on a 5200 or a 4200 type of adhesive. I believe the 5200 is a bit more permanent.
 

alldodge

Moderator
Staff member
Joined
Mar 8, 2009
Messages
40,759
The stuff looks like the adhesive PWC use, its almost black in color and is a bear to get apart. Thinking core bond type stuff. My thought of the air chisel was due to lack of room to swing a hammer
 

tpenfield

Moderator
Staff member
Joined
Jul 18, 2011
Messages
17,711
good point about the lack of space. I've had 2 schools of thought on this presumably 'last' step in the separation process.

1) raise the front and mid section of the deck/cockpit assembly and hope that the wood at the transom is deteriorated enough so that it will separate on its own . .

or . . .

2) give it a couple of whacks with a chisel or similar to force the issue. . . then lift the forward portions of the deck/**** pit assembly hoping the wood will give it up.

not sure which will work best. My inclination is to try #1 a bit to see if it will give up easily.
 

proshadetree

Lieutenant Commander
Joined
Jul 19, 2008
Messages
1,887
Man what a pita. Sometime with glass if you can get a fracture it will split on apart. Hope its the case for you.
 

Scott Danforth

Grumpy Vintage Moderator still playing with boats
Staff member
Joined
Jul 23, 2011
Messages
47,562
can of freeze-it and a chisel should shatter the adhesive blob
 

tpenfield

Moderator
Staff member
Joined
Jul 18, 2011
Messages
17,711
If I'm betting on 40 year old fiberglass (PB/Putty) versus 40 year old exposed plywood to break first, I'd go with the wood being the first to give :D
 

Scott Danforth

Grumpy Vintage Moderator still playing with boats
Staff member
Joined
Jul 23, 2011
Messages
47,562
If I'm betting on 40 year old fiberglass (PB/Putty) versus 40 year old exposed plywood to break first, I'd go with the wood being the first to give :D

thats because you want it to go that way. pretty sure if you tried to force it, the wood would hold, and tear the cockpit tub. remember, Murphy was a fricking optimist
 

tpenfield

Moderator
Staff member
Joined
Jul 18, 2011
Messages
17,711
thats because you want it to go that way. pretty sure if you tried to force it, the wood would hold, and tear the cockpit tub. remember, Murphy was a fricking optimist

Yes, and Murphy is my right hand man :facepalm: I certainly won't force it, but if it wants to come along quietly . . .
 

GA_Boater

Honorary Moderator Emeritus
Joined
May 24, 2011
Messages
49,038
I wonder what would happen if you raise the front of the cap until there is tension on the putty/plywood, place a hunk of 2X4 inside the cockpit over the the putty and judiciously apply pressure to the 2X4 with a BFH? Could that break the putty/plywood joint? Sort of like breaking a flywheel loose when the puller is tight. Use a rubber BFH for quietness. LOL
 

tpenfield

Moderator
Staff member
Joined
Jul 18, 2011
Messages
17,711
I wonder what would happen if you raise the front of the cap until there is tension on the putty/plywood, place a hunk of 2X4 inside the cockpit over the the putty and judiciously apply pressure to the 2X4 with a BFH? Could that break the putty/plywood joint? Sort of like breaking a flywheel loose when the puller is tight. Use a rubber BFH for quietness. LOL

IDK, but I guess we will find out this weekend.

Speaking of this weekend, look at the weather forecast . . . We are going from 18 F to 57 F in 2 days :noidea:

Maybe that will separate the hull & Deck :D
BostonWeather.png
 

tpenfield

Moderator
Staff member
Joined
Jul 18, 2011
Messages
17,711
My weekend plans were foiled . . . Snowed on Saturday and I had to finish my Christmas shopping on Sunday. I won't probably get to trying the hull/deck separating until New Years weekend . . . Weather permitting.

I might be putting the boat back in the garage . . .
 

tpenfield

Moderator
Staff member
Joined
Jul 18, 2011
Messages
17,711
It has been a while since I updated my thread, mostly because I have not done anything with the boat since last winter/spring. I was at the point of separating the boat 'halves' (hull & deck) and had run into a bit of a snag with a bond of fiberglass putty at the transom.

Well today, in a burst of energy, I managed to break the bond at the transom and now have the hull and deck separated.

I decided to put an access plate in the cockpit seat at the stern in order to gain access to the inside of the transom. I sized the hole for a SeaChoice 8" deck plate, which is available here on iBoats :thumb:

IMG_0318.jpg

this gave me good access so that I could hammer in some chisels and wrecking bars into the putty to hopefully separate the bond.

Here is a picture of the putty from inside the transom area
IMG_0324.jpg

The putty is not all that strong, so I was able to break the bond without hurting the outer fiberglass for the cockpit or transom.

Here is the stern area now separated and 'free'
IMG_0330.jpg

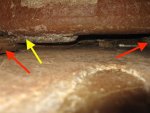
Here are a couple of close ups of the putty areas
IMG_0332.jpg

the hardware indentations are for the upper gudgeon.

IMG_0339.jpg

Here is the inside are of the transom with the cockpit now lifted up out of the way a bit.
IMG_0342.jpg

I placed some boards/timbers between the halves of the boat so that I can get some straps underneath and lift the deck/cockpit assembly off.
IMG_0344.jpg

My plan is to work the boat halves over the next few months and then re-assemble them as they do in the factory. Good news is that the foam seems to have dried out over the summer, so maybe I can just add a bit more in a few places and seal the chambers up so that they are air tight.
 

tpenfield

Moderator
Staff member
Joined
Jul 18, 2011
Messages
17,711
Thanks, guys. :thumb:

I believe that this is the first time that this model of boat has been separated into the 2 halves. I have a thread going on the O'Day Mariner web site, and got a variety of inputs. Along the way, I talked to a guy who worked at the O'Day factory and also to the president of the company that makes the boat currently (Stuart Marine).

Neither of these guys could recall separating boats halves, but they did give me some guidance on how it could be done. My goal was to make as few cuts as possible . . . which I achieved, having to cut only at the keel trunk, a little bit at the bow, and the hole for the deck plate.
 
Top