New build - See Our Sea Flea Fly!

scoutabout

Lieutenant Commander
Joined
Oct 14, 2006
Messages
1,568
And...here's the works glued and trussed up to dry. The challenge with all the off angles was clamping everything without the pieces moving. Everything wanted to slide along its own joint. Good lesson in patience....and I think the kid learned a few new words from his ol dad inadvertently....:facepalm:

IMG_06251.jpg
 

scoutabout

Lieutenant Commander
Joined
Oct 14, 2006
Messages
1,568
And whadaya know....once dry and out of the clamps the thing stayed together!

IMG_06281.jpg
 

Mikeopsycho

Senior Chief Petty Officer
Joined
Feb 6, 2014
Messages
738
Looks like a fun project! What a great experience to share with your son! Very good photos and explanations so far, I'll enjoy watching your progress. 14 eh....just the right age to learn to cuss like a sailor, lol.
 

Patfromny

Lieutenant Junior Grade
Joined
Dec 2, 2012
Messages
1,197
Tagging along for sure scoutabout. Very neat project and story line.
 

Scott Danforth

Grumpy Vintage Moderator still playing with boats
Staff member
Joined
Jul 23, 2011
Messages
47,562
Get a load of that kid's got focus. At this point he hadn't played a video game in 12 hours and showed no signs of withdrawal...:D

He is playing a video game IRL. SIM Boat Building.... Lol
 

scoutabout

Lieutenant Commander
Joined
Oct 14, 2006
Messages
1,568
A very useful tool you might want is a biscuit joiner.

You know, I saw a bag of biscuits at my local hardware the other day and thought of that too. Sure would help keep joints from slipping - although I guess screws would too.
 

scoutabout

Lieutenant Commander
Joined
Oct 14, 2006
Messages
1,568
Thanks for the encouragement guys! Glad people find it interesting.
 

scoutabout

Lieutenant Commander
Joined
Oct 14, 2006
Messages
1,568
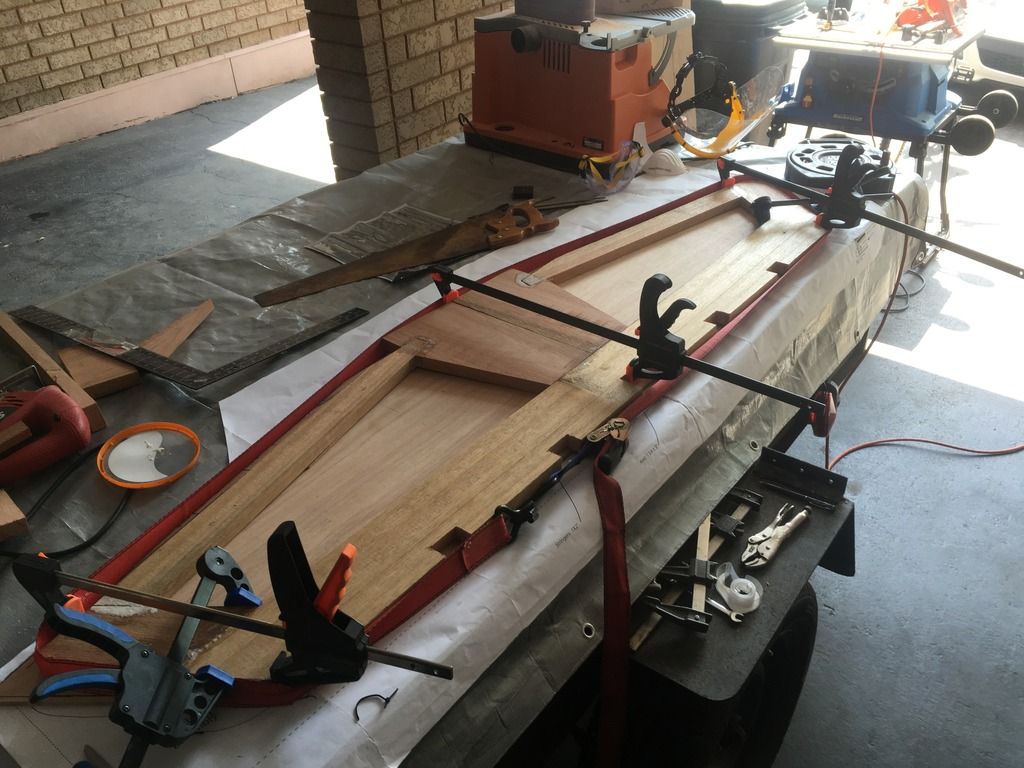
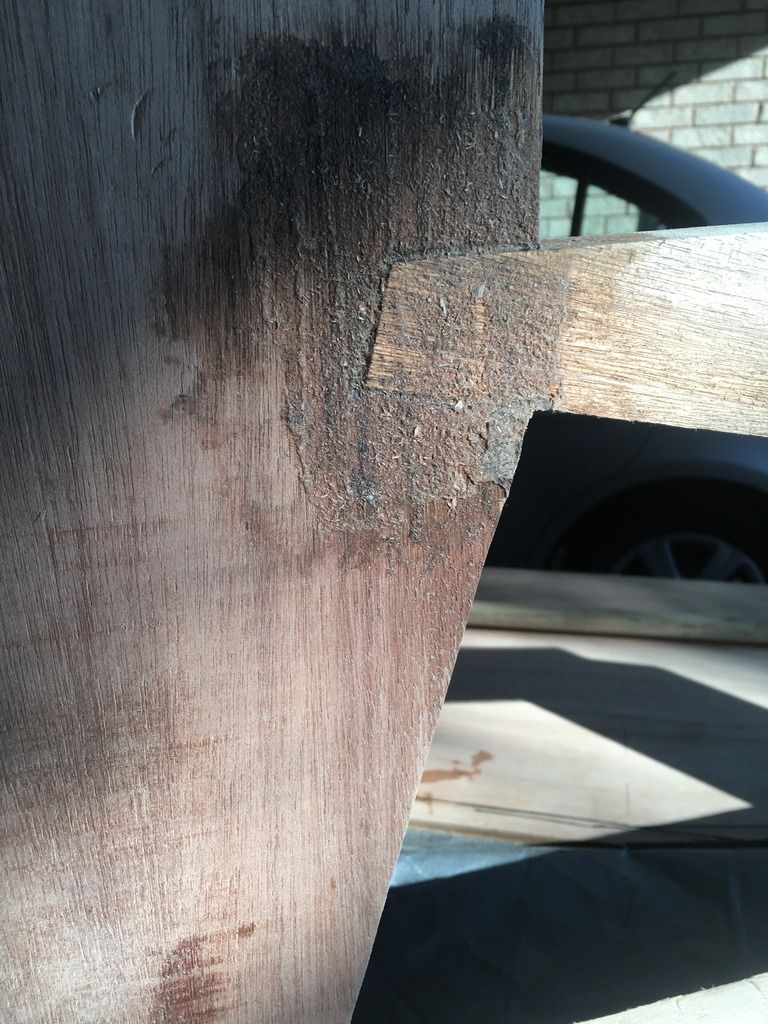
Morning crew - one other little element to note. Not being fine furniture makers, the boy and I found the notched joints at the top of the motor board had a wee bit o daylight showing through in places. And last I checked, no one on this board advocates thin air as an acceptable bonding agent.

Even though this area will be sandwiched in ply both sides, I'm assuming this will be one of the more highly stressed joints in the build.

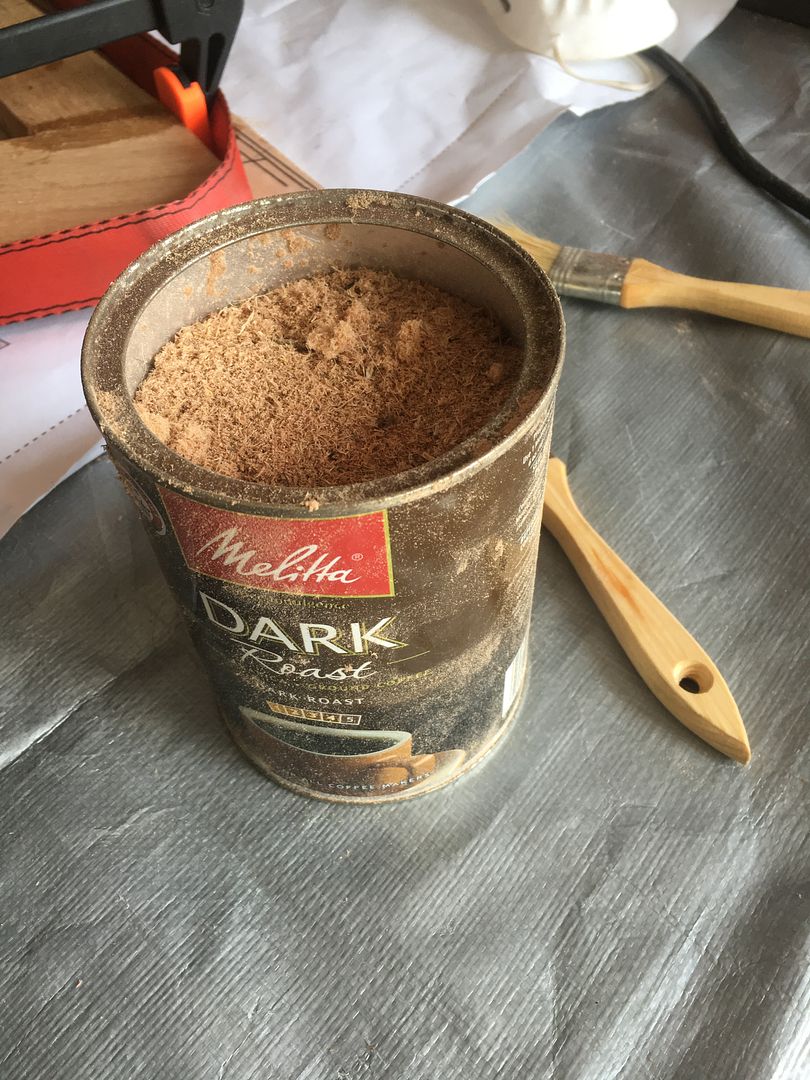
So, taking a page from builders of yore, we availed ourselves of some sawdust from the Shopvac, mixed it up nice and goopy with the glue, and over several sessions, forced the mess into any voids, let dry, then repeated. Once this last application dries we will sand it all down and see what we have wrought.

image.jpeg


Figuring this won't be the last such patch up job we've got ourselves a nice can filled and at the ready. I'm also assuming the odd dog hair that made it's way into the mixture will only serve to help strengthen the bond...😎
 
Last edited:

jbcurt00

Moderator
Staff member
Joined
Oct 25, 2011
Messages
24,871
Can of just saw dust, right? Not mixed w the glue already, correct?

Otherwise, nice team work. Looks great so far.

I can tell you how much I enjoyed building my little knock down wood boat....
 

Patfromny

Lieutenant Junior Grade
Joined
Dec 2, 2012
Messages
1,197
It's good you only took the happy saw dust as evidenced on the can. The angry stuff is a pain to work with.
 

pekstrom

Chief Petty Officer
Joined
Dec 31, 2015
Messages
490
Looks like a real nice project for sure! I came across the mini most plans a while back as well and am wondering if my 14-year old son would want to build one with me once I am done the my PM38. I've subscribed to this thread so I can tag along and follow your progress. Looks like y'all are off to a real nice start!
 

Ned L

Commander
Joined
Sep 17, 2008
Messages
2,266
Great project and progress!! You are so blessed to have an enthusiastic partner there.
(I'll just comment that For boat building I would skip a biscuit joiner.)
 

scoutabout

Lieutenant Commander
Joined
Oct 14, 2006
Messages
1,568
Thanks for the support, guys -- great to have you along. Since going back to work progress has slowed considerably but we've got another two weeks coming up and we'll try to step up the pace again!
 

scoutabout

Lieutenant Commander
Joined
Oct 14, 2006
Messages
1,568
Ok - so, some sanding later and we have solid, if rather crude looking joints, free of gaps. Now let's hide those ugly damn things with some ply.

image_2.jpeg
 
Last edited:

scoutabout

Lieutenant Commander
Joined
Oct 14, 2006
Messages
1,568
Ya know....sanding is a funny thing...It's tedious as all get out but you'd be hard pressed to find a better time to ruminate than if you had a roll of tp in your hand...🙊

So, while the sander was humming, so was my brain. And it settled upon an interesting thing. I'll post a pic below and someone holler when the bell goes off....

image_3.jpeg
 
Last edited:

Corjen1

Lieutenant Junior Grade
Joined
Aug 24, 2013
Messages
1,237
Well Sir, 2 things... I wonder what treasures are in the garage waiting to be re-found....(mine is in the same condition, so Im not taking a shout at you) Also, looks like the angle on the bottom pieces and the transom knee are off....

By the way, cool build!!
 

TruckDrivingFool

Lieutenant Commander
Joined
Jul 30, 2007
Messages
1,818
A sharp chisel (notches) and a hand plane (the rest) will have the right bevel cut in minutes, If you need to preserve the hieght bevel the ends of the battens. (not sure what to call them)

Since my helper has a hard time staying interested when helping I think it's awesome to see your helper stayed interested W/O electronic aids.
 
Top