Motor mount rebuild question

nateo

Petty Officer 1st Class
Joined
Apr 13, 2014
Messages
352
Pulled my motor today to replace spun coupler and discovered structure where motor mounts to is mush. Guess that explains bad alignment / spun coupler. Sliced off top and got rid of mush. Looks like there is one board left that I can glue and screw some new stuff into. One thing that is percular is that there is what looks to be a spike here there. Anyone know what this is? Can I attempt to remove it or do I need to cut new board in around it?
 

Attachments

  • photo221921.jpg
    photo221921.jpg
    114.2 KB · Views: 0
  • photo221922.jpg
    photo221922.jpg
    133.6 KB · Views: 0
  • photo221923.jpg
    photo221923.jpg
    125.7 KB · Views: 0

pckeen

Commander
Joined
Jun 20, 2012
Messages
2,067
Oh dear.

If I'm reading this right, your stringers are rotten.....which means you need a lot more than just a patch job. Take a look at some of the restoration threads for stringer replacements, to get an idea about what is involved.
 

nateo

Petty Officer 1st Class
Joined
Apr 13, 2014
Messages
352
Stringers seem ok. This block (see empty cavity) appears to attach to big stringers via this fibersglass (now empty) box. Also should I use kiln dried wood or pressure treated before fiberglassing?
 

Woodonglass

Supreme Mariner
Joined
Dec 29, 2009
Messages
25,924
"Stringers seem ok"

Have you core sampled the stringers and transom? That's about the only way to Know for sure since they're encased in fiberglass. I'm not seeing the "Spike" you referenced. As to replacing the Mount, the correct way to do it is to cut away the "Glass Box" entirely, rebuild the wooden core from either plywood or Douglas Fir, coat it with resin and glass and then glass it back to the hull with multiple layers of fiberglass, taking care it's at the same location and dimensions as the previous one so the motor will line up as needed.

There is simply No Way to get a new wood core fabricated and fit back into the existing Glass Box and get it to adhere properly. You need to start from scratch. It's been tried by others with no luck!!!:eek:
 
Last edited:

Yacht Dr.

Vice Admiral
Joined
Feb 26, 2005
Messages
5,581
Looks like there is one board left that I can glue and screw some new stuff into. One thing that is percular is that there is what looks to be a spike here there. Anyone know what this is? Can I attempt to remove it or do I need to cut new board in around it?

You should take that last board out ( looks nasty ). The spike can stay or go depending on how the outside of the box is in that area ( is the glass indented ? ).

Your right about them being independent of the stringers. If the stringers were encapsulated well enough then I can see them being sound.

Just make sure you bed whatever your putting in there real good..and glass cap/wrap the top and you should be fine. Like Woody said though..your final glass top is basically right where it should be ( depending on how much adjustment there is on your mounts ).
 

gm280

Supreme Mariner
Joined
Jun 26, 2011
Messages
14,593
Personally If that were my project, I would first take a lot of pictures of the mounts and surrounding area with measurements and such and from different angles too. And then tear out the entire area and grind down to good solid fiberglass again. Then rebuilt some extremely solid new mounts using quality exterior plywood (not pressure treated) and fiberglass materials with polyester resin. If you seriously think about what those engine mounts have to do, it makes common sense to build them like tanks... Do some research on these forums and read and see how others went about their motor mounts in their boats... Do the job the correct way ONE time... JMHO!
 

Yacht Dr.

Vice Admiral
Joined
Feb 26, 2005
Messages
5,581
Do some research on these forums and read and see how others went about their motor mounts in their boats... Do the job the correct way ONE time... JMHO!

I absolutely agree. However..there are guys here that donate their time to help on a more 'hands on' level. Unless there is some damage to the fiberglass boxes ( which are no larger than a size 10 Nike shoe ) then I see no reason to cut/grind/tear out perfectly good bonded glass..just to put the exact same thing back. I agree with the good quality ply stacks as a replacement. But resin coating and bedding them with some tiger hair putty..well they aint going nowhere. You would grind the gel off the boxes to fiberglass wrap the tops. Thus making the structure of the box even MORE solid than OEM. Whatcha got to fasten the mount down ? a few 2-3" x 1/4' lags? In any case..these babys will be super tank after you wrap it all up. You'reNOT glassing the existing glass lid you cut off..you're replacing them with new ( 6 or 8 lams of 1708 and a layer of 1.5 oz mat ). You will have to grind down the top edges of the sides to the thickness of your new top ( ~1/4" ~ )

As a professional fiberglass guy..I personally would not have any issue with this approach.

But as gm280 suggested..its always a good idea to check it out from different approaches. Let us know and we will be here for any questions.
 
Last edited:

nateo

Petty Officer 1st Class
Joined
Apr 13, 2014
Messages
352
I ended up using 2x4 douglas fir kiln dried as they fit the existing box perfectly, shy of 10". I picked up a fiberglass patch/repair kit that can with resin and fabric, etc. I went ahead and laid it in last night. Got about 2 or 3 layers in, resin harded up on me too quick to get anymore in. Will post some pics tonight. How many layers is good on a job like this. Should I go 3 more? Another kit is $20.
 

Yacht Dr.

Vice Admiral
Joined
Feb 26, 2005
Messages
5,581
Which kit are you using Nateo? Some of those things come with fine cloth that is just about worthless on boats.

You should get some 1708 and 1.5 oz mat..some resin..and some cabosil ( might be too late for the cabosil now ). I suggested 6-8 layers ( 1/4" thick yes? )

Anyhow..you really should snap a picture of the Prep job you did before you douse it with more resin. Lets make sure your on the same page here..
 

Woodonglass

Supreme Mariner
Joined
Dec 29, 2009
Messages
25,924
Well, If another Kit is $20 bucks, I'm pretty sure it's the Bondo Big Box Store kit and with out the "Tiger Hair" thickener etc...I'm not real confident that this "Insert" method is gunna be an Optimum fix to the problem. BUT...I've been proven wrong before...:eek:
 

Yacht Dr.

Vice Admiral
Joined
Feb 26, 2005
Messages
5,581
Well, If another Kit is $20 bucks, I'm pretty sure it's the Bondo Big Box Store kit

Yea..but there are two different kits that I know of. One comes with CSM while the other is that junky finish cloth. If it was the finish cloth..then time to take that crap off. If its mat..then you could still use it in the build. ( my bet is on the finish cloth though )

As far as the insert method..well that would depend on how this was done. While I think tiger hair is the preferred method..there are other compounds that would work too. I have completely filled cavities like this out of a phenolic poly compound before ( to make them forever water proof ). Its the glass thats gonna hold this chunk of whatever is in there in place. The glass is Not going to rip off the stringers/hull. The stuff inside the box aint gonna rip out either. The lags will rip out Way before then lol. As it stands..the single most important part of this operation is going to be how well the fasteners are bedded down. But this would have been the case if we reused it..or had new stuff all around.
 

nateo

Petty Officer 1st Class
Joined
Apr 13, 2014
Messages
352
I get the feeling I'm going to be in trouble after posting this pic of the prep job. Unfortunately I didn't have my grinder on me so I used 80 grit sand paper and cleaned off with wet paper towels. The two by fours I had to pound in a little with hammer, very tight fit, I'm thinking the boards probably won't go anywhere.

This is the kit I used: http://bondo.com/products/bondo-fiberglass-resin-repair-kit-420.html
 

Yacht Dr.

Vice Admiral
Joined
Feb 26, 2005
Messages
5,581
Yup..thats the cloth kit. Time to grab your grinder and get it off. But while your at it..you need to grind all the gelcoat from the sides of the boxes and the inside face plus the top of the stringers. Say your box is 10 inches..your stringer will be prepped to about 20 inches ( to allow for 5" overlap on each side of the box ). Meh..Id say about 5 min of grinding on each side.

Looking forward to them Prep pics..before you glass ( *cough* )
 

nateo

Petty Officer 1st Class
Joined
Apr 13, 2014
Messages
352
ok, before I redo it all, can you let me know what is wrong with the cloth kit. What's likely to happen with it if I leave as is? This boat is probably only worth about 3 grand, not trying to make it last the next 30 years, if it lasts for 5 or 10 I'm fine with that.
 

howlnmad

Petty Officer 2nd Class
Joined
Jul 29, 2009
Messages
178
The cloth doesn't have the strength of say a 1708 material. What could happen? Maybe the torgue of the motor pulling your new mounts up through the top of your new repair.
 

Yacht Dr.

Vice Admiral
Joined
Feb 26, 2005
Messages
5,581
Primarily, right now, is the bonding issue with the stuff. You need the mat for the bond for the rest of your layups. After that its like howlnmad said..no strength. That stuff is more for surfboards or..as the name implies..Finishing. You need beefy stuff over it.

As far as what you did so far..and what can go wrong? You really should post up pics of what you have so far. Its really not a big repair and shouldnt cost much. If you had all your ducks in a row I would say it would take a day to do. And thats with lots of bathroom breaks!

But for right now its kinda hard to say how to proceed without them 1000 word pictures handy. Dont sweat it until we eyeball what you got going on. Cant be That bad lol.
 

howlnmad

Petty Officer 2nd Class
Joined
Jul 29, 2009
Messages
178
I'm not familiar with that Bondo product but if it's a waxed resin, you're going to have to do some grinding and wiping down with acetone.
 

nateo

Petty Officer 1st Class
Joined
Apr 13, 2014
Messages
352
No Title

Well I went to actual boatstore today and the accessories guy (who always seems very knowledgeable) sold me some stuff made for marine use. After getting home I'm not a very happy camper though. He sold me some polyester resin which he said is designed for marine use, assuming that's ok. but mat which says "fiberglass cloth" on the package doesn't appear to be fiberglass at all but looks to me like the same stuff I got in the bondo kit. Should I take it back and specify 1708? The one he said me was the cheapest/smallest portion of mat he had.

I went ahead and ripped out the bondo stuff and took the grinder/sander to it. Did I go down far enough? I grinded the **** out of it but wondering if I need to keep going? Also how the hell do I wrap this thing with the cloth? What I'm most worried/wondering about is how do I ensure the corners are covered properly? resin?
 

Attachments

  • photo222042.jpg
    photo222042.jpg
    175.7 KB · Views: 2

Yacht Dr.

Vice Admiral
Joined
Feb 26, 2005
Messages
5,581
Yup..take it back and ask for 1708..and a yard of 1.5 oz mat. While your at it..get a fiberglass bubble roller. If you can find a throw away one that would do just fine.

Ok..lemme see if I can explain this properly here..

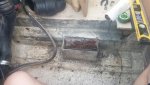
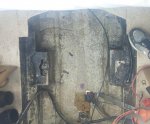
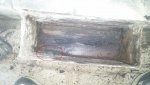
Grind All the gel coat off All three sides of the box ( yes..all the way exposing raw glass )
Grind All the gel coat off the stringer where the box mates it.
Grind the top edge of the box enough to account for your layups. Ok..lets say the box is 10" tall. Your going to be adding about 1/4" of New glass. So grind the 3 top edges down to 9 3/4". Now when you add your glass your back to 10 inches :)
Round the edges.

When you get your glass -

Cut 1 piece of mat the Length of the box ( 10-12" ? ) and long enough to go from the outer edge of the stringer ..over the box top..and all the way down the face to where it meets the hull. Great..now cut 4 pieces of 1708 the same size.

Cut 1 piece of mat the Width of the box ( 4" ? ) and long enough to go from the back of the box to the front of the box Both where it meets the hulll. Yup..4 more in 1708.

Tear up some 2" circles of mat ( Not cut..little hairy circles )

Ok..so you have a total of 10 pieces of glass and a small pile of hairy circles. ( for each side..so a grand total of 20 )

Resin coat the box and stringer. Grab one hairy circle at a time and wet them out on the corners. Oh.. about 4 should do it.

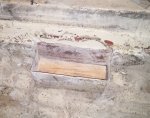
Brush some resin on a piece of cardboard large enough to fit your larger glass pieces. Now.. MAT side Up!..lay down your first Large piece of 1708. Wet that out..then continue with the other 3 Large1708s. Finish with your piece of mat. Roll this out real good with your bubble roller. So now you have a stack of fiberglass all ready to go. Grab that puppy carefully and place the whole thing over your box with the MAT side Down!. Bubble roll this out. Do this same thing with your Smaller ( fwd/aft ) stack. Done.

Go to the other side and do it again.

I know this sounds complicated..but it its real easy. Do a few 'dry' runs to get comfy with it. Pretend to brush,stack and place..that kinda thing. Once you kick that resin your probably about 20 minutes away from being done with one side. Work Quick as you can see some crappy resins kick off Fast! So dont get nervous but do have it all in your mind beforehand so you can work quickly.

Im doing some glassing today, so If I think about it I will do a sample thing with pics and post them when I get home.
 

nateo

Petty Officer 1st Class
Joined
Apr 13, 2014
Messages
352
This is getting a little frustrating. They dont have anything called 1708 or csm. They have fiberglass cloth and fiberglass mat. Are these the same things respectively?

Is the red stuff the fiberglass that i need to grund down to?
 
Top