modopopcorn
Seaman Apprentice
- Joined
- Jan 18, 2013
- Messages
- 46
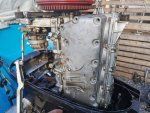
Hi guys! I'm back again having issues again with my 1970 Mercury 500 thunderbolt
It only runs on the top two cylinders and the lower cylinder doesn't fire. When started cold it starts really easy and idles well but as the pressure in the coolingsystem increase the lower two cylinder stops firing.
I have
* Good compression on all four cylinders (A bit high on cylinder nr.4)
* Rebuilt the carbs (jets were all clogged up)
* Checked the ignition were in sync
* Good spark on all plugs
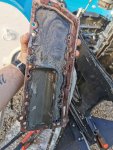
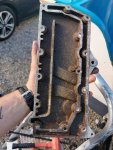
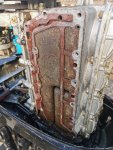
I got a tip that this model could suck water backwards into the combustionchamber if the exhaust-cover fails, I just removed the covers and the gaskets looks like s#!t but I can't see any obvious leaks (and of course two bolts snapped....), the passages between the cooling channels or whatever it is are all corroded and ugly but I can't see any holes.
The inside of the middle cover and the cylinder were covered in this grey goo (exhaust gases mixed with water?)
Boat in water for a quick test-run (excuse my mothers loud voice, the horrible quality and my mothers even worse recording-technique. https://www.youtube.com/watch?v=bhKVxvvdbM4
Idling warmed up (water leaking from a broken plastic fitting) https://www.youtube.com/watch?v=xexh7dVQC70
Appreciate all the help I get, best regards!
It only runs on the top two cylinders and the lower cylinder doesn't fire. When started cold it starts really easy and idles well but as the pressure in the coolingsystem increase the lower two cylinder stops firing.
I have
* Good compression on all four cylinders (A bit high on cylinder nr.4)
* Rebuilt the carbs (jets were all clogged up)
* Checked the ignition were in sync
* Good spark on all plugs
I got a tip that this model could suck water backwards into the combustionchamber if the exhaust-cover fails, I just removed the covers and the gaskets looks like s#!t but I can't see any obvious leaks (and of course two bolts snapped....), the passages between the cooling channels or whatever it is are all corroded and ugly but I can't see any holes.
The inside of the middle cover and the cylinder were covered in this grey goo (exhaust gases mixed with water?)
Boat in water for a quick test-run (excuse my mothers loud voice, the horrible quality and my mothers even worse recording-technique. https://www.youtube.com/watch?v=bhKVxvvdbM4
Idling warmed up (water leaking from a broken plastic fitting) https://www.youtube.com/watch?v=xexh7dVQC70
Appreciate all the help I get, best regards!