Mercruiser 170 Pertronix Ignitor no spark

Corrupt

Cadet
Joined
May 31, 2012
Messages
20
I have an issue with a 1986 Mercruiser 170 that has the Pertronix Ignitor ignition conversion kit installed in it. The owner of the boat decided to move some gauges around so he could install a Lowrance up near the cluster. It would block a couple of the gauges a little so decided to move more important ones around on the cluster. Now the engine won't start. I did check some of the wiring on some of the gauges and found out the lights on all but 1 would not come on. So I crawled underneath and after some tracing figured out the wiring that fixed the light issue. When turning the key to on position, am getting power to the coil pack. If there was an issue with one of the gauges could it still cause the engine to not start? We did take a jumper wire from the battery straight to the coil pack and still no spark. Brand new coil is on the motor. Could it be the Ignitor module inside the distributor?
 

nola mike

Vice Admiral
Joined
Apr 22, 2009
Messages
5,087
There is no coil pack on your engine, just a traditional coil. Is the starter turning? Do you have 12v to the coil pos when cranking?
 

Scott Danforth

Grumpy Vintage Moderator still playing with boats
Staff member
Joined
Jul 23, 2011
Messages
47,621
did you pinch the grey wire to the tach? could be the pertronix module crapped out (happens often)
 

kenny nunez

Captain
Joined
Jun 20, 2017
Messages
3,078
Like SD said about the gray wire, you could try disconnecting the gray tachometer wire at the coil where there is just one wire connecting from the coil to the distributor.
 

Corrupt

Cadet
Joined
May 31, 2012
Messages
20
got a new electronic ignition conversion kit. Installed it and motor started right up. So, the module inside of the distributor went bad.

Now, onto trying to figure out what he did when he was moving gauges around on the cluster. Everything works but the tachometer doesn't work. It moves when cranking but then goes to 0 while running and doesn't move. Only reason for moving gauges around on the cluster is due to space constraints when adding a Lowrance GPS/Depth finder. It covers up the 3 gauges on the far right. The 3 right gauges were temp, trim, and a little larger gauge for speed. Was going to swap out the speed with the tach cause they were both the same size, but after he had disconnected the wiring from the tach, he figured out there wasn't enough of the tube coming from the exterior sensor. So he put those 2 back the way they were. Only other one we moved was the temp. He swapped it out with the voltage gauge. So I now have the oil pressure gauge, fuel gauge, temp gauge and tach visible. Just using the speed on the Lowrance for now. But I do like to keep an eye on the tach also. Any ideas what might have happened to the tach during the movement?
 

achris

More fish than mountain goat
Joined
May 19, 2004
Messages
27,468
Once you have the right prop on a boat, the tacho is almost redundant. What do you really need it for? It doesn't tell you your speed through water, or your speed over ground, just the engine revs, and what use REALLY is that? Important gauges are temp and oil pressure. Fuel gauge is useful for the occasionally glance (maybe once or twice a trip), and trim is nice when it's working, but the tacho is basically useless. I say cover it up and most people wouldn't even notice.

Chris......
 

Corrupt

Cadet
Joined
May 31, 2012
Messages
20
Yea, I did forget to add that trim has never worked since he got the boat, but i did find a post where someone gave the colors and wire locations for the trim gauge so I may look into that one. Does anybody know what wires go where on the tachometer. I'm pretty decent at tracing wires and placing them where they need to be so that shouldn't be a problem once I know what is supposed to be hooked up on the back of the gauge.

on a side note, just got done changing the U-joints and the gimbal bearing on the Alpha One outdrive. That was a blast. But she sounds 1000 times better. I knew the gimbal bearing needed to be replaced as I could hear it vibrating in the turns.

Also, just replaced both batteries also and now I'm worried the alternator may be acting up. The previous owner installed the kit that put a DC-60 Alternator with a V-belt to the crankshaft. After cranking with the new batteries, I was showing exactly 12.49 volts on one battery and 12.50 volts on the other. The batteries stayed steady at this voltage while running the engine for about 5 min or so. Question on this would be, shouldn't I be getting a 13v or slightly higher reading when the alternator is charging? Or with both batteries hooked in line will I just see the voltage I was seeing?
 
Last edited:
Joined
Mar 27, 2010
Messages
3,008
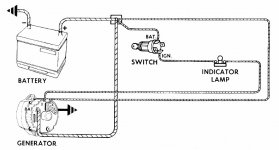
Voltage should have been over 13 when running. How many wires does the new alternator have going to it.
 

Attachments

  • 3-wire alternator.jpg
    3-wire alternator.jpg
    56.6 KB · Views: 3
  • 470 wiring w alt.pdf
    257.8 KB · Views: 2

Corrupt

Cadet
Joined
May 31, 2012
Messages
20
It is a one wire alternator. But, I think we found what was wrong tonight. We took the boat out for another ride this evening and the alternator bracket broke. Well, we checked it out and come to find out the inner bolt had broke off, so we have to drill that out and re-thread. Gotta find a decent welder to weld the piece that broke off the edge. I'm hoping we can get the bracket welded back together because the cost of another bracket (Sierra 18-5968) runs around $269. If not able to use this bracket we may have to come up with a different way for the alternator to mount. I have seen some youtube videos that have shown different ways to mount the alternator, but have yet to come across any that would give a part number for the adjusting sleeve that I have seen in many of them. The way the alternator mounts right now is almost perfectly to the left of the main crankshaft pully. In some of the above mentioned videos on youtube. Alot of them have the alternator mounted up near the top left of the motor.
 
Top