mariner 21' rebuild- need some advice

mattsasso

Cadet
Joined
Apr 13, 2017
Messages
28
finished work and got the chance to leak test my brazing job. solid as a rock and not going anywhere. It will still get a few layers of coat-it epoxy on each side just for good luck. so... the brazing worked but i think it would work a little better if I could have gotten the area hotter faster and kept the torch moving more. all in all I am pleased with the results. I wouldn't do this on thinner aluminum though.
Got a long list pf things left to do.
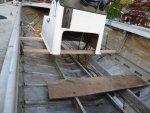
1. prop up the console above the stringers- leaving it attached to everything cause I can work around it and I don't want to reconnect everything
2. clear all the old stringer and floor rivets
3. clean the rest of the draining holes under the ribs along the keel of foam
4. super clean rivet areas
5. check and replace the bildge pump. i keep forgetting this cause its a pain to get in there
6. gluvit the inside
7. re attach stringers
8. add a few braces since I won't be pumping foam in
9. maybe add an additional 2 stringers (we'll see)
10. cut and install foam

If i can get this done this weekend I will be able to get the floor cut and treated and start installing in. can't wait until the floor is in. walking on those ribs sucks!!!!!!!!!!
 
Last edited by a moderator:

Watermann

Starmada Splash of the Year 2014
Joined
Jan 12, 2013
Messages
13,753
That's quite the laundry list of things to do, have fun with it and enjoy the ride. :watermelon:
 

mattsasso

Cadet
Joined
Apr 13, 2017
Messages
28
total loss this weekend. the weather didn't cooperate in order to allow me to seal the hull. I'll have to do it this week. Instead i worked on the engine and attempted to replace the thermostats on an evinrude 115. I cut a porthole through the cowl so I could access the thermostat. Nice an easy. The two side bolts came out splendidly. The center one however, resisted lube, heat and all the general anger I sent at it. Once it was goobed up I even filed it down to a 10mm from 7/16. still no luck. I even tried to just break the head off but that bolt just loved to strip. I finally decided to grind the head off with my dremel. and My dremel of 25 years decided to burn out on me. $50 later and a trip to home depot and my new dremel took it off in short order. I finally worked the casing off over the bolt but the plastic spacer was sacrificed. i was so full of hate at that point I didn't care. A $30 part and its on its way. ugh..............really hoped to have the floor ready for wood. I'll have to give it some time after work this week. Hopefully the weather will cooperate
 

mattsasso

Cadet
Joined
Apr 13, 2017
Messages
28
No Title

the weather hasn't been cooperating so I decided to rivet my stringers back in place. I need one good rain free day so I can I can seal the inside with Gluvit and call it a day. You'll notice I kept the console attached. I just didn't want to have to reconnect everything so I am just working under it. luckily the floor seems right where the wires come up under the console
 

Attachments

  • photo264623.JPG
    photo264623.JPG
    79.9 KB · Views: 1

Watermann

Starmada Splash of the Year 2014
Joined
Jan 12, 2013
Messages
13,753
Be sure to clean up the seams real good to make sure the gluvit adheres properly and you can't leave it outside uncovered as gluvit has no UV inhibitors.
 

mattsasso

Cadet
Joined
Apr 13, 2017
Messages
28
Be sure to clean up the seams real good to make sure the gluvit adheres properly and you can't leave it outside uncovered as gluvit has no UV inhibitors.


Thanks, I don't have an indoor option and was planning on using an old fashioned big blue tarp over the boat for it to cure.will the tarp stop the UV light enough to leave it for a few days or should I hit it with some marine paint to cover it.... what do you think
 

BWR1953

Vice Admiral
Joined
Jan 23, 2009
Messages
5,867
Thanks, I don't have an indoor option and was planning on using an old fashioned big blue tarp over the boat for it to cure.will the tarp stop the UV light enough to leave it for a few days or should I hit it with some marine paint to cover it.... what do you think

I used a blue tarp and it worked fine for me.
 

mattsasso

Cadet
Joined
Apr 13, 2017
Messages
28
No Title

Can anyone tell me what size bolts these are. They were missing when I bought the boat. It's an evinrude 115
 

Attachments

  • photo264866.jpg
    photo264866.jpg
    88.9 KB · Views: 0
  • photo264867.jpg
    photo264867.jpg
    57 KB · Views: 0

Watermann

Starmada Splash of the Year 2014
Joined
Jan 12, 2013
Messages
13,753
No idea but I also don't see a purpose for any bolts that small in that location other than maybe an anode?
 

mattsasso

Cadet
Joined
Apr 13, 2017
Messages
28
Finlly got a bunch of stuff done. It stopped raining for a few hours. I finished the engine. running nice and pushing water. those holes for for an anode and wehn I plugged them with two small bolts I got more water pressure. Today when it stopped raining I got out the wire wheel and cleaned out all the corroded areas along the keel and hit it with jb weld and then some gluvit for a nice covering. I mixed up about a quart and that covered the trouble areas. unfortunately i thought it would cure faster and the sky started showing signs of rain again so i just finished putting a massive dirty tarp over the whole boat. I also picked up some roofing foam from a friend but it has a paper backer. I found some nice styrofoam at home depot. $9 for 6 sheets of 3/4' x48". It's the cheapest I could find and bought a bunch. Once I pack it I'll hit it with a little great stuff to keep it snug. I'll post some pics when I get the tarp off
 

64osby

Admiral
Joined
Jul 28, 2009
Messages
6,799
I found some nice styrofoam at home depot. $9 for 6 sheets of 3/4' x48".

Closed cell foam would be a much better option. Yes it does cost more but it floats much better and won't absorb water over time.
 

mattsasso

Cadet
Joined
Apr 13, 2017
Messages
28
OK, I am going to move to paint soon . I am using a light gray Durabak on the inside. But what do you recommend for the outside? and IO have a few process questions
1. I sanded both sides of the outside and cleaned up of the hull and took out any bad paint. Do I need to prime before I paint or will the original paint serve that purpose?
2. what paints do you recommend for the outside of the hull? I was going to use rustoleum marine but the curing time looks ridiculous
 

mattsasso

Cadet
Joined
Apr 13, 2017
Messages
28
Closed cell foam would be a much better option. Yes it does cost more but it floats much better and won't absorb water over time.


I agree, but it will float with the styrofoam and I set it in the hull so the hull can fully drain. I have enough to float the boat of it fills with water. And if it if fills with water everything else in the boat will be screwed any way so I went with the cheaper foam
 

laurentide

Lieutenant Commander
Joined
Jul 24, 2011
Messages
1,869
I agree, but it will float with the styrofoam and I set it in the hull so the hull can fully drain. I have enough to float the boat of it fills with water. And if it if fills with water everything else in the boat will be screwed any way so I went with the cheaper foam

It will also disintegrate over time and clog/kill your bilge pump. The blue or pink foam is pretty much the standard replacement for all the rebuilds here. It won't take on water. The styrofoam definitely will. If you take a look at some other threads here you can see how many have done it with closed cell panels to allow the bilge to drain. It basically just sits above the ribs. There's a series of limber holes at the keel area of each rib.

You can see what I'm talking about in this photo of my bilge. A lot of guys have done a much cleaner installation than I did, but the end result is more or less the same. It also supports the deck and I was able to fit a couple behind the side panels:

duxX80x.jpg
 

Watermann

Starmada Splash of the Year 2014
Joined
Jan 12, 2013
Messages
13,753
We Stracraft mob types don't like to see guys use things in their rebuild found through experience to be less than optimal or substandard for boats and try to sway them from using the materials. Styrofoam and bed liner material are 2 of those things at the top of the list I'm sorry to say.

Paint and catalyst hardener along with poly beads or non-skid additive makes a way more aluminum friendly combination than truck bed liner. If everything goes right I guess the bed liner stuff would not be a problem but as soon an it has one little spot that lifts and water gets under it then it will continue to lift and now you have a source for corrosion. Problem is most guys think the bed liner is an easy way to have a non skid finish and they don't do proper prep work before putting it on.

Self etching primer on any bare AL, regular primer and then a poly alkyd enamel paint with catalyst hardener added. Most industrial / tractor paint and Rusto Pro or Rusto Topside will work good, with the hardener added 70 - 80 degrees the paint will be dry the next day and most paints don't fully cure for at least 30 days before you should wax them.
 
Top