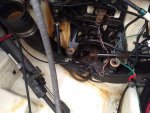
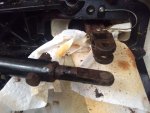
Looking for help from people more familiar with machining than I am. I'm replacing two steering pins on a twin engine and removing engines, exhaust, transom assy, etc. The existing tie rod coupling the two outdrives steering levers together (and attaching to power steering ram) is badly corroded which I would like to replace with stainless. It's currently steel. I had to cut out the pins because the rust welded the pins to the tie rod.
The dimensions of the Mercruiser tie rod part is
Length: Approx 33" end to end
Diameter: 1.0"
Diameter Rod Ends: 0.75"
Thickness of Rod Ends: 0.4"
Hole Diameter: 0.375"
Ideally it would be adjustable within an inch or two but can't figure out how to make it. So far I figured I can get a stainless 1.0" diameter tube and 0.76" ID. Then I can get a solid round bar of 0.782" and either have a buddy mill it down to look like the ends of the old part, or even get it close enough on a bench grinder. The round part of the ends would slide inside the tube, but I don't have enough practical experience to know if the tolerances will work out, only 0.022" spacing. Then I'll have a buddy weld the ends to the tube.
If anyone has any ideas how to do the same but make it adjustable with threaded pieces like the Mercruiser part. I was looking at getting a 3/4"-10 threaded rod for the ends, but not sure how to tap inside the 1" pipe (it can't be NPT since it needs to be adjustable). Not sure if welding a single nut at the end of the tube is good enough.
Let me know if anyone has any good ideas.