No Title
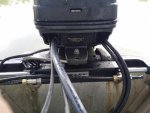
Well, hell. After sleeping on it and going through the process step by step in my head......and drinking a beer, or 2, mustered up the courage to pull the hydraulic cylinder back out of its box and go for it. Used a cut-off tool to cut off about 2" of 2 tabs off the engine support bracket, serving no purpose, that were hooked downwards over the top of the transom. And replaced the 2 too long bolts sticking through the transom securing the engine bracket. This left enough clear space for the hydraulic cylinder and its bullhorn brackets to move to when the tilt/trim lifted the prop out of the water. Dang. It worked! to my surprise. This was the 1st hurdle. Then the next hurdle was making sure full right and left engine turns would make it all the way to the engine stops. My 1st attempt failed as I had connected the hydraulic cylinder link arm ON TOP of the 1996 FORCE 75hp engine tiller tab. This created a bind when turning the engine to the left: link arm hitting engine tiller tab support edge. See pic. So then I called uFlex and talked with Mike. Extremely helpful. He looked over my pic and said go for it on attaching the hydraulic cylinder link arm UNDER the engine tiller tab. Did that and now get free and clear left/right movement of engine to the engine stops. YEA! Next step is hooking up the hydraulic lines and bleeding the system. Don't look forward to that but I think I am on track to having hydraulic steering vs the cable fed mechanical rotary NFB or rack/pinion manual steering. Hope it's worth it! I'll report back after installing the hydraulic lines. Then I'm going to replace the original mercury quicksilver REMOTE CONTROL BOX w/ a uFlex RCB. That will be interesting too.
****one thing I have learned is when you are needing a real tight secure fit use FINE thread BOLTS. Not coarse. When I replaced the top 2 bolts holding the engine bracket to the transom I must have tightened the bolt/nut w/ COARSE threads TOO TIGHT
"Stainless steel can unpredictably sustain galling (cold welding). Stainless steel self-generates an oxide surface film for corrosion protection. During fastener tightening, as pressure builds between the contacting and sliding, thread surfaces, protective oxides are broken, possibly wiped off, and interface metal high points shear or lock together. This cumulative clogging-shearing-locking action causes increasing adhesion. In the extreme, galling leads to seizing - the actual freezing together of the threads. If tightening is continued, the fastener can be twisted off or its threads ripped out.
and now I cannot unscrew one. Evidently the threads warped and now the nut is stuck. Cannot unscrew it. Any ideas on how to unscrew it? If not will have to cut the 1/2" stainless steel bolt. Dread that too!
What are the benefits of fine threaded fasteners over coarse threaded fasteners?
The potential benefits of fine threads are:
1. Size for size a fine thread is stronger than a coarse thread . This is both in tension (because of the larger stress area) and shear (because of their larger minor diameter).
2. Fine threads have also less tendency to loosen since the thread incline is smaller and hence so is the off torque.
3. Because of the smaller pitch they allow finer adjustments in applications that need such a feature.
4. Fine threads can be more easily tapped into hard materials and thin walled tubes.
5. Fine threads require less torque to develop equivalent bolt preloads.
On the negative side:
1. Fine threads are more susceptible to galling than coarse threads.
2. They need longer thread engagements and are more prone to damage and thread fouling.
3. They are also less suitable for high speed assembly since they are more likely to seize when being tightened.
Normally a coarse thread is specified unless there is an over-riding reason to specify a fine thread, certainly for metric fasteners, fine threads are more difficult to obtain.


")