Houston….. We’ve had a problem…..

ScottinAZ

Senior Chief Petty Officer
Joined
Jun 25, 2009
Messages
742
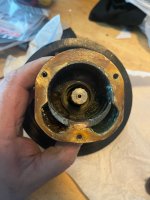
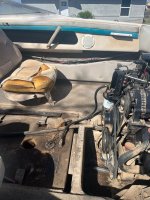
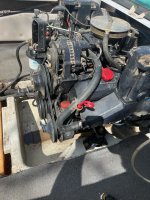
and onto the engine driven seawater pump. Loads easier to service than the "outboard" style of the Mercruiser.... two bolts, and two hose clamps and its off.....

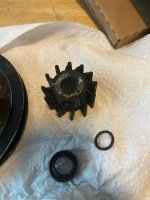
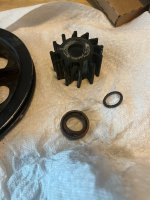
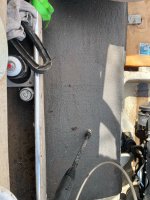
Impeller is toast... not cracked, but has taken a pretty good "set" due to not moving really since 2017. Front seal is toast.. it leaked on initial movement of the crank when troubleshooting the cranking/starting issue (that precipitated this whole thread). At least its serviceable. A couple of screws through it, and its right out.... (and awaiting parts, again).

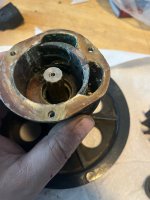
Ill be cleaning up the housing with some scotchbrite to get rid of the little bit of crusty corrosion present. Doesnt look like it ate into the housing too bad. At least its "fresh water"......
 

Attachments

  • image4 (23).jpeg
    image4 (23).jpeg
    2 MB · Views: 1
  • image0 (82).jpeg
    image0 (82).jpeg
    2.1 MB · Views: 1
  • image1 (63).jpeg
    image1 (63).jpeg
    1.6 MB · Views: 1
  • image2 (46).jpeg
    image2 (46).jpeg
    1.7 MB · Views: 1

Scott Danforth

Grumpy Vintage Moderator still playing with boats
Staff member
Joined
Jul 23, 2011
Messages
47,562
New Johnson F5B-9 pumps are cheap if you look (under $150). Easy to rebuild too. (However the kit is 40-50% a new pump)
 

ScottinAZ

Senior Chief Petty Officer
Joined
Jun 25, 2009
Messages
742
time for a bit of an update.. Got the pump cleaned up, a bath in CLR took the accumulated "lake crud" out of the bronze casting, and it looks and feels like new again. Reassembled the pump, and reinstalled it. Fired the boat up on water, and it backfired a bit through the carb.... blew out a chunk of base gasket.... Turns out I warped the adapter when attempting to use it as the lever point when removing the intake.... that and the timing being a bit off didnt help. My bad.

Lapped that back flat this morning (on both sides), and I wish I had a Bridgeport... I coulda decked .020 off it in a lot less time, and more accurately Im sure...

reinstalled the adapter and carb (this uses a 2300 Holley on a stock GM 2 barrel intake, as set from OMC...) and it fired up and is purring like a contented kitten with a belly full of cream. (once I got the fuel bowl filled finally at least....)

next up is to replace the fuel supply line from the tank to pump. Someone had previously cut it shorter, and it was guitar string tight.... no slack at all in it... So for a few bucks in hose, Ill replace it with new.

tank is in pretty good condition. I pumped about a gallon or so of nasty old gas out of it, and I have about 1/4 inch in the bottom I cant get out. Its plastic, so no rust, and thankfully no debris in it. Ill refill it with a few gallons of the "good stuff" to finish cleaning that out.

then, after I seal all the holes, Ill pressure wash it to clean it all out. Im gonna take all the "extra gear" out of the locker, and pressure wash it front to back in the bilges to make sure all the limber holes are clear. Then Ill attempt to leave it open to dry out, but we will see if Mother Nature decides to give it a "fresh water washdown" this afternoon instead....
 

ScottinAZ

Senior Chief Petty Officer
Joined
Jun 25, 2009
Messages
742
and first round of power washing is done. The before and after is fairly telling... this thing has a LOT of dust in it.... even covered, if we get a dust storm, it will get everywhere.... and this one has likely seen several, either covered or uncovered... its disgusting... but getting better

these are the "before" pics
 

Attachments

  • image0 (84).jpeg
    image0 (84).jpeg
    707.4 KB · Views: 5
  • image1 (65).jpeg
    image1 (65).jpeg
    599.9 KB · Views: 6
  • image2 (48).jpeg
    image2 (48).jpeg
    730.4 KB · Views: 5
  • image3 (32).jpeg
    image3 (32).jpeg
    709.7 KB · Views: 6

ScottinAZ

Senior Chief Petty Officer
Joined
Jun 25, 2009
Messages
742
and these are the "after" pics..... I still have a LOT to do, but I need to re-orient the stern downhill first. the jack doesnt get high enough where its parked to be effective draining out the bilges....
 

Attachments

  • image4 (25).jpeg
    image4 (25).jpeg
    729.4 KB · Views: 3
  • image6 (8).jpeg
    image6 (8).jpeg
    772.5 KB · Views: 3
  • image5 (18).jpeg
    image5 (18).jpeg
    744.3 KB · Views: 3
  • image7 (8).jpeg
    image7 (8).jpeg
    868.2 KB · Views: 3

ScottinAZ

Senior Chief Petty Officer
Joined
Jun 25, 2009
Messages
742
ok, lets close this one out... its running, and running pretty decent. I still need to finalize the timing (waiting on the shunt....) and final set the carburetor, which I need the timing set final to do.... its running rich, but thats an easy fix once timing is set.

 
Top