Chaparral 2000 SL Sport floor, and more?? [SPLASHED Sept 2017]

Baylinerchuck

Commander
Joined
Jul 29, 2016
Messages
2,726
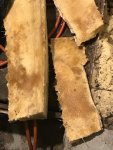
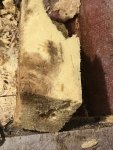
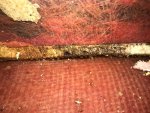
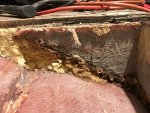
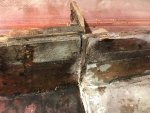
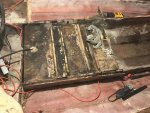
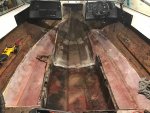
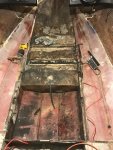
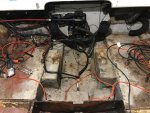
Just tagging along. Amazing how trashed everything underneath was considering how minty the interior looked. Where are you located in PA? I'm in York.

I like that gxrdan is doing for drainage in his thread http://forums.iboats.com/forum/boat...0263711-93-wellcraft-196-sc-bare-hull-rebuild

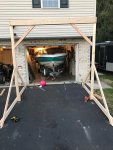
Yeah, I've been a little surprised myself TBH. I started with one small soft spot and ended up with a gutted Chap, lol. I'll check out Gxrdan, thx for the lead.

I live around Chambersburg now but spent most my life in the Southern York Co area, so quite familiar with York. Glad to have you aboard!
 

Baylinerchuck

Commander
Joined
Jul 29, 2016
Messages
2,726
No Title

I had a few more hours today to continue the demo. I took a break for a few days to do a little archery hunting in Maryland. I think it's starting to get close to the rut. I saw a little chasing so I held off on taking any does.

Back to the build.....today I was able to pop out the rest of the foam that was uncovered. This foam has been uncovered for a few weeks and it's still saturated. This obviously is my big hesitation in putting any back in. Pictures I took show wet foam as dark areas. Most of the port side was dry. All of the starboard side was wet. Much of the starboard side foam, forward of the fuel cell came out with the rotted stringer. There were puddles of black water trapped between the hull and stringer.

I keep scratching my head as I pull this boat apart. The stringers are actually in 3 pieces bisected by the two bulkheads surrounding the fuel cell. The bulkheads are not glassed into, or even touch the hull on either side of the stringer. I'm not sure why they wouldn't have extended this plywood, coping it to the shape of the hull. The other thing is that there was a lot of wood that wasn't encapsulated in fiberglass and resin.
 

Attachments

  • photo255090.jpg
    photo255090.jpg
    188.9 KB · Views: 16
  • photo255091.jpg
    photo255091.jpg
    185.4 KB · Views: 17
  • photo255092.jpg
    photo255092.jpg
    140.7 KB · Views: 18
  • photo255093.jpg
    photo255093.jpg
    149.3 KB · Views: 17
  • photo255094.jpg
    photo255094.jpg
    137.7 KB · Views: 16
  • photo255095.jpg
    photo255095.jpg
    144.8 KB · Views: 17

Baylinerchuck

Commander
Joined
Jul 29, 2016
Messages
2,726
No Title

One of my goals is to move the fuel cell forward in this boat. I did a little playing around and I can move as much as 30" forward. I think the reason Chaparral kept it more aft was to allow for a larger ski locker area. I'm not concerned about room enough for skis as most everyone I know wake boards. Moving the cell forward will allow me to put in another bulkhead in an area where everyone steps off the rear bench seat. This will greatly increase the strength here.

Any concerns I should be thinking about when moving the fuel tank forward?
 

Attachments

  • photo255092.jpg
    photo255092.jpg
    140.7 KB · Views: 23
  • photo255096.jpg
    photo255096.jpg
    147 KB · Views: 19
  • photo255097.jpg
    photo255097.jpg
    131.8 KB · Views: 16

tpenfield

Moderator
Staff member
Joined
Jul 18, 2011
Messages
17,712
I like to have the fuel tank at or near the center of mass (gravity), because the amount of fuel in the tank will not affect the balance of the boat. I'm not sure if the boat manufacturers design to this or not.

Not sure if you could determine the center of mass when the boat is taken apart, might have to guesstimate it.
 

Baylinerchuck

Commander
Joined
Jul 29, 2016
Messages
2,726
I like to have the fuel tank at or near the center of mass (gravity), because the amount of fuel in the tank will not affect the balance of the boat. I'm not sure if the boat manufacturers design to this or not.

Not sure if you could determine the center of mass when the boat is taken apart, might have to guesstimate it.


The fuel tank was only a couple feet forward of the engine, so there was a lot of weight in the rear of the boat. If I push it forward to the location I showed above, I will be just aft of the center of the boat. With a full tank the boat was a bit more sluggish to get on plane than when at 1/2 tank. My thought is that the more I move the tank forward the less the amount of fuel I carry will affect the handling of the boat. This is just a guess though as I am more of a "common sense" engineer....:lol: Of course, the more weight forward should help get to plane sooner and stay there at lower speed, plus would be less apt to porpoise, and should take chop a little better for the admiral. Theoretically speaking, of course. :noidea:
 

Baylinerchuck

Commander
Joined
Jul 29, 2016
Messages
2,726
No Title

Well, I reached the point in this restoration where it was time to remove the power plant. I wanted to work around it as long as possible so I had time to formulate a plan. When I started this restoration I was really hoping I wouldn't need to remove it, but as I got deeper in, removing the engine became inevitable. I initially did some measuring and found I didn't have the height I needed in my garage. A cherry picker wasn't going to have the reach or height needed either. A store bought gantry was way more than the budget would allow. I decided to build a pulling fixture out of wood. I opted to use untreated wood since the Mrs. didn't think it added to our house curb appeal.....thus meaning I had to tear it down. The main beam is two 2x8x10'. I doubled up 2x4x10' for the posts since Lowes didn't have untreated 4x4s. The bases are 2x6x10'. I secured everything using headLOK structural wood screws. (AWESOME!!!) The plan is to disassemble this when I'm done pulling the motor, then reassemble to reinstall the motor in a few months. Spent the rest of the day prepping the motor for removal. I opted not to attempt pulling it in the dark tonight.
 

Attachments

  • photo255401.jpg
    photo255401.jpg
    119 KB · Views: 15
  • photo255402.jpg
    photo255402.jpg
    159.5 KB · Views: 15
  • photo255403.jpg
    photo255403.jpg
    138 KB · Views: 14
  • photo255404.jpg
    photo255404.jpg
    103 KB · Views: 14
Last edited:

Baylinerchuck

Commander
Joined
Jul 29, 2016
Messages
2,726
No Title

I made this outdrive stand using a 7.99 furniture dolly from Harbor Freight and some scrap wood. I plan on building an engine stand for the 4.3 using a slightly larger dolly.
 

Attachments

  • photo255405.jpg
    photo255405.jpg
    165.1 KB · Views: 11
  • photo255406.jpg
    photo255406.jpg
    144.3 KB · Views: 12

tpenfield

Moderator
Staff member
Joined
Jul 18, 2011
Messages
17,712
Looks like you are in good shape for the heavy lift. :thumb:

I've been thinking of doing the same thing for the outdrives with a couple of those HF dollies.
 

Woodonglass

Supreme Mariner
Joined
Dec 29, 2009
Messages
25,924
A Black and Decker Workmate makes a Great Outdrive holder.

abae1f54-c50d-4e4a-b598-f1e3bb1d29c1_300.jpg
 

gsxrdan

Petty Officer 1st Class
Joined
Aug 28, 2016
Messages
317
...ur making good headway there, but time to get back to the grinding!! :rugby:
 

Baylinerchuck

Commander
Joined
Jul 29, 2016
Messages
2,726
No Title

...ur making good headway there, but time to get back to the grinding!! :rugby:

I know.....ha ha. Progress will be slow in the next few weeks. Time to go hunt!! On the bright side I did find a couple more uses for the gantry......generator Loader, and tether ball! I'm glad it can be used for something, heck it'll most likely be until after Thanksgiving until I can pull the engine.

Thanks for following along everyone!!
 

Attachments

  • photo255444.jpg
    photo255444.jpg
    120.5 KB · Views: 4
  • photo255445.jpg
    photo255445.jpg
    117.6 KB · Views: 4

Baylinerchuck

Commander
Joined
Jul 29, 2016
Messages
2,726
No Title

I interrupt this restoration to bring you....hunting season. Ended up getting a four point buck in archery, then a much nicer four point the first day of rifle. The boat took a back seat for over a week to restock the freezer. Keeping the freezer full helps to free up needed funding for this project. The larger four point was nice enough that I wanted to try some sort of aqua graphic on a European mount. The bare skull in the picture is just cleaned, but actually looks pretty cool. I'm thinking a winter camo pattern might be neat, or just plain. I'll decide later. Ok......BACK TO THE BOAT!!!!!
 

Attachments

  • photo255773.jpg
    photo255773.jpg
    157.3 KB · Views: 6
  • photo255774.jpg
    photo255774.jpg
    120 KB · Views: 6

Baylinerchuck

Commander
Joined
Jul 29, 2016
Messages
2,726
No Title

I decided I had enough time tonight to pull the engine. I already had everything disconnected and unbolted a couple weeks ago before I built the gantry. With the main beam of the gantry being 10' in the air I was sure there was more than enough room to get the 4.3L over the back of the boat. I was almost wrong.....as it took every bit of the chain hoist to get the motor high enough. Whew!!!

I got the motor situated on a cheap HF dolly and tucked away safely. The holes in the motor mounts were completely dry which is great news. Hopefully I'll be able to build around these mounts without disturbing them.

Next comes the wye pipe and the transom plate, then inspection of the transom. That will be another day!!

Happy Thanksgiving!!
 

Attachments

  • photo255775.jpg
    photo255775.jpg
    151.1 KB · Views: 15
  • photo255776.jpg
    photo255776.jpg
    159.7 KB · Views: 14
  • photo255777.jpg
    photo255777.jpg
    160.9 KB · Views: 14
  • photo255778.jpg
    photo255778.jpg
    153.2 KB · Views: 15
  • photo255779.jpg
    photo255779.jpg
    127.7 KB · Views: 18
Top