'94 Crownline 182 Restore transom/stringers/deck

Rickmerrill

Senior Chief Petty Officer
Joined
Mar 13, 2014
Messages
686
I may not be a natural at a lot of this stuff but making PB fillets comes easy. Maybe I've found my "thing".
 

Rickmerrill

Senior Chief Petty Officer
Joined
Mar 13, 2014
Messages
686
"My thing" is NOT building a support for the ladder. It's just a piece of ply with 6 holes in it that line up with the holes in the ladder, oh and drill some oversized holes and fill with PB then drill the mounting holes so each bolt is encased in glass. First mistake was using a scrap piece of ply I found in the attic - I wanted something thinner than the 5/8 I bought. After fitting, drilling sanding and about to PB my holes I thought, is this stuff even exterior? Pretty sure it wasn't but I did the boil test and in 20 minutes you could separate the play's with a fork. So I decided 5/8 was fine. Next I couldn't get the holes to line up and a couple were so close to the edge of the PB I think they would have leaked. Part of the problem was that the mounting holes were close to the corners of the wood so I could not go too oversized and the board hit against moulding in the transom so not much room for error. I decided I'd need a second set of hands to hold the board in place while I marked or drilled the holes so I waited for my wife. It took her less than a minute to say why not use the old inner skin to get the hole location. Good idea. I refilled the holes I had drilled incorrectly and left it overnight. Finally, in the morning it dawned on me why not just use the ladder mounting holes as a drill guide. The same ladder mount that I had accidentally put the rungs in up side down after I had to disassemble to get off. So, two days of work and this is all I have to show for it!
 

Rickmerrill

Senior Chief Petty Officer
Joined
Mar 13, 2014
Messages
686
Time to ask for more help already. Ready to start tabbing in the transom area and not sure how to approach this since it has wings and curves all over I know there will be issues getting the 1708 to conform. On the wings should I just go from the hull, at the bottom, across the wing and up the transom in one piece? If I use several overlapping pieces will it look ok? Does the ladder support need to be tabbed in or just covered with one/two pieces of 1708? Here is an earlier picture of the general shape.
7D243F06-0F4F-451D-997C-A749F45EEBFD_zpspahcg3ff.jpg
 

GT1000000

Rear Admiral
Joined
Jul 13, 2011
Messages
4,916
Hello Rick,
Just got through reading your ongoing restoration and I would love to come aboard and watch as you bring this nice looking boat back to better than new condition!
Everything you have done so far is first rate and definitely better that anything the factory ever could...
As to your question about tabbing in the transom.
Once you get a nice filet of PB all the way around, you can lay in some strips of 1708, approximately 6-8 inches wide all around the perimeter, then you can cut out the next big pieces of 1708 to completely cover the transom and extend at least a 2-4 inches further than the tabbing, 1708 lays much better than CSM and conforms to curves a lot better, just make sure it is thoroughly saturated with resin.
If absolutely necessary, you can make some relief cuts on the inside corners so it overlaps itself.
If you end up with any voids in the corners, just add another overlapping section as needed...
If you really feel the need, or just want to build up the keyhole thickness, you could add a second complete layer, overlapping the first one, again by 2-4 inches...
Probably not necessary, but you will have a battleship of a transom...
And, like I said, if you wet it out thoroughly, it will conform really well.
Use the chip brush to push the material into place, keep your catalyst on the low end of the scale and hustle...;)
Keep up the amazing progress and best of luck!
Gus:)

PS- I just realized you already did the PB filets...
When you wipe down the transom with acetone, make sure the filets feel sticky/tacky...that will insure that you get a good bond with the next layers...if they don't, you might have to give them a quick once over with some sandpaper to open up the pores a bit...
Also, be absolutely certain to pre-soak the bare transom wood with resin before applying the 1708...wait until it has soaked in and become tacky...if you don't do this, the dry wood could easily draw the resin from the 1708 and cause a weak bond...:tongue-new::tongue-new:
 
Last edited:

Rickmerrill

Senior Chief Petty Officer
Joined
Mar 13, 2014
Messages
686
Hi Gus, thanks for the support, actually reading my ramblings and welcome aboard! Thanks also for the detailed information, I will take it to heart. I've learned a lot reading your posts on the forum.
 

Rickmerrill

Senior Chief Petty Officer
Joined
Mar 13, 2014
Messages
686
Got the first layer of tabbing in on the transom. Between the bubble roller and the chip brush got most of the bubbles out and everything laid down even around the weird turns. I was hoping to go wet on wet all of the way thru but a pint at a time is getting me there, I did manage to get one quart on in one sitting. Here is what it looks like now.
 

Rickmerrill

Senior Chief Petty Officer
Joined
Mar 13, 2014
Messages
686
Learned a few things about laying 1708 the last couple of days. I was doing the first full layer over the transom at the time. If you are laying it on bare wood you definitely should put some resin on it first and let it tack up. I skipped that step but did wet it out, it looked good at first but an hour later there were large white areas where it didn't stick. It had to be the wood soaking up the resin I think. Luckily, with a multi-purpose oscillating tool I was able to cut horizontally into the 1708 all the way around and pry it back off the wood. BTW, it works really good at leveling any nibs or high spots. I left the outer area, coated the bare wood, waited for it to start to tack up, wetted it out, and applied 1708 again overlapping about two inches onto the perimeter. It's been several hours and no white spots at all. Make sure to put some resin on bare wood first and let it tack up before laying 1708. With CSM I didn't have this problem. I wasted about a square yard of 1708 and a pint and a half of resin, not too bad. Here is how it looks now. 
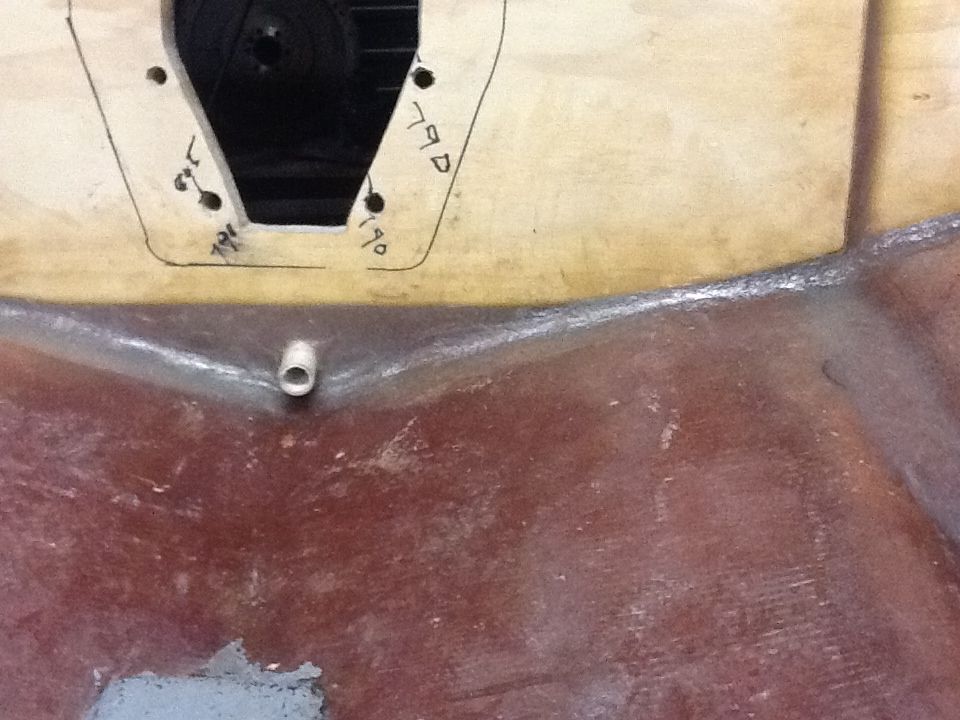
Another thing I learned was if you are going to have any overlaps (around corners or whatever) you need to wet out the bottom piece before you put the second piece over it. No amount of resin will soak thru two layers of 1708. See the white spot just under the tow hook support. The last thing I "learned" is that there always seem to be some areas in 1708 that will not soak up the resin no matter what. Jay had a few spots where he had this happen. I even soaked the resin in a pan and a few spots that never saturated. I don't know what is up. Could it be manufacturing flaw, damage when shipping or handeling or is it sweat droplets contaminating the cloth? I had a couple of small areas that did this and a few strands that did the same thing. An example - the top has some dust on it so ignore, the middle is where I'm talking about and I swear they are not air bubbles even though it looks like it. There is one of the small problem spots off to the left. No matter what I did it would not take resin and go transparent. I even roughed it up with a box cutter, cutting the fibers then applied more resin, it would not soak it up; must be some kind of contamination?
 

GT1000000

Rear Admiral
Joined
Jul 13, 2011
Messages
4,916
Also, be absolutely certain to pre-soak the bare transom wood with resin before applying the 1708...wait until it has soaked in and become tacky...if you don't do this, the dry wood could easily draw the resin from the 1708 and cause a weak bond...:tongue-new::tongue-new:

Yes sir, it can do that...:eek:...

About the "white spots"...Two things...

Yes sweat drops will turn the resin milky white wherever they land...if you encounter a situation where you are sweating profusely and they are getting everywhere, you can use a rag to dab them up...it will help a bit...but don't worry too much about them, as they generally don't cause to many lamination problems...

Another thing that can happen is that in the manufacture of the fiberglass cloth, the "threads" are basically microscopic hollow tubes, that when they get filled with resin, are what cause the glass to turn clear/transparent...in the manufacture they sometimes fail to form and instead of being hollow, they are collapsed and therefore do no become saturated with resin and turn transparent...this was explained to me by a very knowledgeable gentleman that has worked in the marine industry his entire life...

Hope this helps...and BTW, the transom install is looking really good:D
 

Rickmerrill

Senior Chief Petty Officer
Joined
Mar 13, 2014
Messages
686
Thanks for that GT makes sense. Got a drop of water in the resin I was about to mix up from my ice water glass condensation, dipped a paper towel in there and it was gone. Also got a drop on the 1708, tried to dry with the hair dryer but I could still see the stain. I expected to see it after the laminating was done but no, can't find it.
 

Rickmerrill

Senior Chief Petty Officer
Joined
Mar 13, 2014
Messages
686
I'm a proud guy today. Put a layer of CSM on the bottom side of the engine supports, for waterproofing. Wrapped it over the edge by about an inch. Put resin on it and let it soak in until it started to get tacky, wetted it out and applied the CSM with a brush. Barely had any bubbles to chase out. I used some sandpaper to make the beginning of the radius a little more gradual, that may have helped. I plan to put 4 layers of 1708 on to hold them in so I'm not going to bother covering the rest of them in CSM. Here is how they turned out. Oh, it was great to be standing at a bench and working standing up compared to the tortured positions you get into inside the hull. The hairy ends will be cut to length. Here is a closer view of how they turned out. 
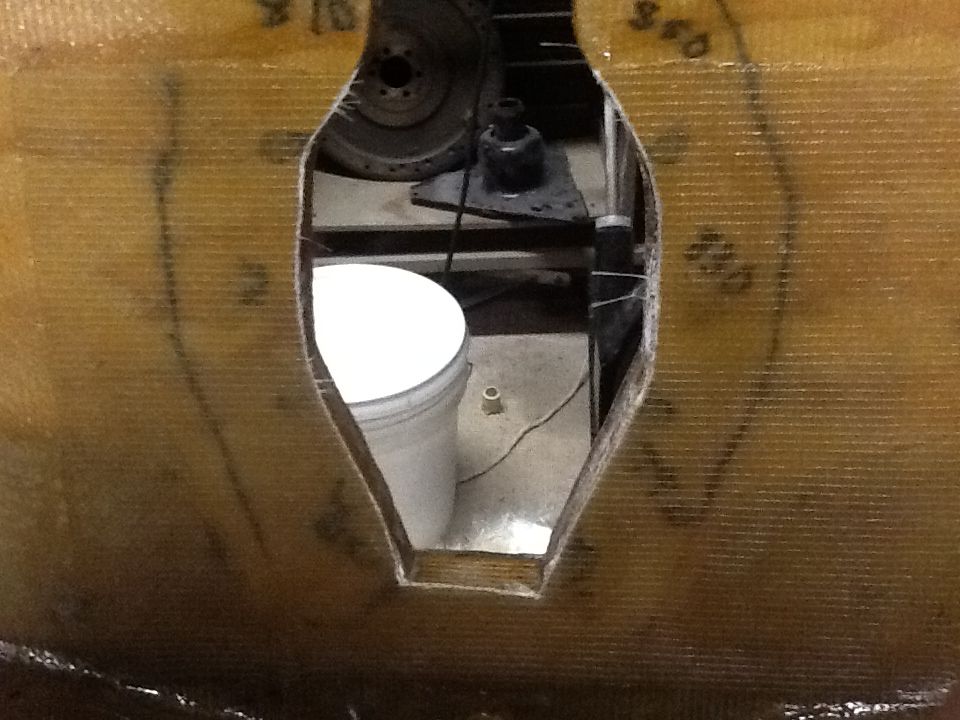
Finally, I got the second layer of 1708 across the transom. Looks like there is some white areas and bubbles but that us just the light reflecting. My thickest area at the top of the keyhole is right at 2" but the bottom is about 1.9". Within spec for parallelism but just a little thin. My two layers of 1708 added about 100 thousandths of an inch so I'd need two more layers of 1708 to get there at the thinnest area. I'm wondering if I could use some layers of gelcoat, inside to get the parallelism even closer, and it can be sanded flat and then put on more layer of 1708 to get the thickness correct. My transom, BTW, was only 1-7/8" originally. Just thinking out loud. Please let me know if you have any ideas on this. Here is the double tabbed and two layers of "skin" transom now.
 

Rickmerrill

Senior Chief Petty Officer
Joined
Mar 13, 2014
Messages
686
A couple of things that should be obvious but those of us in the slow lane might not know. Get a decent pair of scissors and get some furniture stripping gloves and use them for cleaning - acetone doesn't melt them like it does nitrile gloves. The more you clean the less money you throw away. I still toss the rollers but I'll try leaving them in acetone in between jobs as has been suggested in the forum. Not a great demonstration but the 20 year old shop scissors on the left tear the fiberglass and take quite a bit of nawing to cut. The new $15 scissors from Lowes cuts several inches at a time cleanly. I paid about $5 for these furniture stripping gloves, just wish I'd had them all along for cleaning brushes, pails, bubble buster.
 

atjohnson

Petty Officer 2nd Class
Joined
Feb 3, 2014
Messages
106
Rick your work looks great. I'm glad to see that you are having more success with the CSM than I can say I did. Cleaning and reusing your brushes and rollers will save a smaller fortune. I wish I would have salvaged more than I did, but hindsight is 20/20. Engine mounts look great too. Looks like you mirrored the factory judging by what I removed.

Can't wait to see more.
 

Rickmerrill

Senior Chief Petty Officer
Joined
Mar 13, 2014
Messages
686
Thanks Andrew. Mirrored the factory except I forgot there is a little 2-3/4" step down at the front, I think just so the fuel line and vent line can pass thru on the port side. Not a big deal to add it. Looks like you're going to town on the outdrive rebuild, as I suspected. Can't wait to see how it looks when you're finished and heading to the lake!
 

atjohnson

Petty Officer 2nd Class
Joined
Feb 3, 2014
Messages
106
" When are we going to the lake" is beginning to be a daily question. I had made a few predictions, but my most common answer is I'll get back to you on that. Just hoping to make it out a few times before the end of the summer and I would be happy. If I could keep from running out of supplies it would help, but that seems to be inevitable as well.

Yes the outdrive is going well. Do you have any plans to do any work on your's or are things in good shape?
 

atjohnson

Petty Officer 2nd Class
Joined
Feb 3, 2014
Messages
106
Almost forgot.

You are also correct about the cut outs on the back of the mounts, but to be honest they will be easier to glass without the cuts. Those steps downs have been a royal pain since day one for me.
 

Rickmerrill

Senior Chief Petty Officer
Joined
Mar 13, 2014
Messages
686
I can almost hear some little people voices "when are we going to the lake?". Hope that's what your wife is saying too, much better than "when are you going to be finished with that darn boat?". Seeing how hard you've been hitting it I think you'll make it this summer. Hope you do. I'd be happy to get mine on the water for some trials before it gets too cold. I've just about finished with the transom and it took 5 gallons so I will probably have to do some reordering too. Everything mechanical on my outdrive works good and it looked really good when I inspected it but I'm thinking of going ahead and replacing the bellows, gimble bearing and lower shift cable since it's already out. Haven't looked at the replacement interval on the bellows but I bet it is less than 20 years. I just looked at a picture and I will definitely need to cut a step in the front of the port engine support so there is room for the fuel lines. The right doesn't really need it so I might just leave it the way it is.
 

Rickmerrill

Senior Chief Petty Officer
Joined
Mar 13, 2014
Messages
686
Well, the anal retentive side of me may be showing. I managed to wrap the keyhole with CSM (not sure if that is useful, recommended or wise) and ran it out just far enough to cover the inner transom plate cover area to build a little needed thickness. Rather than add two more layers of 1708 across the whole transom to get everything over 2" thick, I decided to try to get the flatness a little closer so I put one layer at the bottom third then overlapped that with a second larger piece that covers the first and second thirds, the top third was within spec so nothing adder there. The thickness of the transom is now between 2.000 to 2.050 well within the thickness and inside flatness specs. I do have an abrupt step at the top edge of the larger piece, about .050" or less than 1/16" and a less abrupt one where the top of the smaller piece is overlapped by the larger one, about .030" or 1/32". I'd like to make the transition more gradual at these edges so the inner transom plate is touching evenly, as much as possible, all the way around. I wonder if I should just do a little sanding or if I should use some gelcoat or PB as a filler and then sand? URL=http://s1328.photobucket.com/user/Rick_merrill/media/Boat/599D9910-04D7-4205-8142-BE6CE8A077D6_zpsolz4pzw1.jpg.html]
599D9910-04D7-4205-8142-BE6CE8A077D6_zpsolz4pzw1.jpg
[/URL]
 

GT1000000

Rear Admiral
Joined
Jul 13, 2011
Messages
4,916
If you have micro balloons to mix up some thickened resin to use as a filler, that would work really well as it would make sanding it down level a lot easier than if you mixed the resin with cabosil...;)
 

JASinIL2006

Vice Admiral
Joined
Feb 10, 2012
Messages
5,548
It's hard to believe that five one-hundredths of an inch would make a difference, especially if the 'step' is on the inside where the seal won't be affected, but if it were my boat, I'd probably be mixing up some thickened resin, too...

Looking REALLY good!
 

bigdirty

Senior Chief Petty Officer
Joined
Oct 4, 2013
Messages
652
I'd likely be just a picky about it (machinist by trade) and I would be tempted to put a layer of csm there to even out the transition... BUT; the top of the inner plate WILL flex a little bit from my exp. and if your outer surface of the transom is good and flat (and clean..) the gasket will seal up just fine.. (there is a torque spec is on those studs/nuts, but its not a lot iirc..) Lookin good man! :)
 
Top