'76 Holiday i/o 18' Fishing Rebuild (pic heavy!)

italianstal27

Chief Petty Officer
Joined
Feb 18, 2017
Messages
403
Question for the gurus,

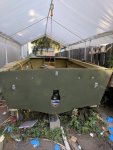
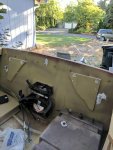
When we pulled the original bow cap (and it exploded), I'm assuming the cap was under tension from the rest of the boat.

Is there a methodology / is it important to pull the boat together before replacing the bow cap? Or is it mostly there to protect the front of the boat?

-John
 

Watermann

Starmada Splash of the Year 2014
Joined
Jan 12, 2013
Messages
13,753
Take that in the house tonight and sleep with it! :lol:

Hey the bow caps shouldn't have tension on them, they just have a lip on the aft side that goes over the RR so you have to kind of lightly persuade them a little with a rubber mallet to go over.
 

italianstal27

Chief Petty Officer
Joined
Feb 18, 2017
Messages
403
Fantastic news. We found one at the boat graveyard that fits good enough. $20 vs the $80 for the legit part someone was selling...

We're getting close. this weekend we gotta get the bow gunnel supports in.
 

italianstal27

Chief Petty Officer
Joined
Feb 18, 2017
Messages
403
Got after it last night...

IMG_20170908_175252.jpg

Getting the bow support fitted with c clamps to the L bracket behind it. Traced out the outline of where we are riveting through the 1x6" board. We used common board... it felt soft as I was drilling it.. Maybe we should've gone with a harder wood? Then again the softness should prevent splitting like hard woods do since we're putting rivets through it.

IMG_20170908_193048.jpg

Riveted L bracket to the back with COPIOUS amounts of loctite PL marine (the stuff we've been using the entire project). The correct tool for removing paint to get back to epoxy layer in those areas is 100% a die angle grinder 3" wheel with sand paper. I spent 10 minutes sanding the first L bracket area and it clogs the paper immediately. At this point, a 21 gallon $150 air compressor from home depot is the bare minimum I'd suggest for getting a boat done. You could go smaller, but it just takes more time to get stuff done :) Here I saved a half hour easy.
 

Attachments

  • IMG_20170908_175252.jpg
    IMG_20170908_175252.jpg
    120.2 KB · Views: 1

italianstal27

Chief Petty Officer
Joined
Feb 18, 2017
Messages
403
IMG_20170908_201609.jpg

Halfway done burning the late night oil. Getting that 1/2" piece of ply to stay was tricky at times.

IMG_20170908_214018.jpg

And here's how we left it last night to cook off. 8 rivets all with 5200. (I know it's not 5200 just easier than typing it all out. I think it's poly-ethylene).

We used 2 c-clamps to squish the plywood to the beam.

Overall very very tricky to get the existing holes in the L-bracket attached to the hole to line up with the holes I drilled in the wood. I ended up having to do some more drilling in the boat. Because the hole expanded by maye 1/16" to 1/8", the rivet will simply pull through and not bind to the metal on the back.

So, the way you fix that is to take a scrap piece of aluminum, drill a 3/16" hole in it, deburr, 5200, and slide it over the rivet. That'll prevent the rivet from pulling all the way through.

Today we work on the gunnel supports and probably getting the batteries, blower, ground bus, etc. installed on the transom.

Question for all of you out there, When you drilled the stern eye hook holes, did you just 5200 the bolt sliding it in, or did you epoxy the interior of the hole, redrill, and then put the 1/2" bolts through?

-John
 

Watermann

Starmada Splash of the Year 2014
Joined
Jan 12, 2013
Messages
13,753
Knocking it out, you guys must want to hit the water before winter sets in. Isn't the fall run salmon in full swing down on your end of the river?

Stern eyes, some guys go bonkers with epoxy over drilling hole and filling it up then re-drilling but the way I see it if the eye is sealed good water should never get a chance at the wood. I use a screw driver coated with 5200 and completely slather the inside circumference of the holes and then run the bolts through with a 5200 bead surrounding the hole on both sides. Tighten and wipe off squeeze out.
 

italianstal27

Chief Petty Officer
Joined
Feb 18, 2017
Messages
403
We're gonna miss the run on the Columbia, but the later run in Tillamook bay and Nehalem bay is still a go in October.
Crabbing really starts picking up soon as well.

Duck hunting starts mid October, so we'll definitely use the boat for that.
And to think.., when we originally started this project we'd be ready for the spring Chinook run lol...
 

italianstal27

Chief Petty Officer
Joined
Feb 18, 2017
Messages
403
HUGE progress today.

Besides us, unfortunately, rotating the gas tank cover 90 degrees (and having to cut off a side and reinstall), the last big hurdle is cleared (we hope!).

Here's one pic, but definitely more to come:
IMG_20170909_153844.jpg

It's just held in place by tension, but we're leaving it overnight so the plywood will "take shape" before we epoxy in the morning. The block at the top is also at a 20 degree angle so everything will line up flush. Expecting to use 6 pumps of epoxy per gunnel support. do NOT want to have to replace these.

Once dry, we can do the final wiring runs on the back side! :)

Guys we're close...

We'll be doing the stern drive in the drive way on pavement because that sounds easier than trying to allign an engine on uneven ground.
 

italianstal27

Chief Petty Officer
Joined
Feb 18, 2017
Messages
403
We went to install the stern eye hooks and realized the kicker mount is missing.

Whoever stole the dash also stole the kicker mount.

It's like getting kicked while you're already on the ground
 

Pusher

Lieutenant
Joined
Sep 2, 2014
Messages
1,273
Really makes you wish you could put surveillance on the property and set them up for another go of it.
 

Watermann

Starmada Splash of the Year 2014
Joined
Jan 12, 2013
Messages
13,753
Yeah cameras are great except for all you see is this... Jawas stealing your stuff.

maxresdefault.jpg
 

Pusher

Lieutenant
Joined
Sep 2, 2014
Messages
1,273
Need one of these
 

Attachments

  • Screenshot_2017-09-10-16-45-47.png
    Screenshot_2017-09-10-16-45-47.png
    400.2 KB · Views: 0

italianstal27

Chief Petty Officer
Joined
Feb 18, 2017
Messages
403
Legit can't stop laughing cause that's exactly what it would look like. Does anyone have a recommendation on an 8hp kicker mount?

eBay looks cheap as hell for a $1000 engine... But some of those mounts are $250
 

Watermann

Starmada Splash of the Year 2014
Joined
Jan 12, 2013
Messages
13,753
Thing thing about cheap retractable kicker mounts is that they aren't rated for trailering with the motor attached to the mount and the mount will get damaged. If it's possible with your set up, the solid mounts that don't fold are the least expensive and for sure rated for trailering with the motor attached.
 

italianstal27

Chief Petty Officer
Joined
Feb 18, 2017
Messages
403
Went with the panther 55-0020 in stainless steel. Think it's an upgrade from what we had.... Spendy, but seems to be top of the line.

Pics to come. We finished the bow supports this weekend (may do a second coat of epoxy for strength on the gunnel supports?)

Got the stern eye hooks in, and panels for mounting electronics / blowers / etc. so we don't drill into the transom.

-John
 

italianstal27

Chief Petty Officer
Joined
Feb 18, 2017
Messages
403
IMG_20170912_085321.jpg

Stern Eye hooks in! And yes, it was as miserable as we thought it would be. Key to not blowing out the plywood on the other side is to put a block of plywood over it. It'll prevent the epoxy from exploding on the back side. This really is a 2 man job.

IMG_20170912_085330.jpg

Close up. 5200 on EVERY surface.

IMG_20170912_085341.jpg

Nice. Some holes from the previous owner had corroded badly because they used a vinyl or nylon washer. Guys, do NOT use a plastic between stainless hardware and aluminum.

IMG_20170912_085403.jpg

Here's the backside. And we meant to make the mess. oh yes. We added those 2 pieces of 3/4" ply (previous scrap) to attach water fuel seperator, main electrical disconnect, negative bus bar, blower, etc. Prevent drilling into the transom.
 

Attachments

  • IMG_20170912_085321.jpg
    IMG_20170912_085321.jpg
    147.2 KB · Views: 2
  • IMG_20170912_085330.jpg
    IMG_20170912_085330.jpg
    105.1 KB · Views: 1
  • IMG_20170912_085341.jpg
    IMG_20170912_085341.jpg
    142.6 KB · Views: 1
  • IMG_20170912_085403.jpg
    IMG_20170912_085403.jpg
    158.6 KB · Views: 2
Top