'76 Holiday i/o 18' Fishing Rebuild (pic heavy!)

Watermann

Starmada Splash of the Year 2014
Joined
Jan 12, 2013
Messages
13,753
Yeah those t nuts have to go on the underside nothing will hold them on top.
 

italianstal27

Chief Petty Officer
Joined
Feb 18, 2017
Messages
403
seat swivels arrived today! Wish we could use 'em, but gotta get the boxes painted first.

IMG_20170806_155556.jpg

IMG_20170806_110925.jpg

The grey "accent" paint arrives today! Windshield and console dash are getting painted grey, and maybe some trim pieces too. Once everything is dry, we can really start assembling the dash components together and get the dash 100% wired up! Once the dash is wired, we can install it, and get the cables routed behind the side panel. Then, we're off to the races!

-John
 

Attachments

  • IMG_20170806_155556.jpg
    IMG_20170806_155556.jpg
    178.1 KB · Views: 0
  • IMG_20170806_110925.jpg
    IMG_20170806_110925.jpg
    179 KB · Views: 0

italianstal27

Chief Petty Officer
Joined
Feb 18, 2017
Messages
403
Paint arrived (super super super clumpy on the bottom), so we took it to ace hardware, shook it up, no problems!

IMG_20170809_084308.jpg
IMG_20170809_084314.jpg

Paint is a little blue.... wondering if that's because of the red primer. Will throw a second coat on as soon as we get home. Hopefully we don't have much red sticking out when we're done spraying, but red is kinda a natural color in nature so no harm no foul. If the console is dry to handle in 2 hours, we'll start physically bolting things together! As soon as the gauges are installed, we'll hook it up to the engine, and BAM, off to the races. Just have to make sure engine is idling at 750 rpm before we drop her in.
 

italianstal27

Chief Petty Officer
Joined
Feb 18, 2017
Messages
403
Now onto the more CONTROVERSIAL POST!

Having removable seats is very very important for us. If we were to build another boat again (I mean who am I kidding, it's going to happen. You can't NOT do a second one. That's like... criminal.), we'd attach the tee-nuts below the deck. And we'd attach a LOT of them. Free drainage holes or whatever. But alas, here we are trying to find a way to get stuff working.

We *think* we found a way to make this work. Will do some destructive testing tonight and see if it holds up.

IMG_20170808_181855.jpg

First, scuff the exterior of the tee-nut. Get it REAL gritty.
Next, drilled 1" hole to remove the first layer of plywood. (Top right)
Next, drilled 1/2" hole through the first 5 layers of plywood. You now have a countersunk hole to put the tee-nut in! Yay!

Take the tee-nut and pound it into the hole, then remove tee-nut. You now have indentations for where the spikes go (bottom left). Throw unthickened epoxy all over those small holes. Wipe the excess.

Now, make some thickened epoxy, we used colloidal silica. Not too thick, still barely runny.

IMG_20170808_181850.jpg

pound the tee-nut in after slathering it with epoxy. Make sure you have a bolt threaded to prevent epoxy getting into the holes.
Next, apply fiberglass over the tee-nut, and using a spatula (which we didn't have, that's why it's so bubbly), evenly spread the epoxy over the fiberglass.

Clean the threads with acetone and a cu-tip. Let dry.

Will report on results tonight! If this doesn't work... we'll have to figure something else out. Possibly attach the seats to the sidewall?

-John
 

Attachments

  • IMG_20170808_181855.jpg
    IMG_20170808_181855.jpg
    125.6 KB · Views: 0

italianstal27

Chief Petty Officer
Joined
Feb 18, 2017
Messages
403
Huge progress tonight. Second coat of paint on windshield and console. Extra paint went on bow supports.

Aluminum L bracket went onto the 4 seat boxes. Took about 2 hours. Water drainage.... We used loctite adesive to attach the aluminum to the 3/4 ply and had an epoxied 2x2 behind it.

Windshield fell while painting. Ugh. Have to reassemble the channel and gasket. Not a huge deal. Pics and videos to come.

Oh, the tee nut with fiberglass held. Pics to come
 

italianstal27

Chief Petty Officer
Joined
Feb 18, 2017
Messages
403
Good morning!

We sanded the fiberglass layer smooth and then got busy.

Here's the breakdown of our "destructive testing":


IMG_20170809_183751.jpg

So first round of testing included hitting the bolt, from the side, 30 times with the hammer (decent strokes, not too hard not too light), and then trying to pull it out. This is a 3/8" bolt. The hammer claw tips broke off on the edges, and we bent the fiberglass frame of the hammer.

Next test: Pry the nut out with a screwdriver.
IMG_20170809_184850.jpg

Snapped the tip of our Stanley screw driver. trying to twerk it out didn't work.

Next test: sledge hammer.
So we put the bolt 5 turns in (basically halfway down), and started whacking it with a sledge hammer while standing on the plywood. This looked like it had HUGE potential for getting the tee-nut out of the plywood. After 10 or so hits, the bolt looked like this:
IMG_20170809_184255.jpg

other angle:
IMG_20170809_184244.jpg

Another couple whacks from the sledge hammer and: we tore the bolt out of the tee nut. Somehow forgot to take a picture of that. But yes, we stripped the threads of the tee-nut and the bolt.

Next test was chipping away some of the fiberglass on the edges of the tee-nut. We then took another screw-driver and finally got a 1/16" to pop up. At this point, we knew it was game over for the tee-nut, and after a ton of wiggling and pounding we finally got it out.
IMG_20170809_185058.jpg
Here's the pic of the mangled threads:
IMG_20170810_085217.jpg

We conclude that if this method is strong enough to rip the threads off a stainless bolt, it's strong enough to hold the minimal shear forces a seat box will have. Will this work for a pedestal? Well if you have 4 of these attached to the deck.... ;)

The only test we didn't do was taking an impact wrench to the bolt to jostle it loose.

-John
 

Attachments

  • IMG_20170809_184255.jpg
    IMG_20170809_184255.jpg
    109.8 KB · Views: 1
  • IMG_20170809_184244.jpg
    IMG_20170809_184244.jpg
    112.9 KB · Views: 1
  • IMG_20170809_185058.jpg
    IMG_20170809_185058.jpg
    100.3 KB · Views: 1
  • IMG_20170810_085217.jpg
    IMG_20170810_085217.jpg
    88.3 KB · Views: 1

Watermann

Starmada Splash of the Year 2014
Joined
Jan 12, 2013
Messages
13,753
Looks like you found a solid method of installing those T nuts. :thumb:
 

italianstal27

Chief Petty Officer
Joined
Feb 18, 2017
Messages
403
More updates...

Going to finish this beast by Labor Day or die trying. Who needs sleep?
IMG_20170810_085057.jpg

Final paint coat. Looks good! Only a light painting on the bow support pieces since they already got heavily primed. Just to help with UV and water (not that there should be any....)

IMG_20170810_085104.jpg

Unfortunately, the windshield did slip off the saw horses while we were painting aaaand the lower bracket fell off. No noticeable damage to anything... So we'll reassemble! Onward!

-John
 

Attachments

  • IMG_20170810_085057.jpg
    IMG_20170810_085057.jpg
    127.2 KB · Views: 0
  • IMG_20170810_085104.jpg
    IMG_20170810_085104.jpg
    182.1 KB · Views: 0

italianstal27

Chief Petty Officer
Joined
Feb 18, 2017
Messages
403
Decided we're gonna use pvc pipe to run the shift cables etc from the front to back. By using pipe, we can hang the starboard side wall and bolt it to the floor, and then, we prime the ENTIRE rest of the boat. Big weekend coming up! The dash is getting wired tonight and finished Sunday. We get rain on Sunday!

How many days should we budget for installing engine and stern drive?
 

italianstal27

Chief Petty Officer
Joined
Feb 18, 2017
Messages
403
Enormous progress this weekend! The boat is starting to really come together!!!
IMG_20170812_174242.jpg

We installed the second sidewall! After doing it once on the port, the starboard side went MUCH smoother and it looks more aesthetically pleasing. Here we're getting a sense for the boat seats bumping into the sidewall.We also put more rivets into this side panel than we did on the previous piece. You can't have too many rivets.

We also put (2) 3/4" and (1) 1-1/4" sections of PVC behind the starboard panel for routing 1) engine 10 cable bundle 2) loose power wire for accessories and 3) steering + throttle linkage cables + trim sender cable. We used screws and copious amounts of 5200 to hold the PVC to the sidewall.

IMG_20170812_161041.jpg

Checking seat distance to steering wheel. We quickly realized that the L-bracket attached to the seat would have to face stern. It was too close to the edge of where the plywood sheets meet.
IMG_20170812_161050.jpg

There is a TON of Bis-A and sawdust in the boat at the moment so we're wearing the masks a lot to avoid over-exposure. A quick rinse after the epoxy has cured is in order to remove the fine dust particles.

Getting to sit in the seat was a big moment... At that point the boat really felt like it was coming together :)

IMG_20170812_174256.jpg

We then realized that the throttle cable actually gets in the way of the seat when you spin 180, AND, the steering wheel actually should have been off center by 1" to the port. The throttle hits the steering wheel -.-. So we had to adjust. But holding that entire chunk of metal is difficult.

So our day of putting tee-nuts into the deck for the seats quickly turned into let's finish placement of the throttle linkage lol. Here, Wyatt is rotating the brass plate so the aluminum points to the front of the boat (to route it through the PVC in the sidewall).
 

Attachments

  • IMG_20170812_174242.jpg
    IMG_20170812_174242.jpg
    134.9 KB · Views: 1
  • IMG_20170812_161041.jpg
    IMG_20170812_161041.jpg
    138.5 KB · Views: 1
  • IMG_20170812_161050.jpg
    IMG_20170812_161050.jpg
    136.7 KB · Views: 1
  • IMG_20170812_174256.jpg
    IMG_20170812_174256.jpg
    120.6 KB · Views: 1

Watermann

Starmada Splash of the Year 2014
Joined
Jan 12, 2013
Messages
13,753
Sounds like some serious thought going into things now for the layout. I have a suggestion for the steering cable, leave it out of the pvc pipe.and life will be much easier, those things are a bear to wrestle if it ever needs replaced. Also SeaStar recommends nothing be in contact with the cable like a wiring bundle.
 

italianstal27

Chief Petty Officer
Joined
Feb 18, 2017
Messages
403
Sound advice thanks... We'll relocate the hydraulic pump lines.

Hoping to finish wiring the dash tonight. Then, it's time to connect it to the engine and check idle rpm!!!!

Getting close!?
 

Watermann

Starmada Splash of the Year 2014
Joined
Jan 12, 2013
Messages
13,753
You replaced the helm with the hydraulic set up or it had been replaced? I missed that sorry, I thought you had the standard steering cable set up.
 

italianstal27

Chief Petty Officer
Joined
Feb 18, 2017
Messages
403
Got a new rotary steering setup. 14'

Before was 16' and we roughed it in and have 2-4" of slop ;)

Doesn't get much closer than that
 

italianstal27

Chief Petty Officer
Joined
Feb 18, 2017
Messages
403
IMG_20170812_195342.jpg

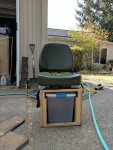
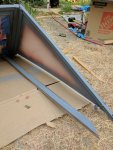
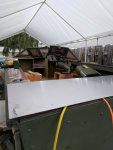
Second deck placement check... not the best, but standing on it bends it to the correct shape. Just have to remind yourself nothing is flat... We'll mark where the edges are and cut the majority of the lines with a skill saw before switching to the jig for the corners. (We're cutting out the walkway) before the final coat of paint.

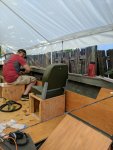
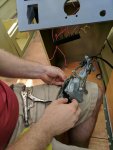
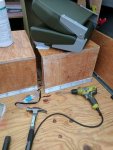
On the right you can see the throttle placement. The driver seat is free to swivel without hitting the steering wheel, nor the throttle. Really only took us 2 hours to get the placement correct... We thought it would take longer. So all is good there! Most exciting!

IMG_20170812_195327.jpg

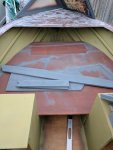
Deck and bow support pieces are almost ready... Has anyone used 5200 on paint? Does it adhere well? Or should we sand the bottom of the second deck, where it mounts to the screws to get better adhesion? Right now leaning towards globs of 5200 on the scaffold underneath, deck on top, then screwd in from the top.

The port bow side of the deck also needs to get sanded... It's rubbing on the rib of the hull. Don't want more cracks -.-

IMG_20170812_195348.jpg
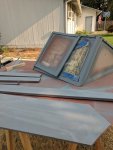
Sheet of 5052 picked up by the father (saved us 2 hours of driving). We went with .080 instead of .062 because why not. The original measured .071. We'll get this sanded, acid washed, zinc chromate primer, rusty metal primer, than 2 top coats before install.

IMG_20170813_120744.jpg
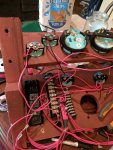
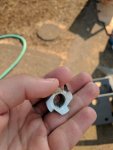
In the above picture, you can see we have the aluminum channel now facing stern. This is on the driver seat. If we were to have it facing bow, it would be on the gap between 2 pieces of wood, so that's not a good idea.

Unfortunately, the L bracket is weak in compression, meaning, it will fold if too much force is applied on it. Then, you have a bent piece of metal, no good. So we'll need to reinforce the L bracket to ensure it can't fold.

IMG_20170813_125436.jpg
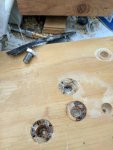
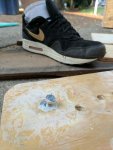
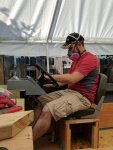
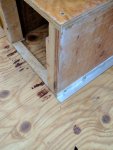
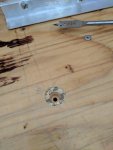
First hole drilled! You can see the counter-sunk first layer. We left 1 layer of plywood on the bottom because drilling the plywood all the way through causes the plywood to splinter. No good! We don't want to destroy this brand new deck that we're now drilling into but thats' ok because we're not nervous at all. Nope, not nervous, just drilling into a brand spanking new deck. No problems!

IMG_20170813_125440.jpg

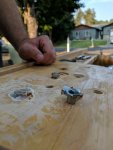
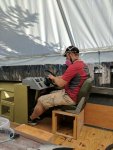
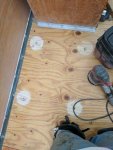
Drilling the first 2 seat box holes were fairly easy, but then the sternmost seat boxes got tricky. How much space do you need between the seats? What about the clearance of the rear seats and the dog house? Will it be easy to move between the rear seats and the dog house? How much leg room do people need?

We decided on 34" of leg room. It gives 12" between the rear seat and the dog house, and enough room for you to lay your feet out in front of you. Suddenly, the 18' boat felt 2' too short....

IMG_20170813_145932.jpg

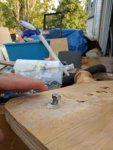
Sanding a circle for the fiberglass insert. Notice we have the shopvac hooked up to the sander with duct-tape. There was an absurd amount of dust still... Definitely wearing the respirator, chemical goggles, and double ear protection.
 

Attachments

  • IMG_20170812_195327.jpg
    IMG_20170812_195327.jpg
    115.4 KB · Views: 1
  • IMG_20170812_195348.jpg
    IMG_20170812_195348.jpg
    107.3 KB · Views: 1
  • IMG_20170813_120744.jpg
    IMG_20170813_120744.jpg
    129.7 KB · Views: 1
  • IMG_20170813_125436.jpg
    IMG_20170813_125436.jpg
    101.5 KB · Views: 1
  • IMG_20170813_125440.jpg
    IMG_20170813_125440.jpg
    139 KB · Views: 1
  • IMG_20170813_145932.jpg
    IMG_20170813_145932.jpg
    128.3 KB · Views: 1

Pusher

Lieutenant
Joined
Sep 2, 2014
Messages
1,273
Looks like you two are really getting after it. At this pace you will be hitting the spring steelhead if not the fall salmon run.

If it makes you feel better, My seat ended up hitting the throttle and steering wheel too. Tight clearances mean no room for error when your fat @&$3 sits down :)
 
Last edited:

italianstal27

Chief Petty Officer
Joined
Feb 18, 2017
Messages
403
IMG_20170814_095602.jpg

Tee-nuts in!! We removed amine blush last night but ran out of sand paper, picking some more up tonight to prep the entire interior for a layer of primer.

IMG_20170816_084401.jpg

And the gauges are all wired up! Minus trim sender... like 0% chance the trim sender is going to work after being disconnected for so long. We have the model where it has a pressure vessel. Assuming that dust and debris got inside the hydraulic tubes over time.

But we'll see!! Tonight, I'll wire the engine wires to the plug on the engine, plug in the dash, and see if it fires up!!!!!!!!

Hopefully the new tachometer reads correctly! Our old one said we were idling at 2,000rpm
 

italianstal27

Chief Petty Officer
Joined
Feb 18, 2017
Messages
403
Seems to like idling at 800RPM on the stand no issues... maybe 850.
How many RPM do you decrease after hooking it to the stern drive and being in water?

Spec says 650-750 RPM, in gear, in the water. What does it translate to on stand?

-John
 
Top