'75 Crestliner Apollo 660 Transom replacement

kevdog2000

Cadet
Joined
May 20, 2012
Messages
24
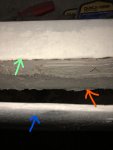
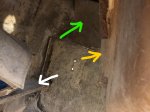
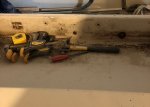
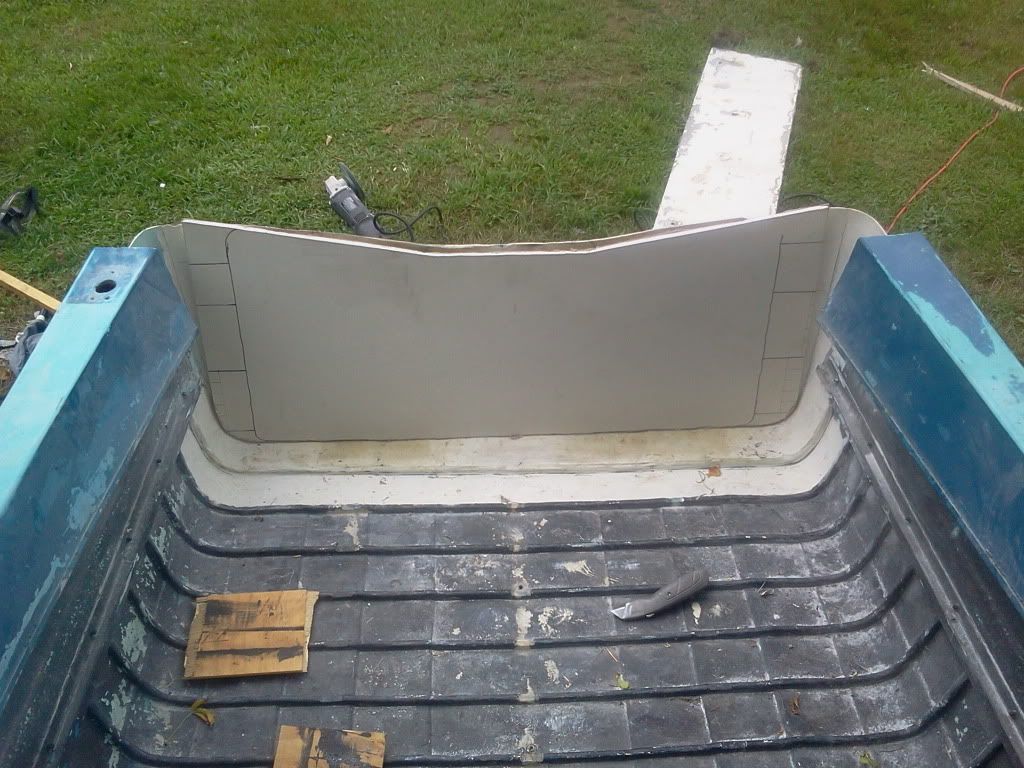
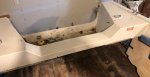
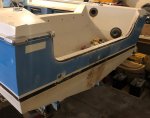
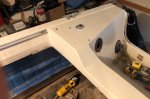
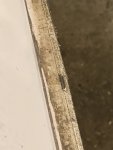
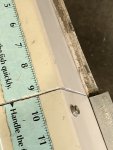
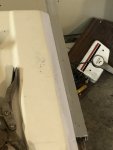
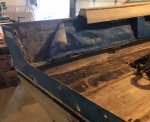
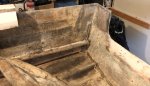
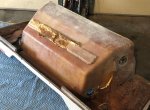
I need to replace the transom on a '75 Crestliner.(see photo). I have a few challenges to overcome in order to replace it and need some opinions. The transom fits in behind the splash well on the inside (see yellow arrow). I can't just tilt the new transom into place because of the support board on the side(white arrow) and the bottom of the boat has a fiberglass hump about 2 inches high made of 1708 on both sides.(not in any pictures) To further complicate matters, the previous owner must have tried to repair this before and poured in some substance that is very hard and is adhering to the splash well (orange arrow). The substance is about 1/4" thick and I can't get at it at all! (a chunk of the substance is in the photo and the transom pieces)

Now to my question: How the heck do I get a new transom in there??? I could split the boat which would allow me access to everything but this is a big undertaking with a few significant dangers. ie: must ensure all dimensions remain the same, cracking the fiberglass, etc. I could cut out the gelcoat on the back and gain access but then I have to rebuild that and I've never messed with gelcoat before. Third, I could cut the new transom into 3 sections, install the top and bottom sections and then fit in the middle section. I'm worried about the strength if I go this route. Other options I haven't considered? Seacast is not in my budget.

Any help/thoughts would be greatly appreciated! This is my first time doing this type of rebuild. I have another post from about a year ago asking about stringer/floor replacement and received some very good help.
 

Attachments

  • photo293143.jpg
    photo293143.jpg
    1.2 MB · Views: 1
  • photo293144.jpg
    photo293144.jpg
    1.2 MB · Views: 1
  • photo293208.jpg
    photo293208.jpg
    1 MB · Views: 1
  • photo293209.jpg
    photo293209.jpg
    1.6 MB · Views: 1

Woodonglass

Supreme Mariner
Joined
Dec 29, 2009
Messages
25,924
I'm assuming this is an outboard powered boat. Pics of the entire boat would help. Based on my knowledge of the Old Crestliners they have a deep and low slung splashwell. You have another viable option and that's to cut the splaswell out by cutting the Gunwhales about 18" towards the front of the boat and removing jus that portion. Here's a pic of what I'm referencing.
2012-07-23_182433.jpg
 

kevdog2000

Cadet
Joined
May 20, 2012
Messages
24
Here's some more pictures. Woodonglass: I assume you are talking about cutting from the back of the boat to the point where the splash well ends or a little beyond. This might be a better option. What type of blade should I use to cut the fiberglass? Also, where the cut is made, do I need to repair or can I just put a piece of rub rail type rubber in the joint? I will use epoxy/resin where the 2 halves meet behind the rub rail, along with all screws.

Thanks!
 

Attachments

  • photo293266.jpg
    photo293266.jpg
    891.6 KB · Views: 0
  • photo293267.jpg
    photo293267.jpg
    1.1 MB · Views: 0
  • photo293268.jpg
    photo293268.jpg
    1.2 MB · Views: 0
  • photo293269.jpg
    photo293269.jpg
    1,017.2 KB · Views: 0

kcassells

Fleet Admiral
Joined
Oct 16, 2012
Messages
8,614
With a grinder you would want to use a metal cutting blade. Make sure you get a grinder that works with thumb action and no lock trigger. Things can get tricky fast with that tool.
Detach your rub rail in that area. Will go back after you reinstall.
Save all parts for re-install.
 

Woodonglass

Supreme Mariner
Joined
Dec 29, 2009
Messages
25,924
Ok, I'd cut on both sides where the red line indicates. I'd use a JigSaw with a Metal Cutting blade. To put it back on is easy. Use PB to glue some 1/2" plywood cleats to the underside of the glass on the boat Then pb the cleats and the underside of the splashwell gunwhales and put in place. The ooze out from the junction can be used to fill the kerf made by the saw blade.. A bit of fairing and sanding and NO ONE will ever know it was done.
 

kevdog2000

Cadet
Joined
May 20, 2012
Messages
24
Thanks for the suggestions! On to my next problem...in trying remove the rub rail, I found through an old post and observation, the rub rail is just pressure fitted onto the seam with no screws/rivets. The 2 halves of the boat are stapled together. The rub rail does not come off because it gets caught on the staples. Gently prying doesn't work and I can't pinch the rail to relieve the pressure. I was able to remove the 2 short pieces on the transom by hammering them "sideways" with a piece of wood. Since I'm going to just cut out the splash well which will be about 3' from the transom to the end of the splash well, can I just cut the rub rail in the same place and hammer it off toward the back of the boat? It's aluminum so it won't rust at the cut and I don't think it's structural. (could be very wrong on this point!) Otherwise, I would have to remove the rub rail over the entire length of the boat which would be tedious and possibly cause some damage trying to pry it off. Any thoughts on this would be greatly appreciated!

Thanks!
 

Woodonglass

Supreme Mariner
Joined
Dec 29, 2009
Messages
25,924
Yup, I'd cut it as you plan. A little JB Weld on the "Go Back" and she'll be like new.
 

kevdog2000

Cadet
Joined
May 20, 2012
Messages
24
Just to update things, I cut the boat about 3' from the transom and removed the rub rails on both sides. Then I removed all the staples holding the 2 halves together. However when I tried to remove the top, the port side lifted up but the starboard side wouldn't. Upon further inspection, I found a fiberglass "tube" under the gunwale running from the transom to the dashboard. This is where Crestliner ran the electrical wires for the electrical to service the forward instrumentation. I have to get something to cut through this without damaging the wires. Shouldn't be too bad. I'll repost with pics once the back is removed.
 

Attachments

  • photo293668.jpg
    photo293668.jpg
    1.3 MB · Views: 0
  • photo293669.jpg
    photo293669.jpg
    1.4 MB · Views: 0
  • photo293670.jpg
    photo293670.jpg
    1.2 MB · Views: 0

kevdog2000

Cadet
Joined
May 20, 2012
Messages
24
Here's how it looks with the splash well removed. A lot easier to get at things now. I'm looking forward to all the grinding!!! I'll try to keep this up to date.
 

Attachments

  • photo293817.jpg
    photo293817.jpg
    1.2 MB · Views: 0
  • photo293818.jpg
    photo293818.jpg
    1 MB · Views: 0
  • photo293819.jpg
    photo293819.jpg
    1.3 MB · Views: 0

Woodonglass

Supreme Mariner
Joined
Dec 29, 2009
Messages
25,924
That's perfect! IMHO this is a much better solution than removing the entire cap. Some boats (Trihulls and Open Bows) sometimes require a total decap but not always.
 
Top