75 18' Chieftain OB Treasure in the woods.

MARUSS

Seaman
Joined
Jul 12, 2015
Messages
60
Russ

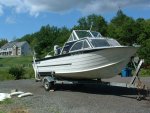
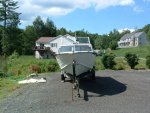
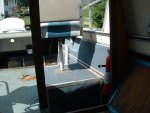
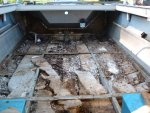
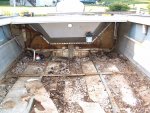
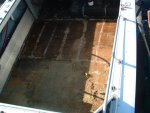
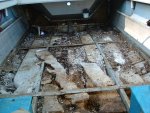
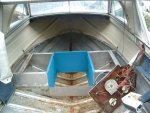
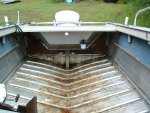
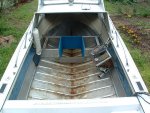
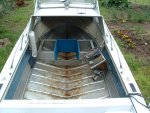
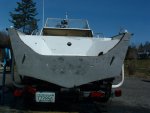
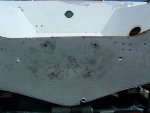
I am about 20 miles south of Augusta in Bowdoin, just 2 miles from the Bowdoinham town landing into Merrymeeting Bay. The Kennebec will likely be the first boat expedition I make this summer after I get this thing serviceable. Should be fun.

Ron

You going to be brackish & salt water most of the time?
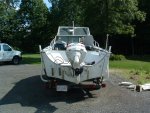
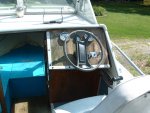
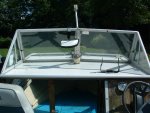
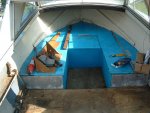
I like to salt water fish and plan spending most of my time in the bays with the Chief. The 180 SS is what we used on the lakes last year. For the $400 I have invested in it we used the crap out of it all summer.
 

MARUSS

Seaman
Joined
Jul 12, 2015
Messages
60
It turned out to be a nice day so I figured I would take some photos of my current power options.
I have a 1986 115 Evenrude VRO came with the 180 SS runs real sweet and strong pulled the SS about 40 mph.
I have a 1988 150 Evenrude I picked it up for $500 runs strong also.
I have a 115 Johnson and the original 115 Evenrude that came with the Chieftian. The Johnson has a dead cylinder and the evenrude has 120 PSI on all cylinders. Haven't run either of them yet.
Here's where the boats sit for the next week or so until weather gets better and my dog hogging up some camera time in front of the old rotten transom and splash well out of the 180SS.
2002_0101motootor0002.JPG 2002_0101motootor0001.JPG 2002_0101motootor0003.JPG 2002_0101motootor0005.JPG 2002_0101motootor0006.JPG 2002_0101motootor0009.JPG
 
Last edited:

oldhaven

Chief Petty Officer
Joined
Aug 30, 2015
Messages
568
Your hull will handle the weight of the 150. It weighs just about what the 90 4 stroke I am going to use does. You may want to pay attention to what the USCG data plate says and not exceed the max HP to avoid any on water problems. My '67 is max 140, but I think the later OB Chiefs went up to 150? Any of those motors should be fine, so you are lucky to have a choice and can pick the best one for your needs (speed, economy, fuel/oil tank, etc.)

I have not been a fisherman for a few years but intend to get back to it in a simple way. Single line, just enough for dinner occasionally. We do get stripers and blues up the river here. I will be on big fresh water mostly, but will have access to the river and ocean for longer cruises. We'll see.

Ron
 

Woodonglass

Supreme Mariner
Joined
Dec 29, 2009
Messages
25,924
If that's the case then, I'd sand and feather the bad areas, clean and prime all bare aluminum with Self Etching primer followed by the primer recommended by the MFG of your Final Paint and Shoot your Paint. I know Lots of the the guys take em down All the way to bare aluminum but I for one really don't see the need or benefit.:noidea:
 

harleyman1975

Ensign
Joined
May 12, 2003
Messages
959
I agree with WOG if the paint is sticking leave it I would just D/A with 180, etch prime any cut throughs, 2 coats of 2k primer surface, sand with 320 and 3 coats acylic or urethane enamel with a hardener. You can use rustoleum or tractor paint if you want to save money or automotive paint if you got the cash. one advantage of auto paint is it dries faster, another is it has higher solids so will cover better.
 
Last edited:

MARUSS

Seaman
Joined
Jul 12, 2015
Messages
60
Your hull will handle the weight of the 150. It weighs just about what the 90 4 stroke I am going to use does. You may want to pay attention to what the USCG data plate says and not exceed the max HP to avoid any on water problems. My '67 is max 140, but I think the later OB Chiefs went up to 150? Any of those motors should be fine, so you are lucky to have a choice and can pick the best one for your needs (speed, economy, fuel/oil tank, etc.)

I have not been a fisherman for a few years but intend to get back to it in a simple way. Single line, just enough for dinner occasionally. We do get stripers and blues up the river here. I will be on big fresh water mostly, but will have access to the river and ocean for longer cruises. We'll see.

Ron

My chieftain is rated up to 150 hp.
I do like the Idea of being able to swap em out anytime, giving me more options.
I've caught some nice stripers on the Kennebec River kill em with fresh mackerel. (years ago)
Thanks
 

MARUSS

Seaman
Joined
Jul 12, 2015
Messages
60
If that's the case then, I'd sand and feather the bad areas, clean and prime all bare aluminum with Self Etching primer followed by the primer recommended by the MFG of your Final Paint and Shoot your Paint. I know Lots of the the guys take em down All the way to bare aluminum but I for one really don't see the need or benefit.:noidea:

Thanks for the great advise
 

MARUSS

Seaman
Joined
Jul 12, 2015
Messages
60
I agree with WOG if the paint is sticking leave it I would just D/A with 180, etch prime any cut throughs, 2 coats of 2k primer surface, sand with 320 and 3 coats acylic or urethane enamel with a hardener. You can use rustoleum or tractor paint if you want to save money or automotive paint if you got the cash. one advantage of auto paint is it dries faster, another is it has higher solids so will cover better.

Thanks for chiming in also
 

Watermann

Starmada Splash of the Year 2014
Joined
Jan 12, 2013
Messages
13,753
I missed your thread here on the general resto glasser wasteland. :lol: Just one day and I had over a page of catch up, thanks for all the great pics to check out!

Super find you got there and she looks well worth the effort to get back on the waves once again :thumb:

I have my preferences when it comes to old tin and leaving 40+ year old paint underneath new isn't mine. I also despise sanding. I've had way better results stripping bare and if there's more than one coat of old paint then no way it will come out making you happy.

I'm wondering about the filling of the corrosion holes and how you did that, can you post some pics of it?
 

MARUSS

Seaman
Joined
Jul 12, 2015
Messages
60
I missed your thread here on the general resto glasser wasteland. :lol: Just one day and I had over a page of catch up, thanks for all the great pics to check out!

Super find you got there and she looks well worth the effort to get back on the waves once again :thumb:

I have my preferences when it comes to old tin and leaving 40+ year old paint underneath new isn't mine. I also despise sanding. I've had way better results stripping bare and if there's more than one coat of old paint then no way it will come out making you happy.

I'm wondering about the filling of the corrosion holes and how you did that, can you post some pics of it?

I haven't repaired all the holes yet. I filled a couple using aluminum filler rod with map gas. I tried using regular propane, just couldn't get the tin hot enough.
The map gas worked really well and filled em up quick. The aluminum filler rods I'm using has flux mixed in it already.
When the weather gets better here (snowing or raining) and have a day off from work I'll post some pictures of before and after repairs.
Were should I have started this resto project in?
Thanks for stopping in. Hope my Chief can come out as nice as yours. Definitely gonna steal some of your ideas.
 

MARUSS

Seaman
Joined
Jul 12, 2015
Messages
60
1975 StarCraft Chieftain OB Restore Project.

I have decided to take Waterman's advise on posting in this StarCraft specific forum.
I tried to contact a moderator 3 times with no response (I probably didn't do it right) So I decided to just start over and abandon my other thread.
A friend of mine gave me the boat, he owned it for about 11-12 years. He used it 1 summer had motor problems and it sat under the same blue tarp for 10-11 years.
So here are some pics of when I brought her home after power washing.
 

Attachments

  • photo241046.jpg
    photo241046.jpg
    161 KB · Views: 2
  • photo241047.jpg
    photo241047.jpg
    178.4 KB · Views: 2
  • photo241048.JPG
    photo241048.JPG
    319.4 KB · Views: 2
  • photo241826.JPG
    photo241826.JPG
    320 KB · Views: 2

MARUSS

Seaman
Joined
Jul 12, 2015
Messages
60
No Title

Here's some picks of her interior.
 

Attachments

  • photo241049.JPG
    photo241049.JPG
    326.8 KB · Views: 2
  • photo241050.JPG
    photo241050.JPG
    317.2 KB · Views: 2
  • photo241051.JPG
    photo241051.JPG
    334.4 KB · Views: 2
  • photo241828.JPG
    photo241828.JPG
    340.2 KB · Views: 3
  • photo241829.JPG
    photo241829.JPG
    331.4 KB · Views: 2
  • photo241830.JPG
    photo241830.JPG
    331.1 KB · Views: 0
  • photo241831.JPG
    photo241831.JPG
    327.9 KB · Views: 1
  • photo241832.JPG
    photo241832.JPG
    317.8 KB · Views: 1

MARUSS

Seaman
Joined
Jul 12, 2015
Messages
60
No Title

Here's some of progress I've done to her.
 

Attachments

  • photo241052.JPG
    photo241052.JPG
    310.8 KB · Views: 2
  • photo241053.JPG
    photo241053.JPG
    321.6 KB · Views: 2
  • photo241054.JPG
    photo241054.JPG
    333.6 KB · Views: 3
  • photo241833.JPG
    photo241833.JPG
    326.5 KB · Views: 2
  • photo241834.JPG
    photo241834.JPG
    318.3 KB · Views: 2
  • photo241835.JPG
    photo241835.JPG
    318.7 KB · Views: 2
  • photo241836.JPG
    photo241836.JPG
    326.1 KB · Views: 2

MARUSS

Seaman
Joined
Jul 12, 2015
Messages
60
No Title

So I have here gutted out and here's some pics of that
 

Attachments

  • photo241057.JPG
    photo241057.JPG
    316.6 KB · Views: 0
  • photo241058.JPG
    photo241058.JPG
    322.9 KB · Views: 0
  • photo241060.JPG
    photo241060.JPG
    331.1 KB · Views: 0
  • photo241061.JPG
    photo241061.JPG
    329.6 KB · Views: 0
  • photo241837.JPG
    photo241837.JPG
    319.7 KB · Views: 0

MARUSS

Seaman
Joined
Jul 12, 2015
Messages
60
A few problems I noticed was PO installed pressure treated plywood decking that made holes in the hull where the water dripped off the plywood
​So I have to repair all the holes to make her water tight again. I filled a few with aluminum filler rod using a torch and map gas. I'm going to try to finish the hole repairs this weekend. I'll take pics of the holes and the repairs when this is done.
Thanks for looking.
 

MARUSS

Seaman
Joined
Jul 12, 2015
Messages
60
No Title

I decided to strip the paint off the old Chief so I did a test using crushed glass with a power washer blaster attachment. When I removed the motor block I noticed it and the transom was made of pressure treated plywood. It pitted up the aluminum behind it and the transom gonna have to go too​.
The crushed glass did a nice job of taking the paint off, it took about 15 min to do just the back transom area after everything was removed. The only downside was it used about 50lbs of crushed glass.
 

Attachments

  • photo241838.JPG
    photo241838.JPG
    332.5 KB · Views: 1
  • photo241839.JPG
    photo241839.JPG
    312.3 KB · Views: 1
  • photo241840.JPG
    photo241840.JPG
    333 KB · Views: 2
  • photo241841.JPG
    photo241841.JPG
    334.8 KB · Views: 2

GA_Boater

Honorary Moderator Emeritus
Joined
May 24, 2011
Messages
49,038
MARUSS - I don't know who you emailed because you can't email Mods. If you want to contact a Mod, use PM's or simply use the Flag feature on the bottom of any post in the thread with a reason for the flag. All Mods see flags and in this case, just ask to move the thread to the Starcraft section.

Your original thread is moved into the Starcraft section, and the new thread has been moved into it. Your duplicate thread has been deleted.

Now that the paperwork is out of the way - Nice start to redoing another Chieftain.

Yep - Get that PT out of her. Pressure treated wood is always contaminated by tin worms.
 

Watermann

Starmada Splash of the Year 2014
Joined
Jan 12, 2013
Messages
13,753
Nice progress on the tear down, thanks for the pics too ;)

It'll be way easier to clean things up if you remove that splashwell and new attachment rivets are always a plus for strength.

Sure glad the navigator survived the PO's horrible decision to put that 5 MPH rated seat post in there. :eek:

fetch
 

MARUSS

Seaman
Joined
Jul 12, 2015
Messages
60
The boxes that they were mounted to were only 3/8" pressure treated plywood double eek.
 
Top