1999 Rinker Flotilla Partial Restoration

Status
Not open for further replies.

AMMO DAWG

Petty Officer 1st Class
Joined
Aug 3, 2012
Messages
226
Sorry for the double post, site gave me an error and then posted it. Now it won't let me delete one of them :grumpy:
 

AMMO DAWG

Petty Officer 1st Class
Joined
Aug 3, 2012
Messages
226
No Title

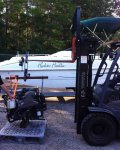
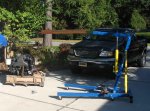
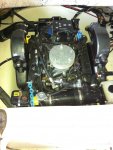
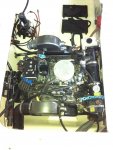
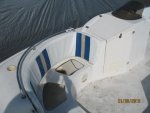
Been waiting a long time for this day, got the engine in the old Rinker. My first attempt was on Friday using my engine hoist with an extension I scabbed on it to get more height and reach. You just can not violate the laws of physics, I tried and failed! As soon and the engine got off the ground the aft of the hoist lifted making for a bad situation. I put some counter weight on it, but soon realized it was just a bad plan. Hot, tired and beat, admitted defeat and regrouped on Saturday at my buddies shop and this time used a 6K forklift. First attempt didn't' go so well, we had the engine level and it just wouldn't clear the lip on the engine compartment. We repositioned the engine so the aft was way below the front and were able to slip it past the lip and into the engine compartment. Definitely a two person job, a third would even have been better. Made me realize even if I got the engine high enough with the hoist, I would never have been able to get it in the compartment by myself. Big relief to have it in the boat, time to get everything connected and make sure I got all the harness connections sorted, looking forward to firing it up.
 

Attachments

  • photo208786.jpg
    photo208786.jpg
    185.3 KB · Views: 0
  • photo208787.jpg
    photo208787.jpg
    495.4 KB · Views: 0
  • photo208788.jpg
    photo208788.jpg
    145.1 KB · Views: 0
  • photo208789.jpg
    photo208789.jpg
    154.5 KB · Views: 0
Last edited:

AMMO DAWG

Petty Officer 1st Class
Joined
Aug 3, 2012
Messages
226
No Title

Been working on little jobs so when the weather gets a bit better (been raining constantly) I'll work on some more wiring and finish plumbing the engine. I have been working on the seats in the garage, I have never sewn before so there was a steep learning curve. Picked up an old Juki commercial sewing head and fabricated a table. Found a clutch motor on CL and it work pretty well. I ruined a bit of vinyl at first but I got a decent seat under my belt so I thing I'm ready for the other nine seats! I have more vinyl on order, as soon as it comes in I'm going to hit it hard. Posted some pictures of a before seat and my finished seat as well as the rig I'm using. I have to wonder if there is any interest in my posts, if you would like me to continue drop me a one liner, or tell me "please quit" Either way appreciate some feedback.
AD
 

Attachments

  • photo213672.jpg
    photo213672.jpg
    132.1 KB · Views: 0

AMMO DAWG

Petty Officer 1st Class
Joined
Aug 3, 2012
Messages
226
No Title

Juki Rig I'm Using
 

Attachments

  • photo213673.jpg
    photo213673.jpg
    194.7 KB · Views: 0
  • photo213674.jpg
    photo213674.jpg
    73.1 KB · Views: 0

Corjen1

Lieutenant Junior Grade
Joined
Aug 24, 2013
Messages
1,237
Good work on the deck boat!! Upholstery looks great as well!!
 

AMMO DAWG

Petty Officer 1st Class
Joined
Aug 3, 2012
Messages
226
Thanks Corjen for the encouragement and thanks for what you do for our country. I'm a retired AF CMSgt (E-9) so I really appreciate your service. AD
 

Corjen1

Lieutenant Junior Grade
Joined
Aug 24, 2013
Messages
1,237
Thanks Corjen for the encouragement and thanks for what you do for our country. I'm a retired AF CMSgt (E-9) so I really appreciate your service. AD

Ammodawg, I am not in the service. If the idea came from the chief petty officer thing under my OU pix, everybody has those and they change by the amount of posts/activity on the forum. I think the more you post, the higher your ranking goes.

However, I do thank you for your service !!
 
Last edited:

AMMO DAWG

Petty Officer 1st Class
Joined
Aug 3, 2012
Messages
226
No Title

Had a little break from the weather and got the dash installed and most of the gauges wired. Dash turned out okay, think I might want to put a sun shield over it, maybe another day. Also finished up my surge tank. I installed a 5.7 that has EFI and from the fuel tank has no baffles what I have read it can starve for fuel as the fuel sloshes around. Had some square thick walled aluminum tube and it worked well for a surge tank. Holds about a liter of fuel. I think I will install an electronic fuel cut off valve from the feed line for some extra protection. Now I just need to find a place to squeeze it in the engine compartment, really tight in there with the 5.7. Posted a couple pics , thanks

AD
 

Attachments

  • photo213682.jpg
    photo213682.jpg
    32.1 KB · Views: 0
  • photo213683.jpg
    photo213683.jpg
    167.4 KB · Views: 0

alldodge

Moderator
Staff member
Joined
Mar 8, 2009
Messages
40,762
Dang just noticed your thread, wished I would have seen sooner. you do some real nice work I have to say. Doing a power plant and transom work my self and I can take some pointers from you. I like the way you re-did the dash, real nice job. I want to redo my panel but was thinking about aluminum because I want to do a redesign with different layout, but after seeing yours , FB doesn't seam so bad
 

AMMO DAWG

Petty Officer 1st Class
Joined
Aug 3, 2012
Messages
226
Thank AllDodge, the fiberglass for the dash worked out real well. Had the material laying around so there was no expense either. Used epoxy resin so it should be plenty durable. The film transfer for the simulated burl wood went okay also. Hardest part was finding a big enough container to get the 70 degree water to dip it in.
 

AMMO DAWG

Petty Officer 1st Class
Joined
Aug 3, 2012
Messages
226
No Title

I have been waiting on more vinyl to come in for the seats so I decided to work on the outdrive this weekend since the weather was decent. I noticed the lower unitI bought has a bent skeg . I decided I would try and straighten it out before preparing it for paint. I had a couple of pieces of 2 x12 to use for a base. I put the skeg on top of my 5 pound sledge and used it like an anvil. I slowly persuaded it straight with a rubber mallet. Took some time and several try's, but in the end it straightened up pretty good. I Spent the rest of the day sanding and cleaning the lower unit getting it ready for primer. I know there's lots of different methods and philosophies out there for paining aluminum, I've had good luck with using a good etching primer followed by an epoxy primer. I finish with a urethane topcoat. Works good for me and I get good adhesion. After a good clean up with dawn dish soap followed by a wipe down with mineral spirits I was able to get several coats of etching primer before the weather got too cool. Need to do a little bit of body work on a couple of pock marks and it will be ready for the epoxy primer and top coat. All in all a good day!
 

Attachments

  • photo213982.jpg
    photo213982.jpg
    174.8 KB · Views: 0
  • photo213983.jpg
    photo213983.jpg
    174.3 KB · Views: 0
  • photo213984.jpg
    photo213984.jpg
    150 KB · Views: 0

AMMO DAWG

Petty Officer 1st Class
Joined
Aug 3, 2012
Messages
226
No Title

The rest of the photos
 

Attachments

  • photo213985.jpg
    photo213985.jpg
    123.8 KB · Views: 0
  • photo213986.jpg
    photo213986.jpg
    138.2 KB · Views: 0

Woodonglass

Supreme Mariner
Joined
Dec 29, 2009
Messages
25,924
SE primer only requires a Light Coat!!! Looks like you got Plenty!!!!:D 
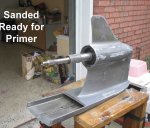
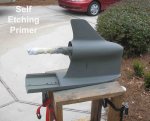
After that, I'd recommend a couple of coats of Rust-oleums Automotive Primer...
0d77398f-5ad4-4790-b4e5-a1c2bcb804b6_300.jpg
 

AMMO DAWG

Petty Officer 1st Class
Joined
Aug 3, 2012
Messages
226
Thanks, yeah I put several coats of the SE on, I'll lighten up on the SE and lay down the automotive primer as you suggested. Thanks for the tip!
 

AMMO DAWG

Petty Officer 1st Class
Joined
Aug 3, 2012
Messages
226
No Title

My vinyl came in and the seat rebuilding and recovering is taking far longer than I anticipated. The curved backrest have proved to be a real challenge. I have had a very difficult time getting the vinyl tight. The backrests are made of a flexible plastic which doesn't hold shape very well when removed, so I have to try and replicate the curve when covering. I learned quickly that if the curve is too shallow when you cover it when you install it and it curves further it's wrinkle city! After several false starts I have two backrests done and one to go. Still have some wrinkles, but I'm hoping the hot sun will shrink the vinyl and pull some of them out. If not I can live with it. I have always had respect for craftsman, I have a new found respect for those that do upholstery work! Posted a picture of my seat back.
 

Attachments

  • photo214969.jpg
    photo214969.jpg
    18.9 KB · Views: 0

alldodge

Moderator
Staff member
Joined
Mar 8, 2009
Messages
40,762
Sure hope the wrinkles come out, any way to stiffen up the backs. Not a vinyl guy, have done some but only small jobs.
 

AMMO DAWG

Petty Officer 1st Class
Joined
Aug 3, 2012
Messages
226
That was my first thought I need to stiffen it up, tried some ply flex board but the extra thickness interfered with the attach clips. Then I did a sample test with fiberglass and epoxy to the backer board, but even after putting a good key I couldn't get any adhesion. I'm sure there's some tricks, just a rookie to upholstery.
 

alldodge

Moderator
Staff member
Joined
Mar 8, 2009
Messages
40,762
Is there any room behind where you could have a ridged back made and fasten it by using T-nuts?
1XGH6_AS01
 
Status
Not open for further replies.
Top