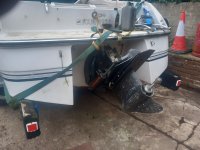
1996 Four Winns Sundowner with 5.0 Cobra engine and drive

kenny nunez

Captain
Joined
Jun 20, 2017
Messages
3,075
It is easier to work on the hydraulics with the engine out of the boat. Just cycle the system a few times and the rams will both be fully retracted. Power steering fluid is good as atf tends to foam easily.
 

Lpgc

Petty Officer 3rd Class
Joined
Jun 17, 2023
Messages
94
Thanks @alldodge and @kenny nunez .

alldodge , sorry my fault for any confusion.. I was thinking out loud, rhetorical question about it being easier to work on the rams (outside the boat) when the engine and leg have been refitted than on the pump (inside the boat) when the engine has been refitted.

Is there a ram repair kit? Before I dissassemble them is there a way to test them without refitting the leg?
 

alldodge

Moderator
Staff member
Joined
Mar 8, 2009
Messages
40,760
Don't know of a easy way to test, but if one is leaking then both should be rebuilt

Not a OMC guy, but I just searched on "OMC cobra trim ram repair kit" and a few came up
 

Lpgc

Petty Officer 3rd Class
Joined
Jun 17, 2023
Messages
94
Apparently it's a late modle OMC Cobra drive so is identical to a Volvo SX drive, so does that mean the rams will be the same as Volvo SX?
 

Lou C

Supreme Mariner
Joined
Nov 10, 2002
Messages
11,856
For the same year they will be the same as a Volvo. However the design did change at some point.
 

Lpgc

Petty Officer 3rd Class
Joined
Jun 17, 2023
Messages
94
For the same year they will be the same as a Volvo. However the design did change at some point.
The boat is a '96 model and so far everything else I've checked on the drive seems to be the same design as a Volvo SX, do you think this makes it likely the rams are the same as Volvo SX?
 

Lou C

Supreme Mariner
Joined
Nov 10, 2002
Messages
11,856
The early years of the SX (94–?) used the same rams as the Cobra but then they changed the design. Not sure when that happened. How to tell?
Original OMC & early Volvo had the plastic covers and the 2 hydraulic line fittings are at opposite ends of the cylinder. Later Volvo cylinders don’t have those plastic covers & both hydraulic fittings are at the rear of the cylinder.
 

Lou C

Supreme Mariner
Joined
Nov 10, 2002
Messages
11,856
Ok looked back at your early pix those are the early OMC style cylinders so you can use a Cobra rebuild kit for those. Here in the US they are about $50 per cyl. If you can get the cap off the cyl it doesn’t look like a bad job, I’m going to rebuild 2 spares I have over the winter.
 

Lou C

Supreme Mariner
Joined
Nov 10, 2002
Messages
11,856
When I do mine I’ll post up some pix
PS there is a you tube vid on this already, guys name is Micheal Roemer I think
 

Lpgc

Petty Officer 3rd Class
Joined
Jun 17, 2023
Messages
94
Thanks again @Lou C

It's been a while again since my last forum visit and I've just seen your last reply.
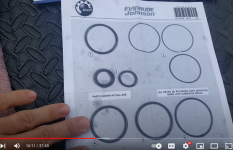
I wouldn't have expected the OMC Cobra ram rebuild kits to come in Evinrude / Johnson packaging but I'm not doubting that your advice is correct.

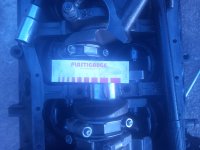
I did some work on the boat engine yesterday. I Plasti-gauged all the engine big end bearings (rod bearings) and main bearings, except for the rear main bearing which I still need to do. All rod bearings came out at 0.0015 (1.5 thou) clearance, which I understand is bang on correct? All the main bearings I've tested so far (all except the rear main) have been between 0.0015" and 0,002" (1.5 and 2 thou), which as I understand is also correct? So I'm happy with the bearing clearance Plastigauge readings I've taken so far.

Picture of taking Plastigauge reading on #4 main bearing

20240305_180252.jpg

Regards, Simon.
 

Lou C

Supreme Mariner
Joined
Nov 10, 2002
Messages
11,856
Sounds good! Evinrude, Johnson & OMC Cobra were all part of the same parent company OMC later called BRP.
OMC = Outboard Marine Corp
BRP = Bombardier Recreational Products, they bought the assets of OMC after they went bankrupt in 2000.
 

Lpgc

Petty Officer 3rd Class
Joined
Jun 17, 2023
Messages
94
The engine is built but I haven't refitted it yet, thought it better to fix the trim hydraulic issues before fitting the engine.

Recap - When I bought the boat the leg was trimmed all the way up, it must have stayed up for months. But when I used it on the river the leg seemed to trim itself down. When it was time to put the boat back on the trailer it did trim up but it was down by the time I had reached the top of the slipway. After removing the engine I found a small leak where one of the hydraulic pipes connects to the trim pump which hopefully I've fixed by fitting a new O ring.

I thought it a good idea to test the hydraulics by refitting the leg before fitting the engine because with the weight of the leg on the rams I could test whether it dropped by itself overnight. But today I tried to refit the leg without the engine installed but couldn't get it on, the closest I got to having the leg back on was with a gap of around half an inch between the mating faces.

What could be preventing the leg going all the way back on?

I'll still try testing the hydraulics but without the leg or engine fitted. I'm just about to make sure all the engine bay wires are isolated (don't want any short circuits etc) then I'll fit a battery and put some hydraulic fluid in it, try to bleed the trim system and see if I can find any external leaks.

The leak I found where a pipe joins to the pump only seemed like a small weep, just noticed a bit of red liquid around the joint, it didn't look like it had been losing loads of fluid or I would've expected to see where it had been running/pooling below the pump.

Do you think I might've found the problem with the weep or is it more likely the rams or pump will need rebuilding?
 

kenny nunez

Captain
Joined
Jun 20, 2017
Messages
3,075
Try rotating the propeller with the drive in gear. Most times the outer area of the center joint retainer needs grease to force it through pivot housing boot.
Hopefully the hydraulic system will hold with the weight of the drive.
 

Lou C

Supreme Mariner
Joined
Nov 10, 2002
Messages
11,856
Not sure if this will work on the cone clutch drive, but on my OMC Cobra what I have found helpful is to use a long thin screwdriver to turn the u-joints to get the driveshaft splines to line up, as long as the driveshaft is centered and entering the coupler that will help it to slide on. The Cobra is installed in neutral, I don't know about the cone clutch drive, though. If it gets installed in gear, you can try turning the prop, I have found that all it takes is just a tiny movement of the driveshaft to get the splines to line up. Kind of like installing a manual trans after a clutch job.
First though, do you have an alignment tool? this is very useful to check alignment and also to get the gimble bearing aligned with the way the driveshaft needs to enter it.
I do that first, then slide the drive in most of the way, then slide the long thin screwdriver in the u joints so I can turn them if needed.
R&R the Cobra.jpg

you can see the screwdriver on the ground
the drive jack is great for making this easy on your back
I've had this one about 15 or so years.
 

ScottinAZ

Senior Chief Petty Officer
Joined
Jun 25, 2009
Messages
742
Not sure if this will work on the cone clutch drive, but on my OMC Cobra what I have found helpful is to use a long thin screwdriver to turn the u-joints to get the driveshaft splines to line up, as long as the driveshaft is centered and entering the coupler that will help it to slide on. The Cobra is installed in neutral, I don't know about the cone clutch drive, though. If it gets installed in gear, you can try turning the prop, I have found that all it takes is just a tiny movement of the driveshaft to get the splines to line up. Kind of like installing a manual trans after a clutch job.
First though, do you have an alignment tool? this is very useful to check alignment and also to get the gimble bearing aligned with the way the driveshaft needs to enter it.
I do that first, then slide the drive in most of the way, then slide the long thin screwdriver in the u joints so I can turn them if needed.
View attachment 396328

you can see the screwdriver on the ground
the drive jack is great for making this easy on your back
I've had this one about 15 or so years.
for the record, the cone clutch drives dont care what gear they are in (even neutral) as the cable doesnt interface with anything during the mating process. The jacket attaches to the pivot housing, and it connects to the lower with an eye fitting and cotter pin once its all said and done... I installed mine in gear, and used the prop to spin the input shaft until it lined up. Getting it past the o-rings was a PITA though, but perseverance and a little ingenuity got that done pretty easily. ( I used the trim rams to hold it in place from coming further out, and rocked it up/down to close the gap, and work it past the o-rings, they were stubborn even though greased.) My alignment tool went in so easily I originally thought it wasnt engaging at all.....
 

Lpgc

Petty Officer 3rd Class
Joined
Jun 17, 2023
Messages
94
Thanks for the replies.

I don't see how it could have been sticking on splines or alignment... Like I said the engine (and bellhousing / coupler) are not even fitted yet, when partially fitted the splines could be seen inside the boat, they'd already gone through the gimble bearing. It took a lot ot effort to remove the leg from its partially fitted position, seems whatever was sticking/preventing it going on also made it difficult to remove. With the leg removed I looked again inside the driveshaft bellow, seems there's lots of old grease and a couple of leaves must have blown in during winter... nothing I would have expected would prevent the leg fitting but still I should clean all the crap out of it.

The gimble bearing seams to turn smoothly and the driveshaft must have gone through it to be visible from inside the boat. The bellow doesn't leak but I have some concerns about the rear of the bellows where they seal to the leg, it looks like it's been pinched at a couple of places where it seals to the leg, like the outer part has been bent inwards a little. I should have taken pics of the pinch points to see what you all think but I'm thinking I should maybe change the driveshaft belows before using the boat? Not sure how the bellows attach but it seems I could undo a large jubilee clip on the transom side and the belows could be pulled out from the rear without needing to further dismantle the transom mounted metal components?

I did test the trim hydraulics without the leg or engine fitted... I filled the pump reservoir with generic ATF/PAS fluid (Dex2/3 compatible) then ran the trim to full extent both ways. There was obviously loads of air in the system and the hydraulic fluid frothed up in the pump reservoir, so I left it 10 minutes between moving the rams from one extreme to the other. I would have expected air in the system anyway because I had one of the lines from the pump disconnected to change its Oring. Made the mistake of brimming the pump reservoir with the rams fully extended (tilted position), obviously it overflowed when I retracted the rams (down position). The rams now feel solid at any position between retracted and extended and I found no external leaks so I'm hoping the trim hydraulics problem was just due to loss of fluid from the minor leak I found... What are your thoughts?

Another thing I'm concerned about is that if I continued to try to trim down with rams fully retracted or trim up with rams fully extended the pump made a squeeling sound. I don't know if that's normal or suggests stripped gears etc inside the pump / motor?

There's a lot of old grease inside the bellows and on the driveshaft. Maybe if I clean it all up and apply new grease the leg will fit on easier next time?

At least it seems there are no external leaks and the rams feel solid now. I know this doesn't mean it'll be OK when under the strain of the engine/prop pushing the the leg forwards and down but before I added fluid and bled the system I could push/pull the rams a little, I can't move the rams manually now.
 

Lpgc

Petty Officer 3rd Class
Joined
Jun 17, 2023
Messages
94
I'll quote myself so you can see what I'm referring to in this post
The bellow doesn't leak but I have some concerns about the rear of the bellows where they seal to the leg, it looks like it's been pinched at a couple of places where it seals to the leg, like the outer part has been bent inwards a little. I should have taken pics of the pinch points to see what you all think but I'm thinking I should maybe change the driveshaft belows before using the boat? Not sure how the bellows attach but it seems I could undo a large jubilee clip on the transom side and the belows could be pulled out from the rear without needing to further dismantle the transom mounted metal components?

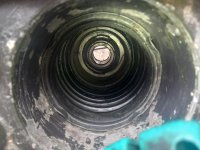
I took a pic of the pinched bellow today. In the pic below you can see the 4 areas at the rear of the bellow I mean.

20240404_121320.jpg

I now realise they match up to the 4 areas of the drive leg that are indented and mate up to the bellows, so I don't think these areas will be a problem?

Before taking the pic I cleaned old grease and a few leaves from the inside of the bellows and rear of the gimble bearing (OK really I got the missus to clean it because my hands were too big to fit :D).

I've been cleaning old grease, a thin film of green slime and a few rust patches from the drive mating areas and input shaft, hoping the drive will go on easy after this when I try fitting it again.

I don't need to know straight away but what grease should I use in the grease gun for the gimble bearing and input shaft universal joints? I'd prefer a standard type grease over specific marine stuff because it'll be much easier to get hold of quickly and locally in the UK.
 
Last edited:

Lpgc

Petty Officer 3rd Class
Joined
Jun 17, 2023
Messages
94
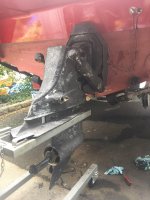
The drive went on easy after cleaning everything up and adding some new grease :) . I've attached the rams to it, tilted it up and will see if it drops overnight.

20240404_154321.jpg

Still need to know what grease to use for the UJ joints and gimble bearing.

May buy an alignment tool but they cost around £79 here. Those I've seen advertised say they do Mercruiser, OMC and Volvo stuff, will that be correct or should I be looking for a specific OMC / Volvo SX alignment tool?

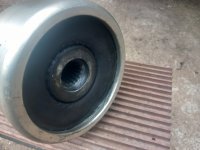
I have some concerns about the coupler (picture below), seems the rubber is out of alignment, it sits around 1/4" from the outside of the metal housing for most of the circumference but there is an area where the rubber comes all the way up to the lip of the housing. is it OK like this (and will it straighten itself out) or will it mean the driveshaft doesn't run true and puts sideways loads on the gimble bearing as it rotates? If I hadn't already fitted the drive leg I'd put the coupler on the input shaft splines and check to see if I could tell it was true or off centre. Maybe I caused the rubber to move out of position durig removing the leg and putting weight on the input shaft?

20240404_154404.jpg
 
Top