1979 McKee Craft 16' Waccamaw - restoration continues

sphelps

Supreme Mariner
Joined
Nov 16, 2011
Messages
11,435
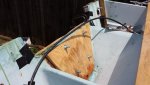
Can you remove the splashwell ? If so you could always remove the inside skin of the transom to make the clean out much easier . Thats what I did with mine and then re-glassed it back in before the pour . Your only gunna have to do this once so you want it as clean as possible for a good bond .
And you are right on the folks down at Seacast . I got absolutely nowhere with the nida-bond people . They acted like if I wasn't planning on buying a truckload then they just didn't have the time for me .
So glad I went with Seacast instead . And just a few hours down the road for me so we drove down and picked it up . No shipping cost ..
Btw, make sure you do a proper re-naming ceremony . Ya don't want any bad luck !
 

djm3801

Seaman
Joined
Apr 12, 2014
Messages
64
@sphelps - You know, you make a great point but I hate glass work and the idea of cutting that thing out makes me cringe... On the starboard side the inner skin on the inside of the transom is solid where the splashwell meets the skin. On the port side the glass was cracked and I pulled it out and will reglass that from the inside with some 1708. When that dries I an going to drill a 1" hole t the top of the port side splashwell and stuff some PB in there. The glass that cracked looked like wood dust and resin.

The seacast people have seen some photos and their main concern is that I get any non glass surfaces glassed to ensure proper bonding with the product. They have a great deal of confidence in this stuff's ability to adhere and fill glassed gaps to proper / greater strength. I think - and they think - that the boat was overpowered at one time. These hulls being as strong as they are, there is almost no spider webbing or stress evidence exterior, but the fractured glass on that port side splashwell upright where it meets the transom tells that story. The entire transom was bowed out a bit on the port side and the entire transom was soaked. I bet that added weight to the boat!

I feel I can get to it Ok but I agree that cutting it out would be optimal. Had both uprights been damaged inside the transom I think I would have gone that path.
 

sphelps

Supreme Mariner
Joined
Nov 16, 2011
Messages
11,435
Yeah, I see what your saying . With just a little more time working on getting all the wood out it will save ya some time and money down the road on glass work ..
Good plan ...
 

djm3801

Seaman
Joined
Apr 12, 2014
Messages
64
I have been taking my time but have the transom about hollowed out. I got the first 18" done with a small electric chain saw and then had to rent a 24" gas one for the last 4". I sawed just till I scratched glass then reset to about 1/2" above glass bottom. After hogging out with that saw I used a 1 1/8"Forstner bit on a 2 foot extension for the last half inch as suggested by Seacast. 1 1/8" is the thickness of the transom. it works well, especially when used in a short chopping manner as opposed to drilling al concentric holes. I ground the tip off - sticks out about 3/16" - so as to not puncture the glass bottom. Then I clean up with the remainder with my sharpened bar chisel tool. I use the saw or drill for a minute, stop, vacuum, chisel, vacuum and repeat the cycle, making heavy use of flashlights. Wiped it all with mineral spirits to remove any chain saw oil and will do it again.

The shop vac bucket is my "transom" remains - about half of it. There is a "motor well" on this boat that is foam filled and I have some places where the glass "PB" the manufacturer used to seal off the transom before foaming broke - likely due to the weak trancom - so will line with 1708 and poly resin before applying Seacast. This can be seen on the left of the first photo. Going to clean this out a but to have a clear channel to the bottom. Then I will drill a 1" hole at the tops of the "towers" of the motor well and applying some thin PB in there to make sure the back of the poly is supported to some degree. I could probably pour some foam as well but it is a small area and the PB is stronger I think. Expanding foam could be a bad thing even with an escape hole. I also need to put a U shaped piece of glass on bottom and sides to make sure there is no exposed foam on bottom and side so transom is encapsulated in poly glass. This should be fun... Sides as stated are pretty clean already.

Once I finish all this I will order the Seacast. Need to move on this cause it is not getting any warmer here in PA and it needs to be 76 degrees for the pour but heat lamps can help that per the Seacast folks. Once it is poured it will get pretty hot.


This photo shows the top of one of the "towers". This clearly shows also the transom stress which cracked the aluminum cap.

 
Last edited:

djm3801

Seaman
Joined
Apr 12, 2014
Messages
64
when I am not working on Transom I started sanding bottom paint off the hull. So far the hull is in very nice shape. Since this will be in the water no more tha 4 - 5 hours at a time 4 months a year, I plan to use WOG's tractor paint on topside and hull.

20141007_114922_zpsoqlpzjir.jpg
 

djm3801

Seaman
Joined
Apr 12, 2014
Messages
64
No Title

20150609_125332_zpsxpcf0ryy.jpg 20150613_134621_zps1dnrqzqq.jpg Well, I bought Seacast last fall but it got cold real fast and I went to Florida so... When I returned this May I resumed my progress. Did a final cleanup, lined weak spots in transom with 1708 and poly per Seacast instructions, braced transom and did the pour. This stuff is pretty amazing and it cured very fast - it was 86 degrees out. My bracing ensured a flat exterior transom. The Seacast folks - just could not be more helpful. I need to fill a couple of soda can sized holes I made to check for water in foam and got pour foam for that.

A few photos of the transom work.
 

Attachments

  • photo223553.jpg
    photo223553.jpg
    51.9 KB · Views: 1
Last edited:

sphelps

Supreme Mariner
Joined
Nov 16, 2011
Messages
11,435
Nice job ! The prep is 10 harder to do than the pour .. :lol:
Just poured my Manatee and the temps were right at 90 deg .. It went off a little faster than the last time I used it .. Even working by myself there was plenty of time to get it in the hole ..
 

djm3801

Seaman
Joined
Apr 12, 2014
Messages
64
The prep is a chore - especially if you have to glass inside the transom, which I did. But the finished product is just rock solid. Back to sanding the hull.
 
Top