1977 16ft SC Holiday re-do

M2HB

Petty Officer 1st Class
Joined
Oct 7, 2017
Messages
206
It looks like you are making good progress.

I can't wait to see it finished.
 

No-AH

Petty Officer 1st Class
Joined
Oct 20, 2016
Messages
234
It looks like you are making good progress.

I can't wait to see it finished.

Thanks for dropping in M2. Getting these must do’s checked off will eventually get me there.
 

No-AH

Petty Officer 1st Class
Joined
Oct 20, 2016
Messages
234
Do those 1/4" blinds pull pretty tight, they look beefy.

[IMG2=JSON]{"data-align":"none","data-size":"full","src":"https:\/\/forums.iboats.com\/filedata\/fetch?id=10567550"**[/IMG2]

They sure do, these 1/4" ss structural magnaloks easily squeezes that fumeee 5200 right out of the tiniest voids....providing you have the capable riveter.....NO handheld or lower end pneumatic riveter can successfully pull these suckers! I have a video showing a rivet being pulled with my marson on my phone that I'm unable to upload to show you guys.
 

Attachments

  • IMG_0998.jpg
    IMG_0998.jpg
    2.3 MB · Views: 1

oscarvan

Petty Officer 3rd Class
Joined
Mar 28, 2018
Messages
87
Do those 1/4" blinds pull pretty tight, they look beefy.

[IMG2=JSON]{"data-align":"none","data-size":"full","src":"https:\/\/forums.iboats.com\/filedata\/fetch?id=10567550"**[/IMG2]

Soooo.... are they water tight when set? Doesn't look like the head ends up smooth like an Olympic.... What do you do, a dab of goop? Never mind, went back and saw the pics of your stern rebuild. They end up dimpled. So, then the question is..... is anyone using Olympics with the shaving tool? Seems to be very popular with the Airstream folks. Shaving tool is not cheap, but the result is as close to a solid rivet as you can get.....
 
Last edited:

No-AH

Petty Officer 1st Class
Joined
Oct 20, 2016
Messages
234
Soooo.... are they water tight when set? Doesn't look like the head ends up smooth like an Olympic.... What do you do, a dab of goop? Never mind, went back and saw the pics of your stern rebuild. They end up dimpled. So, then the question is..... is anyone using Olympics with the shaving tool? Seems to be very popular with the Airstream folks. Shaving tool is not cheap, but the result is as close to a solid rivet as you can get.....

Hi Oscar cheers for visiting my project M8.
I’m familiar with the shaving tool and have worked with them in the past in my trade. They do a great finish to the heads of aluminum rivets but not stainless. Magnaloc shanks are covered with 5200 before they’re put in and when pulled the 5200 oozes out where the pin breaks off, leaving a nice bit when the excess is wiped with mek it makes for a nicely sealed rivet head.
 

No-AH

Petty Officer 1st Class
Joined
Oct 20, 2016
Messages
234
Hey M8s,
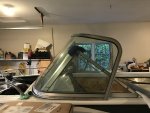
So the Admiral and I hooked up the holi and did a leak test with boat on trailer today. I'm ecstatic to share that not a drop was to be seen after floating the trailer at our marinas launch pad after an hour or so in the water. YAY!!! While chatting with the owner he mentioned he just had to replace the windshield off a 2014 1650 fish n ski and wondered if I would be interested in having it. He no sooner had the question uttered, we were loading it in the boat!
I was in contact with Taylor made last year for an estimate to have one custom fabbed to replace the original. WOAAA !!! ridiculous cost! Nothing wrong with the original as it conforms nicely with it's character. But you have to admit....
Click image for larger version  Name:	IMG_1002.jpg Views:	1 Size:	2.08 MB ID:	10578483
 

Watermann

Starmada Splash of the Year 2014
Joined
Jan 12, 2013
Messages
13,753
Always nice to have a dry bilge alright :thumb:

WS looks really nice!
 

No-AH

Petty Officer 1st Class
Joined
Oct 20, 2016
Messages
234
Cheers M8s.
After taking a long look at the ws, I know that it won't just pop right on without some modifications. Does anyone have any past experiences with having a ws altered?
 

Watermann

Starmada Splash of the Year 2014
Joined
Jan 12, 2013
Messages
13,753
Doesn't it just attach with T bolts? You may have to position the WS on the consoles and gunnels, draw a pencil line on either side, remove and drill some holes to attach it.
 

No-AH

Petty Officer 1st Class
Joined
Oct 20, 2016
Messages
234
Cheers WM. I can fit the port and starboard sides of the ws on the gunnels and make them work as is, but the center walk through section would need to be cut [narrowed] as the beam of the boat it was on must have had a wider beam than the holi. I was wondering if an auto glass place could cut to fit or has anyone done this successfully?
 

Watermann

Starmada Splash of the Year 2014
Joined
Jan 12, 2013
Messages
13,753
I see, what I would do is remove the center piece and fit the 2 sections, secure them in place and then take measurements. Remove pane of glass from center section, resize the frame to fit and then You'll have to get a new piece cut to fit the resized frame. Nobody will cut old safety glass trust me on that, it'll shatter.

Or leave the center piece out completely for now and move forward, there's always time to go back and do something with the WS center piece later on.
 

budski

Lieutenant Commander
Joined
Sep 12, 2012
Messages
1,845
Hey No Ah we've cut down a few center windshields and replaced the glass with 1/8 inch plexi glass this might work for you
 

No-AH

Petty Officer 1st Class
Joined
Oct 20, 2016
Messages
234
Cheers lads. Working around with the mock up ws in place is growing on me more and more. I'll definitely look into your recommendations.
 

No-AH

Petty Officer 1st Class
Joined
Oct 20, 2016
Messages
234
Time for an update M8s. I installed the belly tank, midship, with fittings rearward 32" from the transom leaving room for the bilge and valve livewell intakes. I wrapped the tank with .125" gasket material where it made contact with the ribs below.
 

Attachments

  • IMG_1015.jpg
    IMG_1015.jpg
    1.9 MB · Views: 1

No-AH

Petty Officer 1st Class
Joined
Oct 20, 2016
Messages
234
Installed ply over tank [pic taken before fastening it to the 2 main stringers] with .925" grip range magnaloks burying the heads .125" below flush.
 

Attachments

  • IMG_0828.JPG
    IMG_0828.JPG
    1,022.5 KB · Views: 1

No-AH

Petty Officer 1st Class
Joined
Oct 20, 2016
Messages
234
Wood filled imperfections/rivet heads, sanded, resealed said areas, vacuumed then tack clothed floor and laid the Nautolex vinyl with hh66 adhesive.
 

Attachments

  • IMG_1031 (2).jpg
    IMG_1031 (2).jpg
    1 MB · Views: 2

No-AH

Petty Officer 1st Class
Joined
Oct 20, 2016
Messages
234
Rolling pin was a MUST for this task! It facilitated working out the trapped air perfectly. I started by gluing the center span the length of the area where the tank is, then I worked the port side then starboard side last, applying only enough to keep the work 3-5 minutes from when I applied the adhesive. I left the surplus vinyl all around the perimeter, thinking this will aid in the watershed[up the sides], directing the water to the bilge area. Also, a respirator is a must as the fumes of this adhesive curing is wicked!
 

No-AH

Petty Officer 1st Class
Joined
Oct 20, 2016
Messages
234
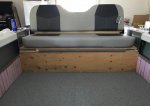
Rear casting deck with flip conversion bench seat mock-up.... IMG_1080.jpg
 
Last edited:
Top