1973 starcraft ss restore in progress

crankbait cowboy

Chief Petty Officer
Joined
Mar 25, 2013
Messages
570
No Title

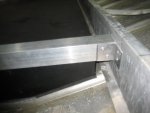
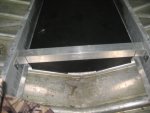
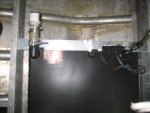
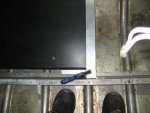
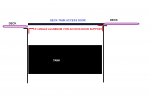
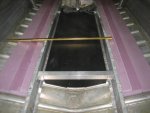
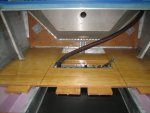
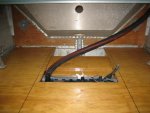
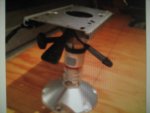
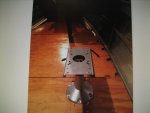
well I heeded the advice of you fellas and went to the aluminum side, and glad I did , as it worked out well I think . its in place and I cant move it, and thinking being a belly tank ( wedge shaped ) those extra tabs on sides do me no real good. last pic shows one clamped in place but see no need for them, unless you guys think otherwise. so the tank is in , and I am off to Arizona to get away for 10 days, thinking when I get back to plumb some hoses and get after the deck.
 

Attachments

  • photo259560.jpg
    photo259560.jpg
    85.1 KB · Views: 1
  • photo259561.jpg
    photo259561.jpg
    92 KB · Views: 1
  • photo259562.jpg
    photo259562.jpg
    88.9 KB · Views: 1
  • photo259563.jpg
    photo259563.jpg
    92.1 KB · Views: 1

crankbait cowboy

Chief Petty Officer
Joined
Mar 25, 2013
Messages
570
No Title

I am also planning on using 1x1 angle riveted to ribs along sides to support and screw my tank access door too. ( RED IN DRAWING)
 

Attachments

  • photo259565.png
    photo259565.png
    11.4 KB · Views: 0

pntbtrjllytme

Petty Officer 1st Class
Joined
Mar 10, 2017
Messages
219
Boat looks good cowboy! Ill be following your progress as well =) I like the work youve done on the tank I will need to do something similar on mine
 

crankbait cowboy

Chief Petty Officer
Joined
Mar 25, 2013
Messages
570
No Title

got a little more done, I am working from back to front, so I got some pink in bottom, and my rear most deck riveted down ( countersunk the rivets as others have done with the plan to use a filler , smooth out and then put down vinyl. had to engineer a bit on stern side of tank, so I could get hoses on ( this area will be close to under splashwell with a storage area hiding what bit will be in usable boat area. mocked up the fill hose ( that should work fine shouldn't it? , its all downhill ) and left some room back in bilge area. plan is to get pedastals, and drill mounting holes for bases , with backer board and installing tnuts before riveting that section of deck down. slow but progress, anybody see any glaring issues to this part of plan? thanks for checking it out
 

Attachments

  • photo260747.jpg
    photo260747.jpg
    89.1 KB · Views: 4
  • photo260748.jpg
    photo260748.jpg
    87 KB · Views: 11
  • photo260749.jpg
    photo260749.jpg
    93.8 KB · Views: 3

Watermann

Starmada Splash of the Year 2014
Joined
Jan 12, 2013
Messages
13,753
From here everything looks to have been done perfect and sealed up great :thumb:

fetch
 

Tnstratofam

Commander
Joined
Aug 18, 2013
Messages
2,679
Looks real nice. I like the backer plates you put in for the stern tie downs. I did the same thing with the transom in our SS and they are rock solid.
 

crankbait cowboy

Chief Petty Officer
Joined
Mar 25, 2013
Messages
570
No Title

so saw the brown truck yesterday, don't need pedestals for awhile, but figured I better get one so I could mock up placement. went with the springfield air ride /swivel/with slider for driver. so I got an 18 ft ss and am trying to figure out placement ( how close to side of boat and how far from console? and I also have a stringer to deal with. ( in second pic you can see my stringer marked under base, I have it strattling it ) thinking a piece of cardboard size of seats I am thinking on top of slide, then swivel to be sure it clears side of boat and room from console. any thoughts or measurements from anybody that has been there/ done that? apologize as pics not so good as a pic of a pic
 

Attachments

  • photo261137.JPG
    photo261137.JPG
    84.6 KB · Views: 1
  • photo261138.JPG
    photo261138.JPG
    88.9 KB · Views: 1

pntbtrjllytme

Petty Officer 1st Class
Joined
Mar 10, 2017
Messages
219
If you dont mind me asking, where did you get your pedestals? Ive been looking at prices b/c they arent cheap!
 

Watermann

Starmada Splash of the Year 2014
Joined
Jan 12, 2013
Messages
13,753
Last edited:

MNhunter1

Ensign
Joined
May 12, 2014
Messages
981
any thoughts or measurements from anybody that has been there/ done that? apologize as pics not so good as a pic of a pic

I just went through this with my 15' Nova, basically came down to mocking everything up and moving the seat and pedestal around until things felt right. The stringer/deck supports were an issue for me, as were the ribs as my pedestals/bases sink into the deck and the shallow hull forced me to fit the pedestal in between the raised ribs. I placed a doubler under the deck where each base was to be mounted, snug up tight against the stringer, and used stainless T-nuts like WM on the underside of the deck. I have one mounting hole for each pedestal base that is directly over the stringer that will receive a stainless screw sunk through the deck and into the stringer. It worked out pretty well, but takes a little planning and measuring. I almost mounted my deck before hammering/gluing in the t-nuts, but luckily I causght it in time:)

If you dont mind me asking, where did you get your pedestals? Ive been looking at prices b/c they arent cheap!


Sent you a PM about some places I've had good luck with...
 

MNhunter1

Ensign
Joined
May 12, 2014
Messages
981
Pictures for more clarity :)

Here you can see the placement of the pedestal base locations. I'm using Plug-in pedestals bases that sink into the deck, hence the holes, but that shouldn't be an issue with the bases/pedestals you're using.


Here is the decking from the back side, with doublers and t-nuts mounted. You can see the single hole off to the side and the faint wear marks from the stringer location where the screw will be used for the one mounting hole. The orientation of your bases as pictured would probably result in 2 mounting holes used in this fashion.
 

crankbait cowboy

Chief Petty Officer
Joined
Mar 25, 2013
Messages
570
No Title

yep that's the plan waterman and mnhunter, get it laid out and get backer plates with holes and tnuts before riveting down deck. cut some cardboard at work and will try mock it all up. I was going to go with the wise blast off centric seats,( see pic) but they are 24x20 and may be a bit bulky for the area I got to work with , so may be looking at them 17 inch seats like waterman, which are 4 inches shorter and 3 inches narrower.
h20 , your boat is an 18 ft ss I believe, do you know how far off wall and how far back from bottom of console you ended up going for pedestal placement.
I have had alumacraft and have a lund baron now and both had nice seats and air power pedestals which I really like and the admiral says don't skimp on seating , and I listen! overkill? maybe but if momma aint happy.... may rethink it down the line , but got a fine pedestal locked up for me the driver, heehee
pnt I sent you a pm
 

Attachments

  • photo261148.jpg
    photo261148.jpg
    21.9 KB · Views: 0

jbcurt00

Moderator
Staff member
Joined
Oct 25, 2011
Messages
24,871
If you dont mind me asking, where did you get your pedestals? Ive been looking at prices b/c they arent cheap!

Please remember to check iboats for your seats and pedestals, they do offer price matching on most stuff and offer forum members a discount.
 

Watermann

Starmada Splash of the Year 2014
Joined
Jan 12, 2013
Messages
13,753
Yeah these V5 models have some variance with the consoles and the hull starts tapering sooner so the best way is to center the seat pedestal with your steering column hole and that's what I did. Distance back with a slider is not a huge concern but you have to figure your height into the comfort as well. I'm 6'04" so I have reach.
 

crankbait cowboy

Chief Petty Officer
Joined
Mar 25, 2013
Messages
570
Gives me a starting point h20 , thanks. My cardboard cutout for size of that centric seat looks like they may work, cold out so just spent a couple minutes so gonna have to get in the boat , put. Cushion on cardboard, sit down, swivel it and check distance from console making. Brrrrrrr boat sounds when nicer weather, hoping I can make them centric seats work, as I like em
 
Top