1972 Johnson 25 HP (25R72R) running like garbage. PLEASE HELP!!!!

Status
Not open for further replies.

pet575

Seaman Apprentice
Joined
Jul 12, 2007
Messages
40
Reading back through this thread, maybe I didn't really get an answer on whether the amount of spark I got is sufficient. It looks like I need to set the gap on the tester to 1/4" and give it a go. I'll follow up and do that tonight and get some video of it and post it up.

Thanks for any comments between now and then.
 
Last edited:

racerone

Supreme Mariner
Joined
Dec 28, 2013
Messages
36,312
A spark that jump the gap on the sparkplug is not very strong.---Often that will not fire across that gap in the cylinder when the air is compressed to 120 psi.--That is why experienced folks ask that you test the design capacity of the system.---A good ignition system will jump a gap of 1/4" with ease and a snap you can hear.
 

pet575

Seaman Apprentice
Joined
Jul 12, 2007
Messages
40
Update time......

First, I want to make sure I give a HUGE THANK YOU to all that have helped me out so far. Once I got the right spark testing tools I had a MUCH better idea what I was doing and trying to test and I'd have never gotten that far with the initial spark tester I bought.

Second, I changed the gap on the tester to 1/4" and it was revealing. On one electrical lead, the spark was able to jump the gap significantly but there was not a REALLY loud snap to it. I'm not sure if the spark was "just enough" to bridge that gap or if it would be considered "strong" simply because it was able to jump the gap.

However, on the other lead I was not able to get a consistent spark with the 1/4" gap. I probably pulled the starter cord 10-15 times and I got a very weak spark to jump it maybe once or twice and that was only after some fiddling with the connection to make sure it was tight after a couple of pulls. Initially, I got NO spark, fiddled with it a bit and got 1 spark out of 5 pulls, and then after I got that 1 spark on the next pull and then never again.

So, I got a flywheel puller and took a look at the points set. I believe them to be the originals. If they are not, I know for sure that they are the set that was in it when I bought the motor in 1994. Here are the pics:


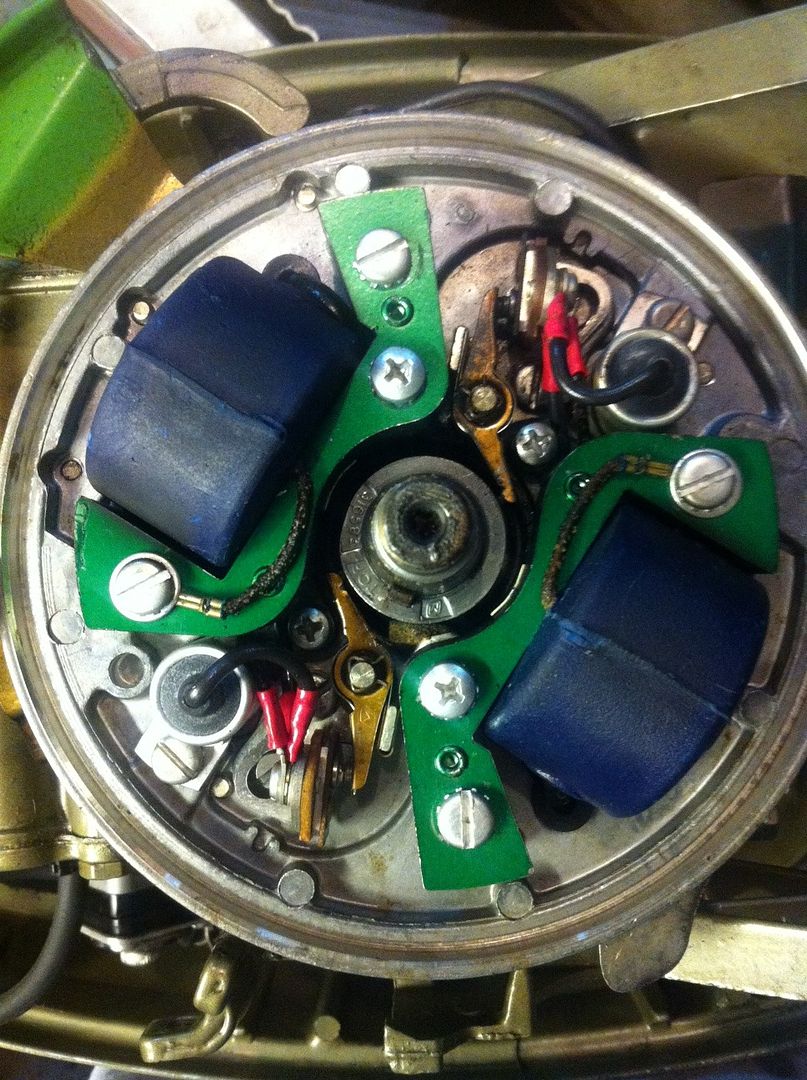
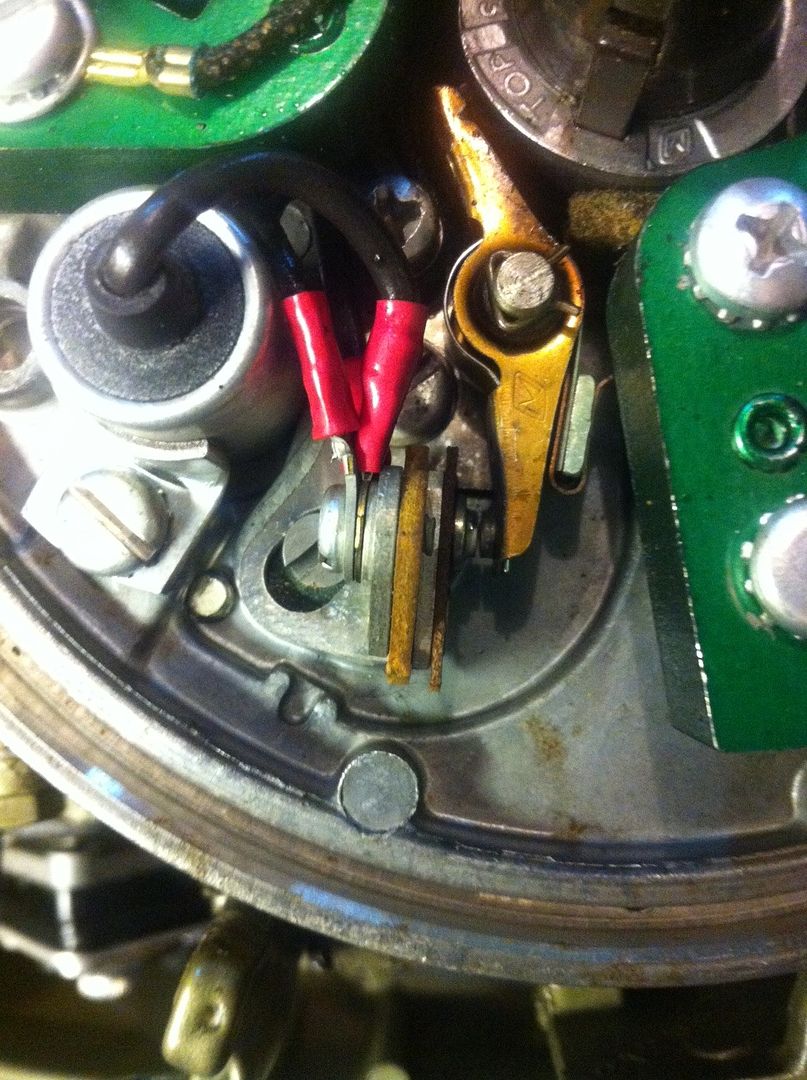
One set of points (is that the right terminology?). Doesn't look terrible but looks like it has a little sooty buildup (or corrosion?) on it.


Other set of points. Looks worse than the other set.

I was not courageous enough to attempt to take the entire assembly apart and try to trace which non-sparking plug wire was connected to which point set. So, with this information, my plan of attack was to replace both sets of points and gap them at 0.020 (per the stamp on the flywheel) and replace the condensers as well. I figure that with their age they are due for replacement regardless of which one is the "good" and which one is the "bad" one.

Anyone have thoughts on what they see in these pictures? Should I adjust my plan?
 

racerone

Supreme Mariner
Joined
Dec 28, 2013
Messages
36,312
Try cleaning the points with some fine emery paper.----Make sure they are absolutely clean and test for spark again.
 

pet575

Seaman Apprentice
Joined
Jul 12, 2007
Messages
40
I understand the reasoning for doing that. I'm guessing that if I get significantly improved performance after that then I'm either satisfied with cleaning them every so often or I'm going to replace them with new ones?
 

racerone

Supreme Mariner
Joined
Dec 28, 2013
Messages
36,312
They are easy to get new and not expensive !----Working on a 33 hp at the moment ( identical magneto to yours ) that had new coils installed.---To me a very simple job , but whoever did it sure messed it up.---They did not know about setting the proper air gap on the coils.-Flywheel was rubbing on them !
 
Last edited:

pet575

Seaman Apprentice
Joined
Jul 12, 2007
Messages
40
OK so I was able to get some time on the water with the boat this weekend. After filing the points with emory paper I was able to get a MUCH healthier spark on both wires with a 1/4" gap on my tester. I was feeling pretty confident that the motor would run if I took it out on a small lake here in town. It DID run, but all I did was sort of get back to the starting point where I was when I first started this thread.

Since this is more fresh in my mind than what I wrote way back, here is what I had going on this weekend:

1. The motor will not start unless the throttle is open past 1/2 power. Then it will start and run like a champ in neutral. You can idle it down some and it will continue to run just fine.

2. If you idle the throttle all the way down to idle speed, the motor will die. This makes shifting difficult as I'm not a fan of shifting at higher idle speeds. Once it dies from idling down too far, the motor will NOT restart unless you open the throttle back to past 1/2.

3. One thing I have noticed is that I have an issue with my priming bulb. If I have the throttle set at idle or "START" position the bulb will not prime. However, if I open up the throttle to the "past 1/2 power" position the bulb will prime and when the motor is off I can hear gas moving into the motor (I"m guessing into the carb?) with each squeeze. I replaced the entire fuel line with a new one (which included the primer bulb) and there was no change to this condition. I changed it back when the motor first started giving me problems, thinking it was the fuel bulb.

4. The motor ran pretty well at fast idle and at planing speeds at first but then the longer I ran the motor at planing speed it returned to the previous condition that caused me to post this originally. The longer we rode, it began to "miss" or "cut out." At first it was a very tiny, subtle miss that you could barely hear. The longer we operated the motor at planing speed, the worse it got. Things deteriorated to the point where it even did it at slower speeds and fast idle.

5. When the motor began missing/cutting out, I noticed that the priming bulb was not hard to squeeze. If I pumped it while running it would slightly improve the missing/cutting out but maybe only for a second. I did not sit there and pump it the entire time out of concern for flooding the motor and causing it to bog down. It seemed like that happened to me in the wintertime and it caused the motor to not run at any speed and my memory tells me that I found wet fouled plugs when I did that.

As I posted above long ago, I did a carb rebuild previously in hopes of correcting the difficult starting/failure to run at idle issue. I'm guessing that I have some adjustment to do with the rebuilt carb in order to get it to idle better but I honestly don't have a good handle on which way to go with it. Anyone have any suggestions or insight on that?

I'm wondering if the magneto coil packs have an issue to where they function properly until they get hot. I've had this happen to me before on cars. Do the magneto coil packs behave the same way if they've gone bad?

I feel like I'm stuck in the middle right now in deciding whether I have a spark issue or a fuel delivery issue. I'm leaning toward spark at least on the higher speed issues. I think I'm leaning toward fuel delivery or air/fuel mix issue on the starting and slow idle issue. Any help is GREATLY appreciated.
 
Last edited:

pet575

Seaman Apprentice
Joined
Jul 12, 2007
Messages
40
I didn't get a chance to do it after using the motor, but I DO plan to pull the spark plugs and see what they look like. I cleaned them off from the pic above prior to running it over the weekend. I'm fully expecting them to be the same dark color again, though.
 

AlTn

Commander
Joined
Mar 9, 2010
Messages
2,813
couple of things...remove the spark plug wires and pull the boot off each one < yep they just pull off, a little wd will help with this > at the end of each wire is a terminal.. pull the spiked end out of the wire, cut 1/2 " off the wire, reinsert the spike making sure it pierces the metal core and the spring is against the end of the wire..reinsert into the boot with the spring facing so that it can snap over the spark plug end..just trying to get the best connection you can w/o replacing the plug wires themselves
your comment #3...throttle position should have no bearing on gas entering the carb when you are pumping the primer bulb
the bulb will go soft when the motor is running...that's normal
could you post a vid of the carb roller against the timing cam..motor in fwd...as you twist the throttle from start to wot?
late to be asking, but what spark plugs are you using?
 

pet575

Seaman Apprentice
Joined
Jul 12, 2007
Messages
40
Thanks AITn. I'll get a look at the plug wires when I pull the plugs tonight. I'll also post up the pics of the carb installed to make sure I haven't screwed something simple up in reconnectin all linkage back when I reinstalled the car.

As for the carb roller/timing cam, I'm not real advanced so I'm not necessarily following the terminology on what those parts are/where they might be located. Is the timing cam the green piece visible outside of the armature plate (about 11 o'clock) in the very first pic I posted in Post #23 above?

Since I'm a little in the dark on that last part, I'm going to get some video of everything moving as I'm working the throttle from idle to fully open.

Plugs- don't know off the top of my head if they are J4C or not. I'll look tonight and find out for sure.
 
Last edited:

pet575

Seaman Apprentice
Joined
Jul 12, 2007
Messages
40
Top of my head I want to say the spark plug number is J4J. Again, I will doublecheck tonight.
 
Last edited:

AlTn

Commander
Joined
Mar 9, 2010
Messages
2,813
well your link won't link but if you are looking at a parts diagram for the 25r72r...under the intake manifold parts..#17 is the roller...under the magneto parts..#48 is the cam-throttle control...hard to tell from the pic but the cam is held to the underside of the armature plate by 2 screws...the carb roller touches the cam from the start position all the way to full spark advance which should be ~ wot...at this point the throttle butterfly at the rear of the carb throat should be horizontal within the carb throat
 

pet575

Seaman Apprentice
Joined
Jul 12, 2007
Messages
40
OK I've got a handle on it now. Thanks! Ran out of time last night so couldn't get to the motor. Hoping to be able to do it tonight and will update.
 

pet575

Seaman Apprentice
Joined
Jul 12, 2007
Messages
40
Got some video of the assembly with me working the throttle:
https://www.youtube.com/watch?v=NlB2_IMJl1o&feature=em-upload_owner

from another angle:
https://www.youtube.com/watch?v=3PigX65tc24&feature=em-upload_owner


Also got some pics of the plugs and the wire connections:


Plugs were a little discolored but not as dark as I expected them to be.

The wire connection came apart so I trimmed back the insulation a tiny bit to make sure the wire wasn't all corroded. It looked OK:


So I put it back together. Does it look like I have it right if I just knock off the exposed piece of wire there?
 

AlTn

Commander
Joined
Mar 9, 2010
Messages
2,813
wires look good...I'd just wind some of the bare wire into the spring as you'd achieve a greater contact area...vids...suggest you do this...loosen the set screw for the throttle shaft linkage...in fwd gear advance the throttle as far as it will go...make certain the throttle butterfly is horizontal when the carb roller is on the highest point of the timing cam....tighten the set screw. With the motor in neutral and the throttle is advanced as far as it will go...is the cam roller beyond the 2 notches in the timing cam? < not the 2 raised marks on the flywheel >....I have found that sometimes setting the timing advance/carb opening relationship like this will minimize some of the worn clearance tolerances in the linkages. If you don't like this setting, it's easy enough to set it with the roller between the 2 notches in the timing cam as the throttle butterfly is just beginning to open. You are very close to this setting as things are now, but it looks like the roller isn't quite up the ramp on the timing cam.
 

pet575

Seaman Apprentice
Joined
Jul 12, 2007
Messages
40
So with this new info, any recommendation on how to proceed? Replace points and coils? What about the poor slow idle issue?
 

AlTn

Commander
Joined
Mar 9, 2010
Messages
2,813
if your patience isn't wearing thin, just replace the points and condensers and see where things stand...the coils and wires may need replacing as well,but you can wait for further testing...it's hard to resist that, "I'm here and they really aren't that expensive so I'll do it now and forget about it." It's the individual's decision and neither is really wrong. Get a strong consistent spark and then look for other issues with the idle. You may try the J6C plugs as they are a little hotter.
 

pet575

Seaman Apprentice
Joined
Jul 12, 2007
Messages
40
Thanks. I'll probably keep it simple for now and start with points/condenses and work on it from there.
 
Status
Not open for further replies.
Top