14' SC Rebuild

frazoo

Petty Officer 2nd Class
Joined
Apr 13, 2017
Messages
198
Started the transom deconstruct this afternoon, getting all the trim and bits and pieces out of the way so I can get the splash well off tomorrow and have at the rotten stuff.
I have a 17" Triumph cc with a 60 hp W/ T&T I'm going to sell off as I never use this boat anymore to fund the new ob and other stuff needed for this boat.
Hopefully, I'll have new transom pics in a day or two, weather permitting.
 

frazoo

Petty Officer 2nd Class
Joined
Apr 13, 2017
Messages
198
No Title

Got the splash well removed and started taking out the sawdust. Found three strips of soft rubber mounted down low on both sides and one transom side. Anyone know what this is for, and is it needed? (It's just above the spray rail in this pic) Thanks
 

Attachments

  • photo277951.jpg
    photo277951.jpg
    343.6 KB · Views: 6

Watermann

Starmada Splash of the Year 2014
Joined
Jan 12, 2013
Messages
13,753
My guess on the rubber strip is to keep a fuel tank or battery from rubbing.
 

frazoo

Petty Officer 2nd Class
Joined
Apr 13, 2017
Messages
198
No Title

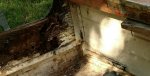
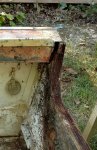
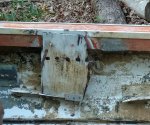
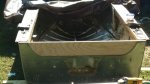
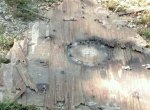
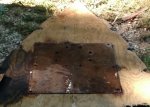
Ahh, okay, sounds like a good thing to have. One of the things I like about rebuilding is seeing what PO's did in the past and trying to figure a way to do it better, if possible. I noticed that the transom was installed in two pieces, and it seemed like the small piece at the radiused section might make for a weak spot. So, I wondered why it was done that way. It seems to me ( and I could be wrong), it was done that way so the gunwale cap that extends over the transom would not have to be removed to do a transom replacement. Now I have to figure out how to do it in one piece without having to take too much loose.
 

Attachments

  • photo277969.jpg
    photo277969.jpg
    368.1 KB · Views: 9

Watermann

Starmada Splash of the Year 2014
Joined
Jan 12, 2013
Messages
13,753
That transom looks to me like factory, white washed and 1.5" thick not laminated..

fetch


Most guys replace transoms in one piece but the accepted reason anyone would make a 3 piece transom including the SC factory is to save on materials. Even the monster winged transom in my SS was factory 3 piece.

y4mLadpPlRNp2sgXzJr90PetO8Sd6GTblFOx0Lbd7Fk1wMKgM28js0TwgzXeZeLzLGp4Ek09na9Mq_AFeYLLuMvU7RGMSekes32JENl7HFAFFUQorNZJtFprFxLQr10NU0iZqEo7HRzrloII0xgHx1He7s7OgtNnZvtG8iuCtaFBcYRkf6gbi98L7koHQ7zyTmST8kmi55-PBpl_XwGtMjVgw
 

DirtyHarry83

Petty Officer 1st Class
Joined
Jun 5, 2012
Messages
302
That's wild to see that in 3 pieces on a 14 footer. I wonder how much money the factory saves on cost. I sometimes wonder if the companies went down and itemized this stuff with comparison photos to justify a slight cost increase? StarCraft "Yes we increased costs but our transoms are 1 piece and treated with 3 coats of epoxy. Our through port holes are all treated with 5200 and our sterns have welded brackets for trans mounted electronics." This raises the price by 1000... Yadda yadda.

May I ask what that pulley is from? Was there anything attached to it during tear down?
 

frazoo

Petty Officer 2nd Class
Joined
Apr 13, 2017
Messages
198
No Title

If the transom is original, and I don't doubt you, it lasted a good long while! Hope the new one does the same. It did appear to be a single, full 1.5". The pulley was part of the old cable-type steering system. This boat sat at a scrap dealers lot right on the highway for years. One night someone came along and stole the OB off it and cut the steering cables to make a quick job of it ( at least that's what the dealer told me). Someone really liked carpet, it was everywhere and the manufacturers ID plate was glued over and carpeted. I need something to take the old Glu off without ruining the plate, any suggestions (maybe a little acetone on a rag and gently wipe)?
 

Attachments

  • photo277978.jpg
    photo277978.jpg
    277.9 KB · Views: 7

Watermann

Starmada Splash of the Year 2014
Joined
Jan 12, 2013
Messages
13,753
Not acetone, use an adhesive reducer like Xylene or MEK.
 

frazoo

Petty Officer 2nd Class
Joined
Apr 13, 2017
Messages
198
No Title

Thanks, I have MEK on hand.
Pattern piece inserted to mark radius, stacked and cut, ready for 'poxy.
 

Attachments

  • photo277980.jpg
    photo277980.jpg
    302.1 KB · Views: 5
  • photo277981.jpg
    photo277981.jpg
    324.4 KB · Views: 5

frazoo

Petty Officer 2nd Class
Joined
Apr 13, 2017
Messages
198
Been musing (that's dangerous!).
Years ago I bought plans for a plywood/ 'glass composite boat, an FS 14 by an online company. One builder had layed out his deck as a center console. After measuring the SC, an 18" wide console will definitely work on this boat. Might go for it.
 

frazoo

Petty Officer 2nd Class
Joined
Apr 13, 2017
Messages
198
Is there anything I need to do to the transom interior ( the aluminum), before putting the plywood in place?
Thanks,
 

frazoo

Petty Officer 2nd Class
Joined
Apr 13, 2017
Messages
198
Getting ready to lay the deck, when I got the boat, the 3 layers of deck were totally shot, so I'm not sure if the deck was cut out with a very small bilge area at the transom or not? Something like a square or rectangular opening? Might be beneficial for seeing if water is getting in below the deck, or might that weaken something? As I said before aluminum boats very different than wood/'glass.
 

Watermann

Starmada Splash of the Year 2014
Joined
Jan 12, 2013
Messages
13,753
The inside transom AL skin needs to be cleaned of any crud or corrosion and now's the time fill pitting and any unwanted holes. I also prime and paint the inner skin on my boats just to give them a barrier.

Yeah I'd think a cut out over the bilge for sure and a bilge pump would be a good idea too.
 

frazoo

Petty Officer 2nd Class
Joined
Apr 13, 2017
Messages
198
No Title

Thanks, will do that.Fill unwanted holes with p'butter epoxy or 5200? This was all of the deck left that wasn't sawdust. PO had a pedestal chair mounted there, when I flipped, was surprised to see this 1/8" steel plate as a reinforcement for the seat. Heavy! This was three layers down. Sorry about the lighting.
 

Attachments

  • photo278061.jpg
    photo278061.jpg
    299.3 KB · Views: 6
  • photo278062.jpg
    photo278062.jpg
    249.8 KB · Views: 6

frazoo

Petty Officer 2nd Class
Joined
Apr 13, 2017
Messages
198
No Title

Deck rough fitted today, removing tomorrow and starting interior hull prep work.
 

Attachments

  • photo278107.jpg
    photo278107.jpg
    372.1 KB · Views: 4

Watermann

Starmada Splash of the Year 2014
Joined
Jan 12, 2013
Messages
13,753
Thanks, will do that.Fill unwanted holes with p'butter epoxy or 5200? This was all of the deck left that wasn't sawdust. PO had a pedestal chair mounted there, when I flipped, was surprised to see this 1/8" steel plate as a reinforcement for the seat. Heavy! This was three layers down. Sorry about the lighting.

No for filling the pitting I've always used Marine Tex, using a bondo spreader to skin the pitting over and then sand, prime/paint. For unwanted holes I use JB Water Weld in the 2 part stick epoxy. Counter sink drill on the inside with a bit larger than the hole to make a bevel. Take a wad of the JB press it firmly into the hole giving pressure on both sides. Once cured sand the JB down flush. It's tough stuff and would have to be beaten out with a hammer.
 

Decker83

Commander
Joined
Apr 5, 2011
Messages
2,592
Floor looks good.. That's good advice watermann gave you on filling the holes..
 
Top