91 Mercury 115 Rebuild - Let's see how it goes!

justchecking

Petty Officer 2nd Class
Joined
Oct 1, 2010
Messages
152
I started with a good 84 Merc 115 and a Bass Boat with a rotten transom given to us by my wife's uncle. The Bass Boat wasn't really convenient so I searched for and found a good deal on a Sea Ray 160 Bow Rider with a 91 Merc 115 with a bad cylinder. The boat, motor, prop were in like new condition other than that so I bought them at a great price. My plan was to put the 84 on the Sea Ray, sell the Bass Boat, and see if the 91 was rebuild-able. The couple I bought the 91 from told me that they bought it in late 2009 used it several times and then had it winterized and stored at the marina. When they picked it up and took it to the lake in the spring of 2010 the motor would start and idle great but wouldn't go to full throttle. They took it back to the marina to be checked out. After a few months they got it back with the lower unit sitting IN the boat and were told the motor needed repair. They didn't have the money to repair it, so put it up for sale.

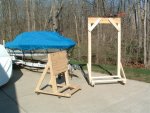
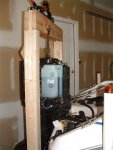
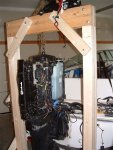
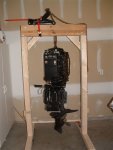
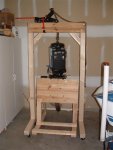
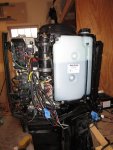
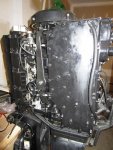
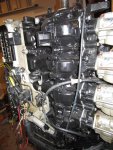
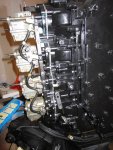
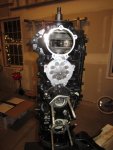
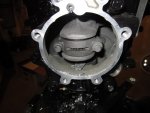
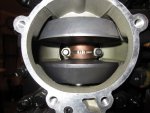
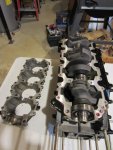
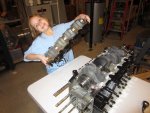
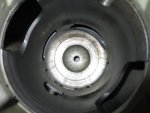
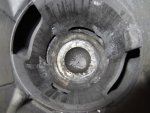
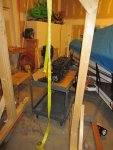
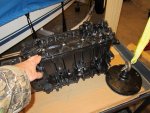
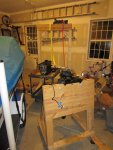
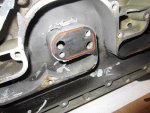
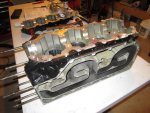
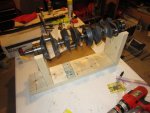
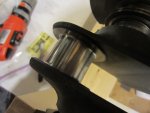
After I got the boat and motor home I tried to do a compression test but found the motor would only turn over about 270 degrees. So I pulled the 91 off and put the 84 on. I used the engine stand plans from iBoats (what a great site!) and also built an engine puller. I don't think I have $50 total in both. Attached are some pictures from when I pulled the motor last spring. Here it is January 2012 already so I'm going to start pulling the 91 apart and start the rebuild. Let's see how it goes. :)
 

Attachments

  • Photo1.jpg
    Photo1.jpg
    102.5 KB · Views: 1
  • Photo2.JPG
    Photo2.JPG
    95.4 KB · Views: 0
  • Photo3.JPG
    Photo3.JPG
    103.5 KB · Views: 0
  • Photo4.JPG
    Photo4.JPG
    136.1 KB · Views: 1
  • Photo5.JPG
    Photo5.JPG
    94.6 KB · Views: 1

justchecking

Petty Officer 2nd Class
Joined
Oct 1, 2010
Messages
152
Re: 91 Mercury 115 Rebuild - Let's see how it goes!

Here's some more pictures of the engine on the stand.
 

Attachments

  • Photo6.JPG
    Photo6.JPG
    98.3 KB · Views: 0
  • Photo7.JPG
    Photo7.JPG
    118.3 KB · Views: 0

jerryjerry05

Supreme Mariner
Joined
May 7, 2008
Messages
17,927
Re: 91 Mercury 115 Rebuild - Let's see how it goes!

Good job!! Nice looking stand and puller.
Rebuild's not that hard.J
 

justchecking

Petty Officer 2nd Class
Joined
Oct 1, 2010
Messages
152
Re: 91 Mercury 115 Rebuild - Let's see how it goes!

Thanks for the post J! I made the puller to fit outside the stand. I accidentally made it so it clears my garage door by 1/4" at the top so I can roll a motor in/out. Didn't plan to do it that way, but sure looks like I did.

I'll be curious when I pull the case apart. So far I have almost all the peripherals off. I found some interesting things. First, all the oil system components are new (Bottle, pump, warning module, wires, lines). From the stickers, all were made in 2009. The newest date was July 15, 2009. I also found that a couple of parts were assembled incorrectly. The shift plate had the tang washers on backwards. Also the fuel pump bolts were loose.

It's starting to look like the block was repainted also. The motor is very clean, but the block is cleanest of all. Absolutely no oil film or dirt on it, where as other components have a slight film.

Everything I took off I baggied and labeled. So far everything is coming off nicely.
 

Attachments

  • Photo11.JPG
    Photo11.JPG
    134.8 KB · Views: 1
  • Photo12.jpg
    Photo12.jpg
    86 KB · Views: 1
  • Photo13.jpg
    Photo13.jpg
    98.2 KB · Views: 1
  • Photo14.jpg
    Photo14.jpg
    89.2 KB · Views: 1
Last edited:

Chris1956

Supreme Mariner
Joined
Mar 25, 2004
Messages
27,158
Re: 91 Mercury 115 Rebuild - Let's see how it goes!

Does the motor still only turn 270*, when the gearcase is off? If so, that is not good. Maybe a broken rod? Hopefully the block is intact.
 

justchecking

Petty Officer 2nd Class
Joined
Oct 1, 2010
Messages
152
Re: 91 Mercury 115 Rebuild - Let's see how it goes!

Chris1956, I haven't pulled the gear case off yet. I put the lower on when I was going to do a compression test. Next time I'll know to check a few things out first.:redface:

I did get all the peripherals off. Attached are pictures as I took off the reed valves and then a picture of #2 rod end for comparison with #4 rod end. OH OH!:eek:

Looks like #4 is the problem as 1,2,3 look nice and clean.

Chris1956, I did rock the crankshaft a little bit and I do see #4 piston moving a little. kind of hard to see, but it doesn't look like the rod is broken. I can't quite see though if the piston pin is loose.

I did find that the block has been repainted with paint over some sticker residue on the side covers. The second coat of paint is kind of soft. So would that mean it WAS rebuilt recently? There are also some wisps of silver plastic on a few bolts etc as if it had been shrink wrapped and then the plastic pulled off. If so, it would have been great if the rebuilder would have marked the date and if any pistons were oversized etc on the block. Does anybody know who shrink wraps rebuilt heads in thin silver plastic?

I also found that someone scratched the carb number on the back of each carb, and then put a scratch on each carb and fuel bowl (1 ea on carb one, then 2 ea on carb two, etc.).

Next step is to pull the powerhead off and get it on a table.
 

Attachments

  • Copy of IMG_0572.JPG
    Copy of IMG_0572.JPG
    122.8 KB · Views: 1
  • Copy of IMG_0574.JPG
    Copy of IMG_0574.JPG
    111.1 KB · Views: 1
  • Copy of IMG_0576.JPG
    Copy of IMG_0576.JPG
    132 KB · Views: 1

Faztbullet

Supreme Mariner
Joined
Mar 2, 2008
Messages
15,620
Re: 91 Mercury 115 Rebuild - Let's see how it goes!

Yep ...found yer problem. Before you start looking for a crank,rod, piston, get the bore inspected to see if it will need to be sleeved.
 

justchecking

Petty Officer 2nd Class
Joined
Oct 1, 2010
Messages
152
Re: 91 Mercury 115 Rebuild - Let's see how it goes!

Manhandled the powerhead downstairs onto a table where I could pull it apart. Lots of anticipation pulling the crank cover off and then pulling the crankshaft and pistons out. Had a little helper.
 

Attachments

  • Copy of IMG_0602.JPG
    Copy of IMG_0602.JPG
    137 KB · Views: 1
  • Copy of IMG_0603.JPG
    Copy of IMG_0603.JPG
    123.6 KB · Views: 1
  • Copy of IMG_0609.JPG
    Copy of IMG_0609.JPG
    140.5 KB · Views: 1

justchecking

Petty Officer 2nd Class
Joined
Oct 1, 2010
Messages
152
Re: 91 Mercury 115 Rebuild - Let's see how it goes!

Three of the cylinders look like the clean one in the picture. #4 looks a little rough.

Question: Can I reuse this piston?:rolleyes:
 

Attachments

  • Copy of IMG_0624.JPG
    Copy of IMG_0624.JPG
    104 KB · Views: 1
  • Copy of IMG_0630.JPG
    Copy of IMG_0630.JPG
    120.7 KB · Views: 1
  • Copy of IMG_0611.JPG
    Copy of IMG_0611.JPG
    115.1 KB · Views: 1

justchecking

Petty Officer 2nd Class
Joined
Oct 1, 2010
Messages
152
Re: 91 Mercury 115 Rebuild - Let's see how it goes!

Found a local machine shop that says they can clean out, hone, and if required bore out that cylinder. Spent a while looking for them. With NCR, Wright-Patt, etc, Dayton Ohio used to be a machining mecca. Forgot to post a picture of me pulling the powerhead, here they are:
 

Attachments

  • Copy of IMG_0594.JPG
    Copy of IMG_0594.JPG
    122.4 KB · Views: 1
  • Copy of IMG_0595.jpg
    Copy of IMG_0595.jpg
    83.9 KB · Views: 1
  • Copy of IMG_0596.JPG
    Copy of IMG_0596.JPG
    132 KB · Views: 1

Faztbullet

Supreme Mariner
Joined
Mar 2, 2008
Messages
15,620
Re: 91 Mercury 115 Rebuild - Let's see how it goes!

A word of caution on boring, do not have block bored with a honing machine(Sunnen) like some auto shops have , only have it bored with a cutter equipped machine like a Kwik-way
 

justchecking

Petty Officer 2nd Class
Joined
Oct 1, 2010
Messages
152
Re: 91 Mercury 115 Rebuild - Let's see how it goes!

Thanks for that bit of advice. I printed it out and will take it with me to the shop tomorrow to confirm their machine. If it only needs honed is the Sunnen ok? I had some energy and two beers tonight so I cleaned up the head and loaded it in the trunk. I measured the pistons and they all seem to be standard bore. I carefully cleaned out the bad cylinder. Lots of the aluminum peeled off. The liner doesn't really look too bad now. We'll see. The crank looks good, no marks on bearing surfaces that I can see. The roller bearings closest to the bad cylinder a little darker than the rest.

I've been looking at parts on iBoats. Haven't bought anything yet, going to wait til the block is confirmed rebuildable.

While the block is at the shop I'm going to tear the carbs apart and see what's up.
 

Attachments

  • Copy of IMG_0644.jpg
    Copy of IMG_0644.jpg
    79.8 KB · Views: 1
  • Copy of IMG_0645.jpg
    Copy of IMG_0645.jpg
    82.4 KB · Views: 1
  • Copy of IMG_0647.jpg
    Copy of IMG_0647.jpg
    82 KB · Views: 1

Faztbullet

Supreme Mariner
Joined
Mar 2, 2008
Messages
15,620
Re: 91 Mercury 115 Rebuild - Let's see how it goes!

You need to have all the cylinder measured to see if they are in spec, if more than .003 out of spec they will need to bored to next oversize which is .020
 

jerryjerry05

Supreme Mariner
Joined
May 7, 2008
Messages
17,927
Re: 91 Mercury 115 Rebuild - Let's see how it goes!

Get the piston FIRST!!After you decide what size you need.
Then take it and the block to the machine shop.
Had trouble with a machine shop(when I was new to rebuilding)They bored it out to the specs in the manual,Then the oversized piston was too big.Had to re-bore.
 

justchecking

Petty Officer 2nd Class
Joined
Oct 1, 2010
Messages
152
Re: 91 Mercury 115 Rebuild - Let's see how it goes!

Faztbullet, I asked the machine shop and they confirmed they would use a cutting machine, not a honing machine, if the cylinder needed bored. I said Kwik-way and they said yes, but I didn't see it for myself. I copied the spec pages from the mercury manual and dropped them off with the power head. They are supposed to use that info to check for tolerances, etc as they hone/bore.

Jerryjerry05, I was hoping to see if the bore could be honed/bored and not resleeved before I bought any parts. It will be a week before they can get to it and then they are supposed to call me when they determine whether it needs bored or not. If it does and they can confirm it will be good, maybe I'll buy the piston and have them hold off til I can get it to them.

The main lower bearing (the ball bearing) doesn't roll smoothly. I think I can feel the balls moving in there. Is that normal? Doesn't seem to be. If I need to replace it, how hard is it to press off and the new one on?

Lastly, I pulled #4 carb apart to see what was up. I think you can see there was some black, soft crud in there. What was that from? I could see a little light through the main jet, so that was letting in some fuel. BUT, you can probably see the dip tube is plugged. I couldn't see any light getting through there. So that must have been why the cylinder burned out. I also noted that the float was not 7/16, but more like 17/32 when measured per the manual.
 

Attachments

  • Copy of IMG_0616.JPG
    Copy of IMG_0616.JPG
    104.2 KB · Views: 1
  • Copy of IMG_0617.JPG
    Copy of IMG_0617.JPG
    66 KB · Views: 1
  • Copy of IMG_0620.JPG
    Copy of IMG_0620.JPG
    99.3 KB · Views: 1

justchecking

Petty Officer 2nd Class
Joined
Oct 1, 2010
Messages
152
Re: 91 Mercury 115 Rebuild - Let's see how it goes!

I cleaned the other three carbs tonight. All of them had that black gunk in them blocking the dip tubes, but #4 was the worst. I also found that someone made a boo-boo on carb #4. ;)You can see it in the pictures I posted in post #15. It has two part #21 gaskets in it.

I'm itching to buy some parts. I found most of the ones I'll need here on iBoats. But, I'm still waiting for the machine shop to confirm the block is usable without re-sleeving.

I'm also still wondering if I should replace the main lower ball bearing 30-43011T. I checked it very carefully and couldn't see any defects. I think I can feel the balls rolling in there. Is that normal?

Lastly I removed and cleaned the crank roller bearings closest to the bad cylinder. The oil on the end closest to the rod was dark. They cleaned up nicely and I could not see any pits, scratches, or particles on them. The bearing surfaces look good, too. Not sure why I would replace them.

Next I'm going to pull the remaining bearings off the crank and clean them up...
 

jerryjerry05

Supreme Mariner
Joined
May 7, 2008
Messages
17,927
Re: 91 Mercury 115 Rebuild - Let's see how it goes!

The black stuff is probably a result of ETHANOL!!!That could be the reason for the FAIL!!!
Ethanol is delaminating older hoses and melting the inner liner of the hose.
Replace with hose that was made in the last year.Install a filter between the pump and the carbs(Wallyworld G2 or G12)
It's not that hard to remove the bearing if you have a hydrolic press. Is it noisy,any movement?
If your really worried then change it.
The others if they are not pitted you might use them again.
 

justchecking

Petty Officer 2nd Class
Joined
Oct 1, 2010
Messages
152
Re: 91 Mercury 115 Rebuild - Let's see how it goes!

I suspect you are right. I checked the fuel filter after the pump and didn't find anything in it. The gunk must have come after the fuel filter. I'm going to replace all those hoses with new when the time comes.
 

justchecking

Petty Officer 2nd Class
Joined
Oct 1, 2010
Messages
152
Re: 91 Mercury 115 Rebuild - Let's see how it goes!

No word from the machine shop yet. I'm going to stop by tomorrow and check on progress. In the mean time I checked the crankshaft bearing surface of the affected cylinder. There was some aluminum bits sticking/welded to it. I picked some off with a razor blade but couldn't get the rest off. I read that lye (oven cleaner) will dissolve aluminum so I sprayed oven cleaner on there and wiped it off after 45 minutes. WOW the aluminum was gone and the bearing surface is mirror bright! There must have been more aluminum on there than I thought. I forgot to take a before picture, but here is an after picture and also my crank holder.

I've been looking at parts. By the time I buy a single piston, 4 ring sets, gasket kit, sealers, rod bearing with cage, 4 sets rod bolts, etc. I'm getting closer to the cost of a complete rebuild kit!
 

Attachments

  • Crank.JPG
    Crank.JPG
    129.7 KB · Views: 1
  • Crank Bearing.JPG
    Crank Bearing.JPG
    87.3 KB · Views: 1

Faztbullet

Supreme Mariner
Joined
Mar 2, 2008
Messages
15,620
Re: 91 Mercury 115 Rebuild - Let's see how it goes!

Pm me for pricing as I have supplied quite a few people on the board parts...
 
Top