Re: Glasspar Project
Judging by the pics, this is what I would do... As for the big crack in your cap by the steering wheel I would grind out the wound and be sure to taper each side of the wound back a bit -- about an inch. Preserve as much original material on the under side of the crack as you can and taper/feather out about 5/8"-3/4" out toward the top (some say 3"). The idea is to give your filler something to bind to. It is the opposite what you would do to stitch a wound on the human body. You're going to make it worse before you start fixing it (like plastic surgery, literally, I guess). Second, do what you need to in order to get each side of the wound to line up...investigate any structural issues, etc. I say this because it appears each side of the crack have no interest in lining up; I would want to know why. I also wouldn't want to repair this in a state of tension (i.e. remove tension, repair, and return to tension). You're going to have a corner to fair, but you need some structural support there first -- at the least cloth and at the most foredeck support in the form of wood, etc (whatever was there but is now possibly rotten). My glasspar had wooden supports on the foredeck as poorly installed as the stringers. Once I had each side of the crack lined up to where they would be (using your imagination being that there is now a giant gaping wound) I would 1) cover the underside of the wound with something to hold my filler in place (tape, etc, the smoother the better, see step 3), 2) fill it shallow with "structural" peanut butter (epoxy, cabosil or West System 406 which I would provide a link to on the iboats.com store if it didn't force me to share my session id), 3) grind the underside of the wound to fresh polyester and layup some cloth on the underside 3 inches past the wound with epoxy, 4) fill "proud" with epoxy/fairing compound from the top and 5) reproduce that corner with sander/hand fairing. Fairing that corner there will be a trial and error if this is your first time messing with fairing...if you go too deep, just remember you can always fill in where you screwed up and fair that part again.
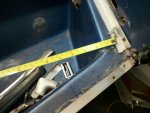
For what I believe is your splash well (what you called reservoir) that looks like a much easier repair because at least the opposing sides of the crack are lining up. First, get the splash well out, obviously; you'll need to in order to replace the transom. Repair process is the same as above. The West System website has some good tips on repairs like these but I recommend getting your epoxy and cloth from uscomposites.com.
I could be wrong...but on this forum or boatdesign.net I have yet to see any Glasspar from the 50s/60s that didn't need a new transom/sole/stringers. The transom/sole/stringers are not encapsulated in resin and what you'll likely find under there is a few very useless pieces of wood floating in some short lengths of chopped strand mat that are barely laminated to the hull. All of that will need to be cut/ground out and replaced. Tab your new stringers with 12 oz biaxial +/-45 6" tape. I learned this from PAR on boatdesign.net. I bought my 12oz tape from Raka. USComposites doesn't sell it without the CSM. Iboats.com might sell it but I have a heck of a time finding stuff on this site, sadly.
On the transom, this has been covered many times as well...glasspars, too. Just remember to preserve the outer skin and cut the rotten wood out from the inside. The more rotten the wood the better...it's easier to get out.
Finally, how on earth did that cap get cracked/ripped like that? It looks like it's been hanging from that deck cleat since the Nixon era.


") No worries. The folks here can talk you through any troubles you may run in to.
No worries. The folks here can talk you through any troubles you may run in to.