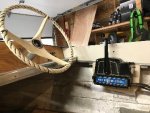
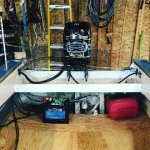
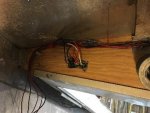
1964 Starcraft Jet - First Boat Restoration Project

WinnipegJet91

Seaman
Joined
May 17, 2016
Messages
65
No Title

[FONT=&quot]Transom cap was the next to be mounted and I couldn't find the ribbed finishing nails to hold it in place so I was able to find ribbed drywall galvanized nails which will work great to grab the transom wood:[/FONT]
 

Attachments

  • photo277014.jpg
    photo277014.jpg
    23.4 KB · Views: 2

WinnipegJet91

Seaman
Joined
May 17, 2016
Messages
65
No Title

With this boat being a 1964 StarCraft Jet which isn't a popular model of the lineup, it was difficult to find any decals or plastic logos for this boat. My original starcraft lettering on the stern of the hullsides were cracked but I was fortunate enough to have enough of the letters to make one complete one. With this I went to my dads work and scanned it into the computer, manipulated it for the sizing and created a Font Style that was as close to original as possible. Sent it over to the 3D printer and below is the outcome. The printer can only print so big so we had to create two pieces with a joint in the middle but the sizing and look is perfect!
 

Attachments

  • photo277017.jpg
    photo277017.jpg
    37.3 KB · Views: 3
  • photo277018.jpg
    photo277018.jpg
    50.5 KB · Views: 3
  • photo277703.JPG
    photo277703.JPG
    180.2 KB · Views: 3
Last edited:

WinnipegJet91

Seaman
Joined
May 17, 2016
Messages
65
No Title

[FONT=&quot]I have been struggling ever since I bought this boat with the motor that came with it. I went through a couple different starters and still wont turn over completely. So a buddy of mine told me about a friend of his, his grandpa went to a home and they were cleaning out his garage and he had a 1970's Mercury 50HP which is the same era as my 1969 red band mercury 50hp. Called him up and next thing I know I'm taking home a beautiful 1973 Mercury 500 std shaft outboard with the original maintenance manuals, owners manual(s), gas tans, fuel lines, controls and multiple keys. They catch is when I grabbed it he said that unfortunately this motor hasn't ran in 22 years so I will give you this in hopes you can use it as a donor motor or whatever. grabbed a brand new battery, new fuel in the tanks, pumped her up good, opened the choke and this ole girl purred on the first turn of the key! What an awesome find![/FONT]

https://youtu.be/TivVT3UjMLo (This is when I got it going for the first time)
 

Attachments

  • photo277019.jpg
    photo277019.jpg
    20.8 KB · Views: 4
  • photo277020.jpg
    photo277020.jpg
    41.9 KB · Views: 3
  • photo277021.jpg
    photo277021.jpg
    46.6 KB · Views: 3
  • photo277022.jpg
    photo277022.jpg
    38.2 KB · Views: 4
  • photo277035.jpg
    photo277035.jpg
    190.4 KB · Views: 4
Last edited:

WinnipegJet91

Seaman
Joined
May 17, 2016
Messages
65
No Title

[FONT=&quot]This got me so excited that I had to mount it right away: P.S. If I can figure out how to post a video I will of the motor running. [/FONT]

https://youtu.be/tk3wOOOVlBc (Mounted on the boat and got her going again)
 

Attachments

  • photo277023.jpg
    photo277023.jpg
    49.7 KB · Views: 5
  • photo277024.jpg
    photo277024.jpg
    33.4 KB · Views: 5
Last edited:

WinnipegJet91

Seaman
Joined
May 17, 2016
Messages
65
No Title

[FONT=&quot]Now it takes me to the bench seats that are for this boat. When I got this boat the PO had made an entire false floor out of PT lumber that made it to sit so high out of the boat on pedestal seats. Now that it's stripped I found the original bench seat mounts but I cant seem to find what the original bench seats looked like. so I was able to grab the below bench seats from an older glastron fiberglass boat but I need max 52" wide and these are 54.75". my dilemma is that these seats would look perfect in this boat but they don't fit. Should I be cutting them to size, or try and find new ones? your thoughts on how to make them skinner would be great![/FONT]
 

Attachments

  • photo277025.jpg
    photo277025.jpg
    28.3 KB · Views: 2
  • photo277026.jpg
    photo277026.jpg
    26.8 KB · Views: 2
  • photo277027.jpg
    photo277027.jpg
    29.2 KB · Views: 2

WinnipegJet91

Seaman
Joined
May 17, 2016
Messages
65
No Title

[FONT=&quot]Next up was the wiring, now let me tell you I am no electrician but I can wire 12V DC all day long. On my dash I have the 3-position light switch for the navigational lights, a bilge pump switch (manual, off, auto), and room for 3 more circuits which I will be adding a 12V lighter plug to charge phones out on the water. A picture of how the dash looks will follow but here are some pictures of the wiring behind the scenes:

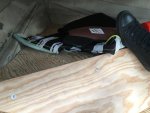
First Picture: Bilge Pump Switch[/FONT]
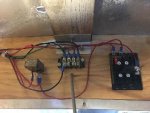
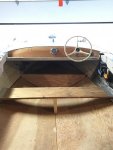
[FONT=&quot]Second Picture: Light Switch - Distribution Block - Fuse Block with the speedometer hose in the middle[/FONT]
 

Attachments

  • photo277028.jpg
    photo277028.jpg
    25 KB · Views: 4
  • photo277029.jpg
    photo277029.jpg
    26.4 KB · Views: 4

WinnipegJet91

Seaman
Joined
May 17, 2016
Messages
65
[FONT=&quot]Next step is to finish the seats, mount them in the boat and get this bluezy boozy in the water before winter! Next year I will be sourcing a windshield for this thing but I need to get this in the water.

I am sorry for why some of these pictures uploaded sideways, if I can figure out how to rotate them even though they were rotated on my computer I will get on that.

Any tips or feedback on the progress would be a huge appreciation. [/FONT]
 

WinnipegJet91

Seaman
Joined
May 17, 2016
Messages
65
No Title

I thought I would upload a larger picture of the motor mounted with the steering cables (now that was a learning curve all in it's own) for everyone to see.
 

Attachments

  • photo277032.JPG
    photo277032.JPG
    250.5 KB · Views: 5

WinnipegJet91

Seaman
Joined
May 17, 2016
Messages
65
Wow. I wish I had the time and patience to tackle a project like this. Good work!

Thanks r1elkins, surprisingly it just takes one week to say lets get this done and then it starts to progress. Once I painted the hull it looked like a completely new boat and that's what fueled the fire again. then once I got the motor and it ran it was like now we will get this done and the push that I have a baby en-route any day now helps the drive to get it out of my garage and stored at the lake.
 

WinnipegJet91

Seaman
Joined
May 17, 2016
Messages
65
No Title

En-route to getting this boat in the water I was able to get the boat numbers for it, but there's a nagging feelin that I should name the boat.. which I'm not sure it would suit the boat.

thoughts?
 

Attachments

  • photo277259.jpg
    photo277259.jpg
    118.6 KB · Views: 1

Watermann

Starmada Splash of the Year 2014
Joined
Jan 12, 2013
Messages
13,753
I've not named any of my boats, so what was the name you're thinking of for the jet?

Oh and don't forget our splash pics either! :D
 

WinnipegJet91

Seaman
Joined
May 17, 2016
Messages
65
I've not named any of my boats, so what was the name you're thinking of for the jet?

Oh and don't forget our splash pics either! :D

A few people have come up with some good ones but I'm in the same boat as you are (no pun intended) and don't feel like it needs one. Don't worry there will be many pictures taken (hopefully this weekend if the rain holds off) for me to get this ole' girl in the water. I might be sitting on a lawn chair but it'll have to do.
 

Coach Dave

Petty Officer 2nd Class
Joined
Apr 3, 2014
Messages
117
Nice work! I have a 1963 Jet rebuild over in the general restoration forum with all the non-Starcraft peons :laugh: I too am trying to splash before winter, but here in NE Ohio we can and do have 7-80 degree days into November.

Maybe I should move it over here after all. JBCurt00 can you move me? I may get more responses.

I gotta question on your new capacity plate: my capacity plate is illegible. I'd like to order a new one also. What are the specs on yours? Of course the way I'm building mine the original specs will probably be just for show.
 

Tnstratofam

Commander
Joined
Aug 18, 2013
Messages
2,679
Really nice progress. Those Starcraft emblems turned out nice too. Looking forward to seing her finished. Are you going to try and find a curved one piece windshield or put a modern walk through style on her? I have a 64 Jupiter with a cracked windshield and I think I'm going to put a walk through on her when I dig into her restoration this winter.
 

WinnipegJet91

Seaman
Joined
May 17, 2016
Messages
65
No Title

So another weekend has come and gone and here we go with the updates that occurred:

On Saturday I attempted my luck on altering the existing controls plate that is mounted to the boat to one that has some more dimension and appeal when looking at it. So I removed the control until from the plate, removed the rusted pins and staples. luckily my wife has a steamer for her clothes which helped me steam the vinyl to a more workable material. Traced the new template that I wanted on some cardboard and also traced the controller so I knew what position I wanted. All said and done I'd say it looks great and I'm very happy with the turn out.
 

Attachments

  • photo277704.JPG
    photo277704.JPG
    170.7 KB · Views: 3
  • photo277705.JPG
    photo277705.JPG
    14.9 KB · Views: 3
  • photo277706.JPG
    photo277706.JPG
    24.4 KB · Views: 3
  • photo277707.JPG
    photo277707.JPG
    31.3 KB · Views: 3
  • photo277708.JPG
    photo277708.JPG
    25.6 KB · Views: 3
  • photo277709.JPG
    photo277709.JPG
    21 KB · Views: 3
  • photo277710.JPG
    photo277710.JPG
    21.2 KB · Views: 3
  • photo277711.JPG
    photo277711.JPG
    19.1 KB · Views: 3
  • photo277713.JPG
    photo277713.JPG
    45.2 KB · Views: 3
  • photo277714.JPG
    photo277714.JPG
    33.9 KB · Views: 3

WinnipegJet91

Seaman
Joined
May 17, 2016
Messages
65
No Title

Next up was to finish the bow flooring and foot well. This was tricky but luckily the existing floor I took out stayed in a relative good condition to use as a template. Should've taken more pictures but you can get the point and since I was cutting plywood I thought why not make the bench (temporary) for where the front seats are going to be mounted.
 

Attachments

  • photo277715.JPG
    photo277715.JPG
    321.1 KB · Views: 6
  • photo277716.JPG
    photo277716.JPG
    131 KB · Views: 6
Top