1973 starcraft ss restore in progress

Watermann

Starmada Splash of the Year 2014
Joined
Jan 12, 2013
Messages
13,753
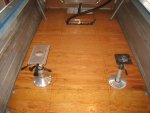
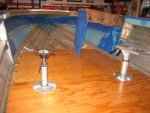
I guess I have to ask why the deck isn't sitting down on top of the ribs? If there's foam holding it up then it's going to need to be shaved down. Screws will hold by a couple teeth is all, very weak compared to the rivets and they won't suck it down without stripping out. You don't want to have it up either with a gap between the deck and rib because as it settles and it will over time, it will loosen anything you use either screws or rivets.
 

crankbait cowboy

Chief Petty Officer
Joined
Mar 25, 2013
Messages
570
yep h20, gotta shave some foam for sure, but when I mocked it up without foam, it looked like on a rib on each side I may have cut my 1/2 circles ( for ribs ) a bit to big making it a bit short on those ribs port to starboard. I will start by shaving some foam then mock it and see what I got, its really one rib on each side, so I think my 1/2 circles are the problem. and I am thinking I need some more aluminum bracing under the deck also. ( as I have come this far , might as well go the distance )
I am thinking 1 between the stringers in between seats area, and 1 on each side in front of consoles from stringers to ribs.
 

crankbait cowboy

Chief Petty Officer
Joined
Mar 25, 2013
Messages
570
No Title

well I got it figured out , and another section of deck done. shaved some foam as h2o suggested, and found that one of my stringers was wiggly and when pulled in to much it raised the deck, so I got the position of stringers correct and braced them with aluminum angle out to the ribs on 2 ribs each side. made things much sturdier and the deck lined up nicely on outer ribs, and very solid with that tight pink underneath. I am very happy with how solid it seems and how it turned out.
do to time issues ( a couple hours each evening ) and the use of a hand riveter, I have tackled this deck 1 section at a time, and my progress is much slower than most, but one section at a time has worked well for me, one more section of pink and deck to go, and I can put this phase behind me!
 

Attachments

  • photo262151.JPG
    photo262151.JPG
    99.5 KB · Views: 2
  • photo262152.JPG
    photo262152.JPG
    119.1 KB · Views: 11

MNhunter1

Ensign
Joined
May 12, 2014
Messages
982
well I got it figured out , and another section of deck done. shaved some foam as h2o suggested, and found that one of my stringers was wiggly and when pulled in to much it raised the deck, so I got the position of stringers correct and braced them with aluminum angle out to the ribs on 2 ribs each side. made things much sturdier and the deck lined up nicely on outer ribs, and very solid with that tight pink underneath. I am very happy with how solid it seems and how it turned out.
do to time issues ( a couple hours each evening ) and the use of a hand riveter, I have tackled this deck 1 section at a time, and my progress is much slower than most, but one section at a time has worked well for me, one more section of pink and deck to go, and I can put this phase behind me!


Lookin' good! I completely relate to the time management piece of things. With a full time job, grad school, and two young kids at home...my boat time consists of late nights in the garage while everyone else is asleep. I try to do at least one thing a night, but some nights all I want to do is catch up on some TV and head to bed. It does seem to really start to progress once that deck is in however...and things start looking like a boat again:)
 

No-AH

Petty Officer 1st Class
Joined
Oct 20, 2016
Messages
234
However itsy bitsy amount of progress gets accomplished, the warmer weather IS just around the corner and starmada is here motivating us along.....keep it up CC the decking will be in your rear view mirror so soon.......;)
 

Watermann

Starmada Splash of the Year 2014
Joined
Jan 12, 2013
Messages
13,753
Yeah CC that decking really looks well done to my eye :thumb:

fetch
 

pckeen

Commander
Joined
Jun 20, 2012
Messages
2,067
Lookin' good! I completely relate to the time management piece of things. With a full time job, grad school, and two young kids at home...my boat time consists of late nights in the garage while everyone else is asleep. I try to do at least one thing a night, but some nights all I want to do is catch up on some TV and head to bed. It does seem to really start to progress once that deck is in however...and things start looking like a boat again:)

I know the feeling. Issues like that are why it took me way to long to get my Naden done. You are doing great, just keep plugging away.
 

crankbait cowboy

Chief Petty Officer
Joined
Mar 25, 2013
Messages
570
No Title

this weekend, I got the last of the deck done, nice to have that behind me. plan is to hold off on vinyl for awhile as I need to paint splashwell and rails, so thinking get my painting done before vinyl of deck. looking for some inputs on filling my countersink holes. the way I have gone about this I need one more coat of clarkcraft epoxy over the deck ( I held back on last coat thinking it would help seal seams after install ). wondering if this would be sufficient for filling countersinks or should I use like marine tex then the last coat of epoxy? thanks
 

Attachments

  • photo262413.JPG
    photo262413.JPG
    95.6 KB · Views: 1
  • photo262414.JPG
    photo262414.JPG
    108.2 KB · Views: 1
  • photo262415.JPG
    photo262415.JPG
    102 KB · Views: 10

ezmobee

Supreme Mariner
Joined
Mar 26, 2007
Messages
23,767
I did exactly as you are proposing. Hit the screws with more CC epoxy. I bought some fiberglass cloth at Home Depot and put it over my seams with more epoxy. Worked awesome. You can't find any screws or seams under my vinyl.
 

Watermann

Starmada Splash of the Year 2014
Joined
Jan 12, 2013
Messages
13,753
Deck looks great!

fetch


I filled my countersunk rivet holes with marine tex, it doesn't need sealed with anything, it's waterproof. If the epoxy will fill the void and not shrink down then I guess you could use it to level the countersunk rivets.
 

crankbait cowboy

Chief Petty Officer
Joined
Mar 25, 2013
Messages
570
I'm hearing ya guys, my thought was plenty of epoxy over countersunk rivets and seams , hopefully a bit much then sand down dimples or whatever to smooth out in case of shrinkage, if that don't get I thought I could go with the marine Tex as plann b
 

crankbait cowboy

Chief Petty Officer
Joined
Mar 25, 2013
Messages
570
No Title

well, if you had been following along, you know by now that I have stalled out a bit on my project. I am in agriculture and april/may/june been busy at work. have also had some family issues to deal with ( some good, some bad) and needless to say, the project has been on back burner. the good news is I plan to get after it after the 4th of july ( gotta try slay some walleye over holiday) I have taken some time and been searching for power for the 18 ft ss, and landed on this 1990 110hp Johnson vro. am hoping I can get some feedback from you all as far as a good engine or not? and if you feel it would be a good fit for my project. thanks in advance to all.
 

Attachments

  • photo268304.jpg
    photo268304.jpg
    18.5 KB · Views: 2

Watermann

Starmada Splash of the Year 2014
Joined
Jan 12, 2013
Messages
13,753
I don't have a V4 Johnnyrude and I'm not sure of the years where the VRO was faulty and cooking power heads. Many of the VRO systems during that period were disconnected to avoid the potential issue.
 

BWR1953

Vice Admiral
Joined
Jan 23, 2009
Messages
5,875
Looking good CCB!


Deck looks great!

fetch


I filled my countersunk rivet holes with marine tex, it doesn't need sealed with anything, it's waterproof. If the epoxy will fill the void and not shrink down then I guess you could use it to level the countersunk rivets.

Waterman, did you countersink or counterbore your rivets?
 

Watermann

Starmada Splash of the Year 2014
Joined
Jan 12, 2013
Messages
13,753
Yes on the base deck, no on the raised since I wrapped the pieces in vinyl prior to installing them..
 

crankbait cowboy

Chief Petty Officer
Joined
Mar 25, 2013
Messages
570
yeah, seems most unhook the vro and go with mixed gas from my research, wondering if that motor would be plenty of power, and not aware of other issues with them. you guys?
 

Candutch

Chief Petty Officer
Joined
May 8, 2015
Messages
637
Glad to see your getting back at it CC. I have a 93 Evinrudeb120 VRO but I can't help you out as I don't know anything about them. I don't even know if it runs yet, will find out soon enough I guess.
I'll be watching for the replies as I'm curious about the reliability as well. No plans on removing VRO yet but I'll see what the mob thinks.
 
Top