Winter refit - transom

erikgreen

Captain
Joined
Jan 8, 2007
Messages
3,105
Re: Winter refit - transom

Okay... no pics yet, but picture the interior of a boat's transom, with an I/O drive hole, with about half the wet wood pulled out.

The largest piece so far is about 6x6 inches.. the ends are less rotten now that I'm getting to them, so they're harder to get out. I'm glad the outer skin is so tough, otherwise I would have punched through with the pry bar a couple times.

I got a set of pry bars from harbor freight for $8 and they've helped a lot... having two bars lets you "walk" a crack larger to peel up wood.

I stopped at a local glass place that redfury pointed out to me yesterday at lunch time. I got a vacuum fitting, a little gelcoat, and some flow media.

If I can put together a vacuum reservoir/overflow canister tonight I'm basically ready to laminate in a vacuum bag, although I still need a vacuum switch. I'm thinking I'll laminate the transom with glue by hand, then when it's cured I'll laminate 3 or so layers of 8 oz cloth (I have a lot of it) over the forward side under vacuum. Then I just need to tab it in place when I install it in the boat.

If that works I'm thinking I'll do the same with the other structural parts I put in this winter... cut to shape, fit, then vacuum laminate, then put 'em into place and tab. Might be a lot easier than working on vertical surfaces in the boat.

Erik
 

erikgreen

Captain
Joined
Jan 8, 2007
Messages
3,105
Re: Winter refit - transom

I spent a little time yesterday pulling more wood out. I found out I need some more cutting discs for my grinder, or possibly a new small circular saw.

It's too bad my mini circ saw from Clarke failed... that Crocodile thing would have done very well for this. Too bad the company went out of business, too.

If I can get a saw or discs, then tonight I think I can get the rest of the transom out. I also decided I need to remove the first bulkhead at the back of the fuel well. This is a super heavy bulkhead that's really solid, but I need to add a few small "ribs" to do the conversion work I'm planning, and so I need to replace that wood. I'm sure I can make it even stronger and much lighter, though.

I ordered a vacuum controller and gauge yesterday, hopefully I should have them before the weekend. I'm going to put together a vacuum reservoir/overflow tank from PVC, then I should be set to go for vacuum bagging. Should be fun.

I seem to have washed my work shirt in the same load as some of my fiberglass covered pants... I'm sitting at work typing and itching like crazy. Gah, dumb mistake.

Erik
 

sprintst

Commander
Joined
Apr 18, 2009
Messages
2,066
Re: Winter refit - transom

You're really going for it... Nice to see progress in the off season.
 

BobsGlasstream

Commander
Joined
Sep 11, 2009
Messages
2,128
Re: Winter refit - transom

erikgreen,
You really are moving fast on this one.
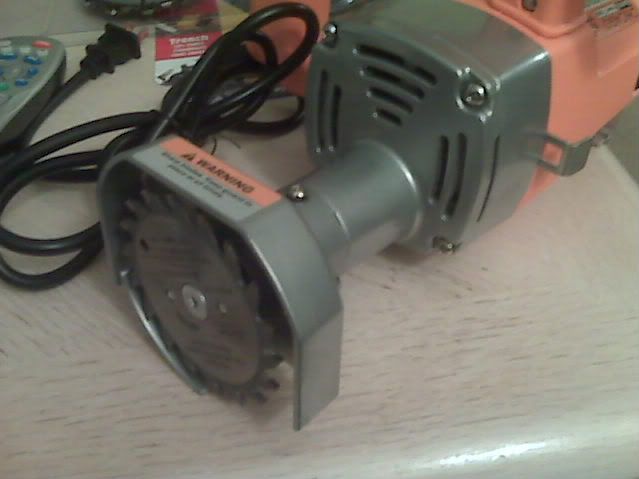
Like you I like to get tools at HF myself. I bought the Lancelot there along with a flush cut saw that is turning into my favorite tool. I used it to cut out my deck, stringer and transom.
You may like it too.
Here is a pic of the tool.
IMG00123.jpg

Great Job.
Great info too.
Thanks
Bob
 

erikgreen

Captain
Joined
Jan 8, 2007
Messages
3,105
Re: Winter refit - transom

Yeah, I've been thinking a lot about one of those... they're usually called "toe kick" saws, made for removing floors near walls and under cabinets. They're supposed to be kind of dangerous, but so is using a grinder with a chainsaw blade.

I'll probably see how I do tonight with the saw blade on the grinder... I found a tool shop that sells the "bad blade c5" for grinders that cuts wood. Should let me finish just fine I hope. The inner side of the outer hull glass is in nice shape, clean looking and ready for epoxy, no problems there.

Basically the last little bits of the transom left are the edges where it's glassed to the side hull and the starboard upper corner. If I can get those out tonight then I'll be sanding with flap discs and hopefully laminating a new transom this weekend. Dunno if I'll get to gluing and glassing it in.

Plus I should have my new vacuum bagging gear by then, so I'll give that a try.

Erik
 

BobsGlasstream

Commander
Joined
Sep 11, 2009
Messages
2,128
Re: Winter refit - transom

erikgreen,
Your correct about it being called a Toe Kick Saw.
Good luck with the vacuum bag to. I plan to use the same method myself, but I plan on using my vac press. It's large enough for my transom.
Still moving along, looking forward to seeing more.
Bob
 

erikgreen

Captain
Joined
Jan 8, 2007
Messages
3,105
Re: Winter refit - transom

Nice... I ordered a vacuum controller that's meant for vac press use, should work well for me.

I spent some time last night with the metal cutting abrasive discs in my grinder... they work well to go through the thick glass. Now I'm just cutting to help me pull out the old wood and trying to avoid making any holes in the outer hull while I work.

I'm down to about 15 percent of the transom left, the most intact wood (and therefore the hardest to get out). Once I pick that out I'll be doing a general clean-up and bagging transom bits and trash, then maybe pulling out the bulkhead I've been thinking about tonight.

If I get through all that, then I'll be using the 3m sandblaster discs, my new grinder, and my dust muzzle with vac hose attached to start smoothing everything over and cleaning.

More soon,
Erik
 

erikgreen

Captain
Joined
Jan 8, 2007
Messages
3,105
Re: Winter refit - transom

Another quick yet boring (no pics) update.


I got the rest of the transom wood out (and two big pads that were for the transom eyes, and separate from the actual transom) using a metal cutting disc in my grinder. I then picked up most of the debris from the work, and I'm about ready to start grinding.

After I got that done I spent most of the weekend getting my vacuum bagging setup put together... it's almost there, I'll start another thread about that soon.

For grinding I have some 3m sandblaster flap discs in 36 grit (you have to be careful not to overdo it with these) plus a specially equipped grinder.. I got a couple "dust muzzles" on sale at harbor freight a while back.

These are thin plastic circles that fit around the grinding wheel or disc on your grinder, and have air holes and an outlet to a vacuum hose. The idea is that the vacuum sucks up all the dust as you grind. There are a couple problems with this.. you can't grind metal like this as you would melt the hose, and you have to have a vacuum hooked up to the grinder, so you're hauling around a vacuum hose in addition to the power cord. I think I've got a decent way to do that worked out, so hopefully this thing will cut the dust down a lot.

But if it doesn't, I still should be ok. I had really good luck at the local surplus place over the weekend.. I went there for a relay for my vacuum bagging system, and found they had disposable lab coats in XXXL size for $3, that should be nice for painting/epoxy.

Plus, they had head to toe coveralls from a local computer hard disk factory surplused. They are the kind that you wash and re-use, and they came clean and vacuum packed. They're nylon with metal fasteners, and they have hoods. I don't think resin will stick to them, they're dust proof, and they're comfortable. I think they probably originally cost $500 or so each.

I also got some more of the gloves I like... they had anti-C (contamination) gloves for $8 a pack of 11 pairs. They're super heavy pink rubber with radiation symbols on 'em.. I've found they can be used 5-6 times for resin and glass work then left to cure, they just get a little stiffer.

So I'm all set protection-wise for grinding the transom out. Unfortunately I'm short on cash for a week so I may need to wait a few days to get the wood for the new transom, but I dunno if I'll finish grinding that quickly anyway, and I have the vacuum stuff to play with too.

Erik
 

BobsGlasstream

Commander
Joined
Sep 11, 2009
Messages
2,128
Re: Winter refit - transom

Hey erikgreen,
I was curious about what type of vac control switch You use. I got mine from Air Logic and it's adjustable and it will get to set vac it shuts off and when it drops 4" it will come back on. It really works great.
I had a problem with my press this weekend and had to revert back to clamps. :eek:
I will work on it next week when I get back home. :confused:

The dust collection sounds pretty good. I would love to get rid of that dust.
I have a pretty big dust collector that I have thought about using, but I'm not sure yet. :confused:
Have fun with the restore.
Bob
 

erikgreen

Captain
Joined
Jan 8, 2007
Messages
3,105
Re: Winter refit - transom

Hey Bob, saw your reply in the other thread.


Not much new to report on this project - I spent all last night getting a new tank set up for vacuum bagging. That's almost working now though, so I should get back to the boat soon and get grinding.

It's bugging me that I don't have the energy for both projects every night :)

Erik
 

BobsGlasstream

Commander
Joined
Sep 11, 2009
Messages
2,128
Re: Winter refit - transom

erikgreen,
I wish I was home to focus on mine. Your plan is to use the vac bag for some of you boat so you need to complete it and get operational anyways. Don't let it bug you, just keep moving forward.
Have fun
Bob
PS Just think about all the cool stuff we learn when start a project. Not just the project. :cool:
 

erikgreen

Captain
Joined
Jan 8, 2007
Messages
3,105
Re: Winter refit - transom

Okay, still nothing happening here... I did get the pics uploaded today though.

Here's how it looks currently:

nPA180001.JPG.jpg


As you can see, there's still a little bit of wood clinging in places. I let that dry out for a week now, so I'm sure it'll come off with some mild scraping.

Most of the inside of the outer skin is clean glass that holds a mold impression of the transom plywood. I mostly need to rough it up some and clean with lacquer thinner... I'm looking for a less hazardous cleaning fluid, there are some "green" alternatives now, but they're really expensive. The darker area at the top of the transom is the old surface... basically a chopper gun sprayed coat of glass over the inside surface of the molded hull. I'll grind that off.

In the upper left of the picture you can see a darker rectangle.. that part of the transom was a separate piece of wood that backed up one of the eyes for towing or trailering. Nice how it wasn't structurally a part of the rest of the boat, just joined by the skin :)

I took both of the eye pads off, they were paneling patterned pieces of wood held to the transom skin by big blobs of black glue, maybe resin with some kind of thickener.

Given the change in depth of the transom at that height I'm going to have a hard time making the new core full height, but maybe I can put a piece of wood on the top part first.. probably it would be good to provide more support for the eventual gunwales there anyway. It's hard to tell from the pics but that's where there's a shelf in the outer hull.. once ground off the difference in level there is maybe 1 inch, with the top part of the transom farther out. Mostly for styling I think.

Here's a closer pic of the pad area:

nPA180002.JPG.jpg


The black stuff isn't rotten wood, that's the adhesive they used.

After I get that done and the transom wood in place and tabbed, I'll cut the transom door, then glass around it. The transom will already have an inner skin before it goes on, I'm going to vacuum bag that. So I should be able to just clean up the cut for the door and start on the supporting structure.

I've decided on my core material, nothing special here. I'll be using Arauco exterior grade ply, 3x 1/2" layers for extra stiffness (more plies = more stiff).

I'm glad I started this work before the holidays, I'm already worrying about getting on the water late next season :)

Erik
 

BobsGlasstream

Commander
Joined
Sep 11, 2009
Messages
2,128
Re: Winter refit - transom

erikgreen,
It doesn't look to bad now. :D
I like the idea of the vac bag for your transom, I was going to do the same thing on mine.
I really like the detail in your thread.
I noticed in your post that you are also going with 3 X 1/2" plys.
I guess I never really thought about the number of layers in each size ply. :confused:
Keep it coming.
Bob
 

erikgreen

Captain
Joined
Jan 8, 2007
Messages
3,105
Re: Winter refit - transom

Yeah, the 3/4" and the 1/2" both have 5 plies, at least the kind I buy(Arauco ply, $19.95 a sheet in half inch). 3/4" would be about $18 cheaper total, but oh well.

So I went and bought 3 sheets of 1/2" Saturday, that'll give me 15 plies total, which should be good :)

I spent a lot of time working on cleaning my basement space and getting ready to vacuum bag this weekend, but I did spend two 2-ish hour periods grinding the boat. That's about all I could stand, crouching in the boat like that with my ankle still sore.

Right now I've gotten one pass of surface grind done, and I took a cutting disc and cut away a lot of the stubborn bits during the second session. The corners, edges of the old deck, the half inch of glass in the bilge, lots of little things like that.

There's lots of eventual grinding work to go on the whole boat but the transom itself is close to done. One more pass with a grinding wheel and then finish with the flap disc and I should be ready to vacuum, acetone and then glue in the new core.

My grinder's dust muzzle helps a lot, but it's only on the flap disc grinder, so now the whole garage is coated with white dust. I have to be careful to close the door to the house to make sure I don't create a cleaning nightmare for myself. Respirator definitely required. The cutting disc generates dust, and usually smokes a lot when it hits wood. After I opened the door to the house to leave when I was done, the smoke detector went off. I'll have to be careful not to cause a dust explosion.

The green bunny suits work really well... I took a pic of myself in one, I'll post that here soon. That plus rubber boots and the pink anti-C gloves kept me from itching, mostly.

I may get some more grinding done tonight. Either that or I'll be working on my bagging setup.

Erik
 

BobsGlasstream

Commander
Joined
Sep 11, 2009
Messages
2,128
Re: Winter refit - transom

erikgreen
The green bunny suits work really well... I took a pic of myself in one, I'll post that here soon. That plus rubber boots and the pink anti-C gloves kept me from itching, mostly.
I have got to see this. :p
I thought I looked pretty funny in the white suit. Now green would really be cute. :D
Bob
 

erikgreen

Captain
Joined
Jan 8, 2007
Messages
3,105
Re: Winter refit - transom

Yep, I am the picture of totally itch-free fashion.

I didn't bring the camera today, I only had that pic and one other on it.. I'll try to get the pic up soon.

I was washing those suits last night so I didn't do much on the boat. I worked on the vacuum bagging setup instiead. Hopefully tonight I'll finish grinding the transom area and start cleanup.

I also have to take accurate measurements of the transom, or even better make a template. I think I have some foam core poster board I can cut into strips and hot glue to shape for an outline template. I'll make a couple pics of that in case someone's interested.

Erik
 

erikgreen

Captain
Joined
Jan 8, 2007
Messages
3,105
Re: Winter refit - transom

I got the suits out of the wash and went to town grinding last night. I have 90 percent of it done I think, but I might be really wrong.

Near the keel and transom, the combination of structure and hull means I have spots where there's a full inch of glass in a wide (1 sq ft) bump to grind down even. The hull in those few spots must be 2 inches thick.

Plus Sea Ray sprayed a bilge "liner" in between the motor mounts... once those were out I can see there's a half inch of chopper gun glass about 2 feet by 3 feet.... I need to reduce that some and smooth the edges, otherwise it looks funny and the bilge water will flow off it instead of staying there.

But, I got the transom and rear sides (about three feet) done except for a few persistent bits of wood, the thick glass I mentioned, and the black glue pads that held the wood backing plates for the stern eyes. Tonight I'll take a chisel to those pads, a fresh flap disc to the wood and then start on the thick glass. I'll probably get 3-4 more flap discs to work on this with since they shape glass 2-3x as fast as a metal grinding disc and they don't gouge the glass.

Grind, grind grind. Probably the least fun part of FRP boat repair :)

Erik
 

erikgreen

Captain
Joined
Jan 8, 2007
Messages
3,105
Re: Winter refit - transom

Well, I got more work done over the holiday weekend. Mostly I focused on the boat itself, although I did some stuff with my vacuum bagging setup.

I started with boring things... I needed to clean up my work spaces big time, get tools put away, haul out wood and fiberglass scraps, and generally make it sort of safe to walk in both areas (garage and basment). Then I needed to vacuum out the boat... everything was coated with dust.

That took about half the time I had available... lots of tools out, lots of dust.

I wore my anti-dust outfit:

nPA250056.JPG.jpg


That's rubber wellington boots, a green nylon/polyester suit surplused from a computer disc drive manufacturer (it's washable and tough), pink anti contamination (radiation) gloves also from surplus, and a 3m respirator mask (the carts are expired on it, I'm just using it for dust ATM). The background is my messy kitchen, complete with a basket of pans I just brought up from cleaning in the basement.

I also got out a couple new tools, courtesy of christmas gifts and after christmas sales. I got a portable dust collector, which I should have gotten a long, long time ago. I also picked up this 7 inch grinder:

nPB020058.JPG.jpg


It's sitting in the middle of some stuff I ordered from US Composites and some cheap flap discs from Harbor freight. I got the grinder on sale for $30, it's a close out model. The little orange grinders are 4.5 amp, this one is 15. It's heavier than the orange ones but not cripplingly so. I'm hoping it'll make the rest of the grinding on this project much easier.

Then I took a look at the interior of the boat and did some planning.

Looking at what I had done, I realized I was close to finished with the transom (I spent some time cleaning things out more and doing another grinding pass). I just had to finish the black glue on the eye pads and a few little bits of wood and glass here and there.

But then I referred back to my plans for the new structure and realized that I really wanted to "extend" the transom up the sides of the boat. That is, since I'm removing the top cap permanently and I'm also cutting a big hole in the transom (once it's installed) for a transom door, I need to take some extraordinary measures to stiffen the boat sides. The first one of these will be turning the aft third of the hull sides into composite panels by using a process similar to the transom re-core.

I'm going to use 1/2" plywood in one layer on the sides. Basically I'll be cutting a piece to size and gluing it to the existing glass (which will be ground down like the transom) and then tabbing it with biax fabric and covering it with cloth just like the transom. This will stiffen the sides a lot, as well as strengthening the aft third of the boat. The new deck and transom structure will tie into the sides so the whole thing will be one piece.

Making a structural connection like this will let me do a few experimental things later on in this refit, assuming I get to them. But for now it's just a good way to make the whole thing stiff and strong.

In order to get ready for this work I had to remove more deck, more structure, and clean the sides. I've done that now and I'm ready to tackle things with the big grinder tonight:

nPB020060.JPG.jpg


You can see the transom is basically ground out, I've removed the fuel tank bulkhead and deck to either side of it, and basically pulled everything out going forward about a third of the way up the hull, except the stringers, which I plan to leave in place (I re-did them two years ago, and they're still insanely solid).

The only problems I had doing all this were difficulty (I went overboard on structure and epoxy last time) and I made one mistake with the sawz-all.. I ended up with about a 9 inch slit through the hull on the port side. No big deal to repair, just annoying.

The silver tube is some flex ducting I've got attached to my dust collector... that thing really, really helps the dust problem. I didn't grind any with it on yet, but I'm sure when I do that it'll keep a haze from forming in the garage. I am always tempted to use it like a big shop vac, the silver hose will pick up dust and grit no problem from inches away. I'm afraid bigger chunks would clog the blower though.

So, grinding coming. Starting with the transom, then the sides up to the cut in the top cap, then the inner hull surface.. I still have that pad where the old motor mounts were to remove too. Then on to templating the new plywood cores.

I really want to get the transom moving so I'm spending my available time on this project this week.

Erik
 

andgott

Master Chief Petty Officer
Joined
Sep 2, 2009
Messages
801
Re: Winter refit - transom

Nice setup for the dust- I should try something like that. I've been lucky, since my boat is small, I can open up the shop door and take it outside when I have heavy grinding to do... Of course, I also have the advantage of living in Southern Tennessee, so the weather is a tad warmer, too... Though it's a bit chilly this time of the year!

I ended up with about a 9 inch slit through the hull on the port side. No big deal to repair, just annoying.

I've always LOVED how Nonchalant people who are experienced with 'glass are when they make a mistake like this... I've been there myself! That's the beauty of fiberglass, though- You can fix ANYTHING.

-Andrew
 
Top