1963 16' Star Dust I believe

StarTed

Senior Chief Petty Officer
Joined
Jul 14, 2015
Messages
694
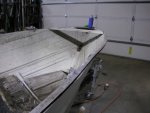
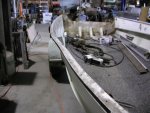
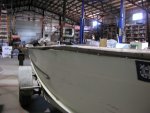
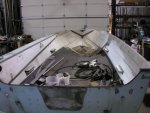
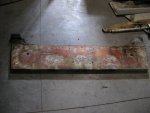
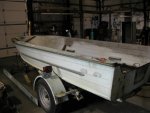
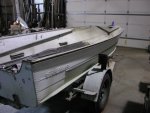
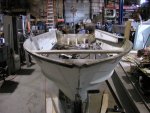
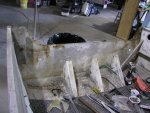
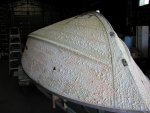
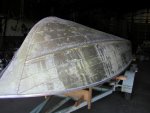
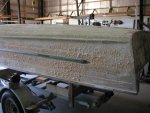
I'm new to this forum and haven't posted anything before so I'm checking to see if anyone is interested in my rebuild of this 1963 16' Starcraft. I purchased it around Feb. of this year and have done some work to it already. I didn't take any pictures of when I bought it. It had left the trailer at some point before I got it and got scraped up some along the top starboard side. I now have some pictures of the work as I've progressed. Now I.m side tracked into making a metal press brake to bend some 14 and 13 gauge aluminum. I know the aluminum is kind of stout but the price was right. I'll be doing some work on the boat but slower now that I have the brake to make. I'm using some scrape metal (very heavy) for the brake but it is what I have lying around. Let me know if there is any interest in such a thread.
 

jbcurt00

Moderator
Staff member
Joined
Oct 25, 2011
Messages
24,829
Whether there is current interest or not, it'd be great if you'd post whatever pix you have to bring a topic up to current state of the project. There will likely be plenty.of interest.

Include fab work for your brake. Good descriptions of the work along w pic is always great.

Then just keep adding to this topic as you do more work to the boat, until its done or you're happy with it.

Having the info available for those that follow us is why this huge forum is so great. Loads of work already documented, so by all means, add to that knowledge base.

Welcome to the tin-sanity.
 

StarTed

Senior Chief Petty Officer
Joined
Jul 14, 2015
Messages
694
Thanks for the welcomes. I appreciate it. I've waded through Jasoutside's Jet Star rebuild and got lots of ideas from all of your inputs.

I'm somewhat computer illiterate and my pictures are around 2MB each so I think they may need some down sizing for the forum. That may be a problem. I do have a good grasp of electrical power and some in electronics so I could be of some help in those areas. I like doing mechanical work so I have a lathe, a mill and some home made equipment such as a 17" box and pan brake and a metal roll that is about a foot wide that can handle 1/4 X 4 steel barely. I also have a few welders. I've recently acquired a plasma cutter / tig welder that I need to learn how to use better. Boat and aluminum work are new to me but I have a friend who has helped me so far. He has aircraft aluminum experience and tools to go with it. He also has rebuilt Starcraft aluminum boats. His advise has been very helpful but I'm getting to the point where I need to improvise due to lack of parts available. I also need to brake some aluminum to make some angles for the boat and my home made camping trailer. That and the cost are the incentives to build the press brake.

I'll get some pictures up when I can figure out what I have to do to make them compatible with the forum. They are Jpeg taken with an older digital camera.
 

garbageguy

Lieutenant Commander
Joined
May 8, 2012
Messages
1,531
StarTed, sounds like you have an interesting project and some valuable knowledge. Looking forward to seeing your build.
 

StarTed

Senior Chief Petty Officer
Joined
Jul 14, 2015
Messages
694
I see that it takes 3 posts before I can post any pictures per forum rules. I opened a Photobucket account and copied some pictures into it. I also seem to have lost several pictures of the boat so there will be some holes.
 

jbcurt00

Moderator
Staff member
Joined
Oct 25, 2011
Messages
24,829
W photobucket, theres no wait to post pix. Only wait is if you use iboats uploader, just copy IMG code from photobucket and paste it into your posts.
 

StarTed

Senior Chief Petty Officer
Joined
Jul 14, 2015
Messages
694
I tried to send a picture from a new Photobucket account but I keep getting a message (HTTP500 - Internal Server Error) and nothing happens.

Here is another try after rebooting my laptop. Now I get an (Invalid Link). Still no pictures.
 

StarTed

Senior Chief Petty Officer
Joined
Jul 14, 2015
Messages
694
I'll try this again.
 

Attachments

  • 2015-04 006 (Small).jpg
    2015-04 006 (Small).jpg
    68.3 KB · Views: 4
Last edited:

StarTed

Senior Chief Petty Officer
Joined
Jul 14, 2015
Messages
694
I guess I was inserting it into the wrong place. Now I'll try to add some text. You can see that the above picture shows a dented in area from the boat leaving the trailer during the PO's possession.

fetch

A view of the boat from the front.

fetch

Another view from a lower angle.

fetch

Partially stripped but still has the PO's carpet he installed to hide the rotted original floor. I know that the floor was original because the rivets were in the original holes and they looked like an original installation of the 1/4" plywood seamed down the middle and 10' long strips.

fetch

The decayed transom plywood perforated with holes for various motors.

fetch

Port view from rear.

fetch

Starboard view from rear.

fetch

Looking down from the bow.
 

Attachments

  • 2015-04 007 (Small).jpg
    2015-04 007 (Small).jpg
    85.5 KB · Views: 6
  • 2015-04 008 (Small).jpg
    2015-04 008 (Small).jpg
    81.4 KB · Views: 6
  • 2015-04 009 (Small).jpg
    2015-04 009 (Small).jpg
    85.1 KB · Views: 6
  • 2015-04 010 (Small).jpg
    2015-04 010 (Small).jpg
    71.9 KB · Views: 6
  • 2015-04 012 (Small).jpg
    2015-04 012 (Small).jpg
    73.9 KB · Views: 6
  • 2015-04 013 (Small).jpg
    2015-04 013 (Small).jpg
    80.8 KB · Views: 6
  • 2015-04 014 (Small).jpg
    2015-04 014 (Small).jpg
    100.5 KB · Views: 6
Last edited:

StarTed

Senior Chief Petty Officer
Joined
Jul 14, 2015
Messages
694
Here are more pictures to help bring this up to date.

fetch

View of the inside of the stern with the transom plywood removed.

fetch

Here is a picture of the side after paint remover was applied for a day. A few hours did little to no breakdown.

fetch

The other side.

fetch

The bow with paint remover soaking for a day.

fetch

Another view of the bow after removing the loosened paint. It took more applications and time to get it all off.
 

Attachments

  • 2015-04 015 (Small).jpg
    2015-04 015 (Small).jpg
    99.6 KB · Views: 4
  • 2015-07-23 P7230001 (Small).JPG
    2015-07-23 P7230001 (Small).JPG
    110.2 KB · Views: 4
  • 2015-07-23 P7230002 (Small).JPG
    2015-07-23 P7230002 (Small).JPG
    94.6 KB · Views: 4
  • 2015-07-23 P7230005 (Small).JPG
    2015-07-23 P7230005 (Small).JPG
    65.9 KB · Views: 4
  • 2015-07-23 P7230006 (Small).JPG
    2015-07-23 P7230006 (Small).JPG
    82.7 KB · Views: 4
  • 2015-07-23 P7230003 (Small).JPG
    2015-07-23 P7230003 (Small).JPG
    108.3 KB · Views: 4
  • 2015-07-23 P7230004 (Small).JPG
    2015-07-23 P7230004 (Small).JPG
    94.7 KB · Views: 4
Last edited:

StarTed

Senior Chief Petty Officer
Joined
Jul 14, 2015
Messages
694
I removed all the paint from the exterior using Citrisafe stripper and used a SS wire brush on the drill to remove much less paint from the interior. The stripper with lots of time worked quite well.

I primed the outside with zinc chromate primer and painted it but those pictures got lost. Probably some other pictures went over them while downloading because I saw them in Adobe Elements after they were initially downloaded.

The boat's exterior got painted with Rustoleum rattle cans - Ocean Mist on the bottom and Navajo White above. I had lots of problems getting it barely acceptable to me. I hate painting but I like the results when done well.

While the boat was turtled I slid it back off the trailer.

While the boat was off the trailer I removed the side rollers and modified the center rollers so I can adjust them up except for the center rear one.

I painted the trailer using Rustoleum paint in a quart and a brush. I mixed a little blue into a can of white to get a lighter blue. It worked well but I made a mess and paint got places I didn't want it.

After the paint dried I added two 2X6 boards covered with I/O carpet for side bunks. Then slid the boat back on and adjusted the center rollers to take a little weight. That worked quite well.
 

Watermann

Starmada Splash of the Year 2014
Joined
Jan 12, 2013
Messages
13,747
Nice work on the tear down Ted. Next up the fun of hull repairs. Anything beats stripping paint in my book.
 

StarTed

Senior Chief Petty Officer
Joined
Jul 14, 2015
Messages
694
I think I'll quit for the evening. It seems that I get moving along and the built in mouse pad blows the entry away forcing me to restart. I guess I'll need to disable the mouse pad since I use a mouse off a port. Anyhow, the third time should be successful. No more pictures tonight.
 

classiccat

"Captain" + Starmada Splash Of The Year 2020
Joined
Dec 20, 2010
Messages
3,405
Nice progress Ted! You're making quick work of it! :thumb:

that Dent isn't bad...we've seen much (!) worse! :eek:
 

StarTed

Senior Chief Petty Officer
Joined
Jul 14, 2015
Messages
694
This information may not be in order because I'm trying to catch up to date. After stripping the paint a friend came over and we reset all the bottom rivets. We found 5 that had cracks radiating out from them. He said that was caused by loose rivets over time. We discussed options such as welding up the cracks, patching, etc. I opted to use a hole saw and cut out 5 large aluminum washers with 3/16 holes. We sanded the edges a little on the outside to form a taper and countersunk the holes for flush rivets. We drilled out the old rivets, sanded down the aluminum hull then applied epoxy and reset the rivets with the washers then liberally covered them with more epoxy. Hopefully they'll hold.

(Sorry, I can't find the picture)
Here is a picture after the finish of one of the patches.
 
Last edited:

Watermann

Starmada Splash of the Year 2014
Joined
Jan 12, 2013
Messages
13,747
Whoa that may be the first 16' OB SC I've seen with rib end cracks. Actually what causes this WELL known older (pre-mid 70's) SC issue is using the boat with compromised decking without the later added hull stiffeners under each of the ribs from about 2/3 rds the way up the boat from the stern.

There's a bunch of threads showing how we've over come these cracks. The cracks have to be stop drilled and then a patch placed over both the rivets and back buttered with 5200. Here's a pic of a couple rib end crack repairs I did on my Chief. Also the hull stiffeners that I added to help keep the spray rail from cracking which is also another issue some have had to address as well. SC placed them under the ribs in later models to head off both issues.

IMAG1143.jpg


IMAG1221.jpg


IMAG1238.jpg
 
Top