Leaking power steering fluid. VP 5.0GL-E in a 2004 Stingray 200LX

Status
Not open for further replies.

dannyual767

Petty Officer 1st Class
Joined
May 15, 2010
Messages
273
I've had to add power steering fluid to the reservoir several times since last fall. Now I'm having to add fluid more often so it was finally time to take a look.

The power steering pump on the engine is dry as are the hoses coming and going to the pump. The "steering actuator" at the transom is wet with oil. Is there something here that tends to go bad and start to leak fluid? I've wiped it off and will look at it again after our Memorial Day of boating. Heading out right now with the grandkids!
 

NHGuy

Captain
Joined
May 21, 2009
Messages
3,631
Start out by checking for leaking fittings. They are very high pressure so you will need line wrenches if they are loose. But start by checking for looseness.
 

dannyual767

Petty Officer 1st Class
Joined
May 15, 2010
Messages
273
Here is a picture of where the fluid seems to be leaking. It is on the bottom side of the actuator. I put a wrench on it but it wasn't loose.


IMG_0848.JPG

Is there an o-ring under this hex head? It kind of appears that the cotter pin holds this bolt in place. I'm pretty sure the power steering fluid is leaking from here.
 
Last edited:

dannyual767

Petty Officer 1st Class
Joined
May 15, 2010
Messages
273
I did a lot of research on this topic last night and it appears that these actuators are like the lousy VP raw water pumps. They are notorious for going bad and VP says they're not rebuildable but they're happy to sell a new raw water water pump for $411 or a new actuator for well over $600 :mad-new::mad::mad-new: !

Two weeks ago, I rebuilt my raw water pump with a $65 "rebuild kit" from Amazon. Works great. There is a $65 Ebay "rebuild kit" for these steering actuators as well. I just need to confirm which actuator I have and whether or not it's actually the actuator leaking fluid. During my research last night, I read one thread where a guy said that his leak ended up being a high pressure hose rubbing against an actuator cotter pin. I did notice that one of my hoses was rubbing a cotter pin as well. When I get a chance later this week, I'll confirm where the leak is and post back in here what I find.
 

dizzy1

Seaman
Joined
Aug 6, 2009
Messages
69
Keep us posted if the leak is the bottom or thru some other seal. My 2007 5.0 GL has been leaking slowly the last few years. Dumped some Lucas Transmission Fluid stop leak in it and after a few weeks, still keeping fluid, just not sure if that will end up working out so might need a rebuild as well.
 

dannyual767

Petty Officer 1st Class
Joined
May 15, 2010
Messages
273
It'll be Thursday or Friday before I get a chance to work on it again. As soon as I find out anything, I'll be sure to post it here.
 

dannyual767

Petty Officer 1st Class
Joined
May 15, 2010
Messages
273
Thalasso, thank you for that thread link. I've seen it before but this time I actually did a Google search of the part numbers that he listed. I was able to find them online and they cost a total of about $5. Shipping would probably be double or triple that, though :rolleyes: .

Anyway, I'm hoping to get in my boat tomorrow and have my daughter crank the steering wheel back and forth with the engine running. I'm going to have a bright light shining on the areas around the actuator where I'm suspecting the leaking. I'm hoping that I can see just exactly where the fluid is coming from.
 

dannyual767

Petty Officer 1st Class
Joined
May 15, 2010
Messages
273
IMG_0862.JPG I finally got in the boat today and started it up (boat in the water.) My wife turned the steering wheel back and forth while I used a bright light back at the actuator looking for the leak. I saw the steering fluid leaking off of the bolt head that I posted back in post #4.

I should have moved to the port side of the engine compartment to confirm that the fluid was leaking out of the actuator rod. I'm pretty certain that it was that's why it was running down to and off of the bolt head in the picture.

We have guests in town for the weekend, so I removed the power steering belt and we'll "suffer" through the manual steering :D . I'll have time next week to remove the actuator and take it apart to confirm what is bad. There are rebuild kits out there on Amazon and Ebay. More than likely, I'll buy one and rebuild the actuator just like I recently rebuilt my raw water pump.

I'll come back into this thread and update as I make progress.
 

dannyual767

Petty Officer 1st Class
Joined
May 15, 2010
Messages
273
Okay, so the weekend of manual steering was fun :lol: ! Trying to pull skiers with manual steering was, how should I say this? HARD! At least we got to go boating and we did ski.

Anyway, I removed the actuator and it wasn't difficult at all in my boat. I'm at the point of trying to take the actuator apart and that is where I've run into trouble. I can't get the end cap off. This end cap here:

IMG_0869.JPG

It has four holes spaced 3/4" apart. I tried sticking some machine screws into two of the holes and using a screwdriver to turn the cap but that didn't work. The machine screws just bent. I read on another thread that someone else make a "tool" using a block of wood with four nails (points cut off) driven into it. I guess I'm going to have to try that tomorrow or the next day. I've got to get this pesky cap off!
 

dannyual767

Petty Officer 1st Class
Joined
May 15, 2010
Messages
273
The good news is that I made a 4-prong spanner tool and was able to get the end cap off!

IMG_0873.JPG

The white thing is a block of wood with 4 holes spaced 3/4" apart. I had to use a hand drill since my drill press is dead. The holes aren't that straight but the machine screws still fit in the cap holes. There is a hole drilled through the long part of the block. You can see it on the end facing the removed cap. While the "tool" was on the cap, I stuck a rod through that hole and was able to turn the tool CCW and remove the cap.

Now for my next hurdle. I can't get the end off of the piston rod. This end:

IMG_0876.JPG

When I try to remove the grey/black part, the piston rod just spins. How do I keep it from spinning so I can remove that grey/black end?
 

Attachments

  • IMG_0873.JPG
    IMG_0873.JPG
    85.5 KB · Views: 0
  • IMG_0876.JPG
    IMG_0876.JPG
    91.5 KB · Views: 1

dannyual767

Petty Officer 1st Class
Joined
May 15, 2010
Messages
273
This is the piston end where I removed the cap with the four holes:

IMG_0878.JPG

I don't really want to but should I clamp a pair of vice grips to the end of the rod that I'm pointing to? That would keep the rod from spinning so that I can remove that grey/black end. Then I could remove the piston and rod assembly so I can take a look at the leaky seals.
 

dypcdiver

Lieutenant Junior Grade
Joined
Nov 1, 2005
Messages
1,018
No, put the exposed rod in a vice clamped between 2 blocks of hard wood, then put a rod in the hole of the fork and unscrew it from the rod.
 

dannyual767

Petty Officer 1st Class
Joined
May 15, 2010
Messages
273
No, put the exposed rod in a vice clamped between 2 blocks of hard wood, then put a rod in the hole of the fork and unscrew it from the rod.


Awesome! Thank you for that advice. I'll do it tomorrow and finally take this thing apart!
 

dannyual767

Petty Officer 1st Class
Joined
May 15, 2010
Messages
273
I was able to get everything apart by using the wood blocks in a vice trick. My "rod end piece" was on really tight. I kept trying and trying but the rod just kept spinning in between the two wood blocks. I finally clamped down on the wood blocks like a gorilla would and the vice/wood blocks held the rod and the end spun off!

I removed the wiper seal on the end and it looked fine. I messed up the inner, rod seal trying to remove it. Upon close examination, I couldn't see anything wrong with it other than the damage that I inflicted up it during removal from it's groove. That being said, I don't have microscope eyes and I'm sure 1000-2000 psi of hydraulic pressure can find expose imperfect seals!

Over the course of the last several days, I spent too many hours trying to research the hydraulic rod seal (inner seal) and the outer, wiper seal. I finally made a decision and ordered both items from https://www.metricsealsinc.com/

I'm not going to get the parts until the middle of next week so I'll have to wait to see how they fit and work. I'll be sure to come back in this thread and update with my results. Stay tuned!
 

dannyual767

Petty Officer 1st Class
Joined
May 15, 2010
Messages
273
Sweet success!!!!! It's all back together and working without leaking. Here is picture of the rod seal that I ordered:

IMG_0899.JPG

Of course it was a total PITA to install. I referenced this great writeup to install this seal into it's tight groove:
 

dannyual767

Petty Officer 1st Class
Joined
May 15, 2010
Messages
273
The really important part was the drawings he posted at the end. I ended up using dental floss to tie the seal up. At first I thought that I could just tie it in the center and get the seal into it's groove. Not a chance. I kept trying to do it my way and it just didn't work. My wife started helping and she took a look at the drawings and said that we needed to do it the way the drawings showed. Thankfully, I listened to her!

It took several tries and I almost gave up because the only way that seal was going into it's groove was by twisting it into a pretzel like the drawing. Finally the seal was in it's groove and all looked well. Then came the next hurdle that I hadn't read about.

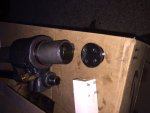
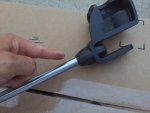
The size of the seal was exactly what I needed but the piston rod just didn't want to pass through it during reassembly. I tried and tried but that rod wasn't going through the rod seal. I thought that maybe Metric Seals, Inc. had pulled the wrong seal out of the bin even though the ziplock bag had the proper label of the correct seal that I ordered. In any case, there was no way that I could get that piston rod through the seal. Yes, I oiled it up with power steering fluid.

At this point I was very frustrated and was ready to throw in the towel and order an overpriced VP replacement. I figured if mine was junk, I might as well do what it took to get the rod inserted through that seal even if I destroyed the actuator. I set the actuator body and piston rod assembly into my hydraulic press and slowly applied pressure. The rod popped through the seal! However, there was no way I was pushing/pulling that rod through by hand. I had to use the press to send the rod through further. It didn't seem right to me but what the heck? I was going to buy a new unit anyway, right?

Got the actuator all put back together and installation back into the boat was about the smoothest part of the whole job. I added power steering fluid to the pump and then started to turn the steering wheel to see if I could get that piston/rod assembly to move through that tight Metric Seals, Inc. rod seal. It moved and I started to bleed the system of air! Eventually, all the air was out and I started the engine and continued to turn the wheel with power steering assistance. I got a couple of weird "burps" of air but once they were gone, the steering was as good as new and there was no more leaking!

I've had the boat out twice since the repair and the power steering is working perfectly and there is no fluid leak. It was a pretty big job and by God's favor, it all turned out successfully. Good luck to you if you need to do the same rebuild. It can be done.

Oh, one last thing. I ended up reusing my old, outer wiper seal. The new one that I ordered (less than $5) was too wide/thick. It wouldn't stay in place without "gluing" it in. My old wiper seal was in good shape so I popped it back into place. Even with the $10 shipping charge for these two seals, my total monetary cost was just over $27 to fix this leaking steering actuator.
 

boatime

Recruit
Joined
Jun 15, 2020
Messages
5
Does anybody know if you can re-use the cottor and split pins or if you need to get new? If new, can you get them at any hardware store? Tackling this job in the next couple of days...

Thx
 
Status
Not open for further replies.
Top