Bravo 3 Bellows Replacement - Times 2

tpenfield

Moderator
Staff member
Joined
Jul 18, 2011
Messages
17,621
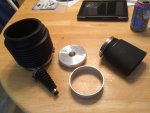
As I prepped my boat for seasonal launching I noticed that the u-joint bellows are showing signs of wear from chaffing along several ridges of the bellows. At least from what I can see with the outdrive tilted up. I have not known chaffing to be an issue, at least based on my previous Bravo outdrive. Otherwise the bellows look fine. I wonder if they were installed wrong by the PO ? . . .

Anyway, rather than run the risk of a wear-through hole developing, I am going to replace the bellows - both outdrives, as I have twin engines. This will be my first venture into bell housing disassembly, but stuff like that has not stopped me before . . . :)

I replaced the gimbal bearings over the past year ( one last year and the second one this year). Just looking for any words of wisdom, experience, etc before I dive into this. I'll be ordering the parts today with quick shipment and hopefully tackling this over the weekend. Got to do 2 outdrives, which should be 'fun' x 2. :rolleyes: :facepalm:

What tools should I order vs do a makeshift? I figure that I will need the bellows expander, the water line fitting tool, the hinge pin tool, but can improvise the others?

I plan on buying OEM bellows and adhesive and not aftermarket . . .

TIA for any words of wisdom and experience.
 

tpenfield

Moderator
Staff member
Joined
Jul 18, 2011
Messages
17,621
Oh, add the shift cable calibration tool to the list . . . My understanding is that the shift cable has to come out in oder to access and replace the bellows, etc.
 

alldodge

Moderator
Staff member
Joined
Mar 8, 2009
Messages
40,581
I would recommend replacing the oil lube tubing

I would pull the lower pin just to inspect. Most times it's easy enough to pull and have a look. If you do your going to need cotter pins for the bottom pin, also check lower bushing 23-847638.

Time to have a real good look at the shift cables
 

tpenfield

Moderator
Staff member
Joined
Jul 18, 2011
Messages
17,621
OK, thanks.

I am still concerned about the chaffing that I observed, as it seems to have ruined what appear to be otherwise good bellows. I guess I will get a good look at probable cause and solutions once I take things apart.

Since I am a 'late decider', I have spent much of the morning trying to get the parts and tools delivered by Friday.
 

alldodge

Moderator
Staff member
Joined
Mar 8, 2009
Messages
40,581
My thought is if there is chaffing then something is loose. Only things I can think of that cause it in that area is the pins (gimbal and bell housing)
 

tpenfield

Moderator
Staff member
Joined
Jul 18, 2011
Messages
17,621
My thought is if there is chaffing then something is loose. Only things I can think of that cause it in that area is the pins (gimbal and bell housing)

Almost looks like the accordion ribs of the bellows is rubbing on part of the bell housing when the outdrive is tilted up/down.
 

Bondo

Moderator
Staff member
Joined
Apr 17, 2002
Messages
70,465
Ayuh,..... When I did the bellows on my tinbarge at 10 years old, the one I took off wasn't dry rotted or checkin' at all,....

It had Grown though,.... The rubber was swollen from I guess the purged grease, 'n time,.... super flimzy, 'n swollen, weird,...

Could be what yer seein',..??
 

tpenfield

Moderator
Staff member
Joined
Jul 18, 2011
Messages
17,621
Ayuh,..... When I did the bellows on my tinbarge at 10 years old, the one I took off wasn't dry rotted or checkin' at all,....

It had Grown though,.... The rubber was swollen from I guess the purged grease, 'n time,.... super flimzy, 'n swollen, weird,...

Could be what yer seein',..??

Yup, possibly. One thing for sure, it could wear thru at the worst of times. Plus an extra launch & retrieve during the season to fix something like that puts a big dent in the boat budget. . . So, I decide not to roll that dice.
 

tpenfield

Moderator
Staff member
Joined
Jul 18, 2011
Messages
17,621
OK, I had to scramble around a bit yesterday trying to find suppliers for the various parts and tools that I will need this weekend, and more specifically those who had the items in stock and would ship them out same day. Looks like everything is on its way, but I am still awaiting a couple of tracking numbers.

I have a hinge pin tool somewhere, but not sure where it is, so I just bought another one. . . I've been doing that lately with my tools, if I cannot find something quickly, I buy another one. I now have about 50 screw drivers (but never the one I need at the moment mind you :facepalm: ) and a dozen Cresent wrenches (SAE & Metric interchangeable :D ).

I have watched a few videos on disassembling and re-assembling the bell hosing/bellow/shift cable, etc. Plus, I have my Mercruiser manuals on my iPad. So, hopefully, I will be good to go.

Not sure how long this will take, but I and guessing 6-8 hours per outdrive. Sound about right ? :noidea:
 

alldodge

Moderator
Staff member
Joined
Mar 8, 2009
Messages
40,581
OK, I had to scramble around a bit yesterday trying to find suppliers for the various parts and tools that I will need this weekend, and more specifically those who had the items in stock and would ship them out same day. Looks like everything is on its way, but I am still awaiting a couple of tracking numbers.

I have a hinge pin tool somewhere, but not sure where it is, so I just bought another one. . . I've been doing that lately with my tools, if I cannot find something quickly, I buy another one. I now have about 50 screw drivers (but never the one I need at the moment mind you :facepalm: ) and a dozen Cresent wrenches (SAE & Metric interchangeable :D ).

I have watched a few videos on disassembling and re-assembling the bell hosing/bellow/shift cable, etc. Plus, I have my Mercruiser manuals on my iPad. So, hopefully, I will be good to go.

Not sure how long this will take, but I and guessing 6-8 hours per outdrive. Sound about right ? :noidea:

Your first one might take you four hours or so, the next will be quicker. Biggest issue I see is getting it apart. Hose clamp placement is important during reassembly. Need to find (or buy another :rolleyes:) that 12 to 18 inch skinny flat pit screw driver to tighten the one clamp :D
 

tpenfield

Moderator
Staff member
Joined
Jul 18, 2011
Messages
17,621
OK, thanks for the insight. Looks like you and I will be working our respective boats over the weekend. :)
 

Bondo

Moderator
Staff member
Joined
Apr 17, 2002
Messages
70,465
Hose clamp placement is important during reassembly. Need to find (or buy another
rolleyes.gif
) that 12 to 18 inch skinny flat pit screw driver to tighten the one clamp

Ayuh,.... I've found that a 5/16" short 1/4" drive socket, a 1/4" pin type swivel adapter, various lengths of 1/4" extensions, 'n a 1/4" racket work Waayyy better that a screwdriver for the screw clamps,....

Especially on a bellows job, but also for hose clamps in general,....
 

tpenfield

Moderator
Staff member
Joined
Jul 18, 2011
Messages
17,621
Ayuh,.... I've found that a 5/16" short 1/4" drive socket, a 1/4" pin type swivel adapter, various lengths of 1/4" extensions, 'n a 1/4" racket work Waayyy better that a screwdriver for the screw clamps,....

Especially on a bellows job, but also for hose clamps in general,....

Yea, as long as I can get the 1/4" drive socket in through the 'side holes' which I think I can, that is what I will use.

Also, a question about the bellows . . . Do they only rely on the adhesive to stay in place? . . . or are they also 'trapped' in place by a flange of some sort and the clamp, similar to a hose & barb fitting provides mechanical grip ???
 

Bondo

Moderator
Staff member
Joined
Apr 17, 2002
Messages
70,465
Yea, as long as I can get the 1/4" drive socket in through the 'side holes' which I think I can, that is what I will use.

Ayuh,.... That's the beauty of it, slip the extension through, 'n snap on the socket inside the hole,....


Never done the bravo bellows, can't answer yer question, other than the ole Alphas ya glue on, 'n clamp the ridge into the ring groove,...

The Gen.IIs, ya just squirt some Quicksilver Power Tune in the bellows, 'n push the aluminum retainer ring in with yer fingers, 'n hold it there a few seconds,....
The power tune makes rubber slicker than you know what, but evaporates is no time,...

I've been usin' it for all sorts of rubber bushin's needin' pressin' into tight places, ever since Don S taught me the trick,....
 

alldodge

Moderator
Staff member
Joined
Mar 8, 2009
Messages
40,581
Bravo's have the same type lip as Alpha's just a single lip to push over, no barbs. There are flat spots on the sides of the boots which are placed vertically.

Power tune is a great, it along with the adhesive and your sealed tight
 

tpenfield

Moderator
Staff member
Joined
Jul 18, 2011
Messages
17,621
OK, thanks. One thing I noticed on the current bellows is that the flat spots are at an angle . . . not horizontal and not vertical either . . . I wonder if that is contributing to the wear marks that I am seeing. :noidea:

In other news, I got the Bellows Sleeve install tool today. I ordered it yesterday and it arrived today. :thumb: Of course the stuff I ordered first will probably arrive last, just got a shipping confirmation and it is supposed to arrive on Friday. No room for error. :rolleyes:
 

alldodge

Moderator
Staff member
Joined
Mar 8, 2009
Messages
40,581
OK, thanks. One thing I noticed on the current bellows is that the flat spots are at an angle . . . not horizontal and not vertical either . . . I wonder if that is contributing to the wear marks that I am seeing. :noidea:

In other news, I got the Bellows Sleeve install tool today. I ordered it yesterday and it arrived today. :thumb: Of course the stuff I ordered first will probably arrive last, just got a shipping confirmation and it is supposed to arrive on Friday. No room for error. :rolleyes:

That's good and bad news. The bad (should always be first) is they should be vertical. the good is that you probably don't have play which means installing them vertically should solve the chaffing problem :applause:
 

tpenfield

Moderator
Staff member
Joined
Jul 18, 2011
Messages
17,621
that would be awesome to remedy the problem . . . else I'd be replacing them every couple of years.
 

tpenfield

Moderator
Staff member
Joined
Jul 18, 2011
Messages
17,621
The Bellows arrived, along with the sleeve installation tool. So, just waiting on the rest of the tools and the adhesive to arrive tomorrow. IMG_6190.JPG


Here is the collection of 'stuff' I have so far. Bellows, exhaust tube and shift bellows along with the clamps, sleeve and the installation tool. I got 2 kits like this, one for each outdrive.

Here is the 'ridge' that I was looking to find. This would create a mechanical connection to the transom assembly once clamped and not fully relying on the adhesive to hold the bellows intact. IMG_6191.JPG


Same thing for the other end . . . IMG_6192.JPG


Here is the 'flat spot' that we have talked about . . . IMG_6194.JPG


So, that goes vertical as shown (right ?)

One thing that I did notice is that the bellows when held with the flat spots vertical is actually larger at the top than on the sides and bottom . . . so it is not symmetrical or perfectly round. The arrow shows the larger part, which would be facing up (or possibly down) as installed with the flat spots vertical. IMG_6199.JPG


I would think that is goes 'up' as there would be the potential for exhaust tube interference if it faced downward. As the bellows on my outdrives are currently installed the flat spots are at an angle, which would explain why they are chaffing.

Sound about right ???
 

Attachments

  • IMG_6190.JPG
    IMG_6190.JPG
    169.9 KB · Views: 3
Last edited:

alldodge

Moderator
Staff member
Joined
Mar 8, 2009
Messages
40,581
So long as the flats are vertical your good. Never found anything to reference the larger over the smaller end to be up/down. Not to say there might be something out there, just never heard of anything
 
Top