Getting ready to overhaul my transom assembly. Part questions.

MI_Pirate

Seaman Apprentice
Joined
Apr 27, 2016
Messages
33
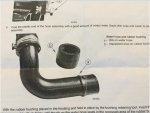
My upper swivel shaft is leaking, and my boat is 11 years old now, so I'm going to pull the bell housing and fix the leaking seal and replace all of the rubber parts, lower shift cable, and upper swivel shaft. I've got almost everything I need in order to get started. I've spent the past hour trying to find information on the transom assy end of the water intake line. Specifically, my transom assy (s/n 0W429518) has the quick disconnect water intake housing on the inside of the boat. The Merc parts catalog is showing an insert with a "Design I" and a "Design II" water intake hose.

Looking at the inset, my thoughts are that if I had the "Design II" hose, it would be fairly obvious, as I should be able to see the plastic section of tubing and the hose clamp where it changes to rubber hose above the bellows. I've looked at my drive hundreds of times, and I'm 95% sure that mine has a rubber line all the way to the inside with a normal tapered insert inside of the intake housing with the quick connect. Is that a fairly safe assumption (that I'd see the plastic section easily)?

Edit: Does it matter which one you get? Are they interchangeable? I assume that Design II would be an improvement... Worth it to "upgrade"?
 
Last edited:

Bt Doctur

Supreme Mariner
Joined
Aug 29, 2004
Messages
19,111
2433.gif
serial number says Bravo 1 while its apart install the grease fitting for the bushing and the seal will never fail again as long as you keep it greased
 
Last edited:

MI_Pirate

Seaman Apprentice
Joined
Apr 27, 2016
Messages
33
No Title

Boat most definitely has a B3. Always has. I'm using the part catalog on Merc's page. As you can see in the attached photo, when I search on my s/n, it fall into the "0W250000 & Up" range for all 3 (BI, BII, and BIII). I always assumed that it was telling me that the assy didn't change much between revisions, so I just picked Bravo III because that's what I have. Why couldn't Merc just have unique serial numbers for each product to make it easier on us amateurs?
 

Attachments

  • photo242984.jpg
    photo242984.jpg
    246.2 KB · Views: 0

MI_Pirate

Seaman Apprentice
Joined
Apr 27, 2016
Messages
33
Yep. I have dual 28P counter rotating.

I see that Merc has discontinued the single piece rubber intake line. Some places, including iboats still sell the Merc and aftermarket versions. The Design 2 hose seems to have a different type of insert on the inside of the boat, presumably because a plastic tube comes through the transom. Have you personally seen any of these Design II hoses? Is that version any easier to install as opposed to the usual tapered insert?
 

Yegboats

Chief Petty Officer
Joined
Feb 20, 2016
Messages
513
I see design i has superseded to design ii and is 20.00 cheaper than design i used to be.
 

Fun Times

Moderator
Staff member
Joined
May 16, 2009
Messages
8,807
I see design i has superseded to design ii and is 20.00 cheaper than design i used to be.
Just curious what you find when you run his transom serial number.... 0W429518

Do you see Parts catalog part number 90-80980896 PARTS MANUAL, BRAVO I/II/III STERNDRIVE AND TRANSOM ASSEMBLY Or do you get,
90-891748001 — PARTS MANUAL, Bravo-X (I-II-III)

I get both catalog part numbers depending on where you/I go. One/Some charts only show the one design while others show both designs.....

Either way, MI_Pirate, originally you have design one since design 2 is only roughly about 2 - 3 years old now that I'm aware of. It's mercruisers way to combat the corrosion build-up inside the transom housing similar to this, http://www.amarket.com/BRAVOblock.htm

Being that you see design 1 in red with the website you looked up, it says design 1 is no longer available and you'll now get design 2 provided you (and/or your dealer) ordered the hose "recently" from Mercuiser factory and it's not old stock off the dealer shelf which being this hose in question, you could receive the old design still from a lot of dealers....but not factory ordered.

Forgot to mention that yes they will interchange easily and member MarkSee has recently changed over to the new design intake water hose and might be able to add a little more information about this.
 
Last edited:

MI_Pirate

Seaman Apprentice
Joined
Apr 27, 2016
Messages
33
Either way, MI_Pirate, originally you have design one since design 2 is only roughly about 2 - 3 years old now that I'm aware of. It's mercruisers way to combat the corrosion build-up inside the transom housing similar to this, http://www.amarket.com/BRAVOblock.htm

Being that you see design 1 in red with the website you looked up, it says design 1 is no longer available and you'll now get design 2 provided you (and/or your dealer) ordered the hose "recently" from Mercuiser factory and it's not old stock off the dealer shelf which being this hose in question, you could receive the old design still from a lot of dealers....but not factory ordered.

Forgot to mention that yes they will interchange easily and member MarkSee has recently changed over to the new design intake water hose and might be able to add a little more information about this

I'm leaning towards ordering the new design since it looks like the "inside" end of the plastic tube uses what appears to be a compression fitting instead of the tapered insert. I'll be replacing the hose with the engine still in the boat, and I suspect that the compression fitting is easier to install where there is limited access.

Maybe Mr MarkSee can elaborate on the installation process for the new design a little more? I've been Googling the new design for 2 days, and I am blown away by the fact that I can't find anything in regards to the actual installation process for the new design hose. No Merc bulletins. Nothing in the Service Manuals, nothing on the web. Talk about a stealth rollout. It's like it never even happened... ;)

Anyone have any opinions on the Nuwave Marine SS swivel shaft vs. the JR Marine one? There is about an $80 difference in price between the two. Both claim to be made to "exact" specs in an ISO9001 factory. It wouldn't surprise me if they both come from the same place.
 
Last edited:

MI_Pirate

Seaman Apprentice
Joined
Apr 27, 2016
Messages
33
No Title

My hole in the water going by on the forklift... First launch of last year.
 

Attachments

  • photo243049.jpg
    photo243049.jpg
    202.7 KB · Views: 0

Fun Times

Moderator
Staff member
Joined
May 16, 2009
Messages
8,807
Yes there's not much out there on the internet about the new design inlet water hose for the Bravo. And somehow when MarkSee and I went into some detailed conversations about the new design, it ended up being via private message.:phone: .Not much help I know.:fish: But he did seem to like the new design too.

I've seen Nuwave Marine SS swivel shaft mentioned a few times on some boating forums but don't have any personal experience with them nor JR's kit either but below is a quick video of them (Nuwave) showing fitment vs whoever Nuwave's competitor is as there are a few out there now such as Hill Marine which those that have mentioned using/installing Hill's SS swivel shaft seemed to like it.

https://www.youtube.com/watch?v=qJuM7z8RfUw
http://hillmarine.com/gimbal-ring-installation-bundle-1923.html

Beautiful boat you have there.:)
 

MarkSee

Lieutenant Junior Grade
Joined
Sep 10, 2010
Messages
1,172
Sorry, been away for a few days and was just trying to find the installation document I used for the new design and can't find it at the moment but will look more later.

Basically the new design there is a plastic piece of a couple inches in length that is attached to the rubber hose which goes into the transom assembly and apparently being hard plastic will not be able to corrode and block the passage.

The installation went something like this:
You first insert from the outside into the transom assembly a rubber sleeve that is about 1 1/2 inches long.
Then from the inside of the boat, you attach a plate to the holes of the housing inlet (this is needed for the next step).
Then insert the hose through the transom and the plate inside not allow the rubber sleeve to go to far but will allow the plastic piece to extend just past the sleeve.
Then reinstall the housing with new gasket.
The bell housing side still uses the plastic insert.

You can find the new design on several sites so here is one of them:
www perfprotech com/mercury-marine-parts-catalog/gimbal-housing/assembly/11210/60?search=32-8M0090859&sortpartnbr=8M0090859

Here is what to be aware of when you order.
When I did my order, I ordered 32-8M0090859 thinking I was going to get just the 'legacy' hose as this the 'design 1' and 'design 2' was not listed.
When my order arrived, I found a bag that was considered a 'kit' that had the hose, sleeve, special plate, 2 styles of housing inlets, etc. so I was surprised to say the least which is why I reached out to FT to see if he had seen this style.

In looking at some websites now, there is actually the 2 different 'design 1 and 'design 2' showing and with different part numbers where the new 'design 2' is showing as part number 8M0062102.

The new design seems like it will resolve the water passage corrode issue with the only thing I'm hoping is that the clamp used for attaching the rubber hose to plastic part doesn't corrode and fall apart being used in salt water.

Mark
 

MarkSee

Lieutenant Junior Grade
Joined
Sep 10, 2010
Messages
1,172
I wasn't able to edit my reply above from this morning so I'll re-type what's needed as I did find the installation instructions.

The installation instructions look to have a part number of 90-8m0090860 if you want to find that as I could not attach a doc with photo copies of the installation instructors. I you want pm me and we'll figure out a way to get it to you.

The installation based on the instructions:
1-Insert rubber bushing in t/a; there is a recessed area in the rubber bushing
2-Install bushing retaining tool from inside in place of the housing inlet
3-Turn screws nor more than 1-2 turns maximum; this tool serves to hold the rubber bushing in place for the next step.
4-Coat plastic end of insert with dish soap
5-Insert plastic end of hose through t/a pushing firmly until the rib on the plastic end seats in the rubber bushing. Look inside the boat and you should see the plastic end flush with the bushing tool.
6-Inside the boat, tighten the screws to 20.3 inch pounds. This will push the rubber bushing away from the end of the plastic hose.
7-Remove the retainer tool.
8-Verify water hose and rubber bushing are installed correctly. The water hose should extend about .25 inch beyond the rubber bushing.
9-Install the gasket onto the water inlet housing
10-Install water inlet housing to gimbal housing. Tighten to 44 in pounds.

Note that there was so little room behind the engine I could not get any sockets in there for torquing so I just did the best tightening I could.
There are some pictures with the instructions also that help.

Mark
 

MI_Pirate

Seaman Apprentice
Joined
Apr 27, 2016
Messages
33
Thank you very much, Mark !!!!

I really appreciate you taking the time to make two very detailed posts that address my questions perfectly. I need to swing the power steering unit out of the way to get the the inlet housing on my boat. There isn't much room to work, and my thoughts were that there was no way that I would be able to get that tapered insert in if I went with the old style. I'm going to pay my mechanic to come up when I do the reassembly since I don't have all of the Merc special tools needed, but he is an older gentleman and I can't imagine him getting back in there to do that. I've never installed one before, so I was hoping to avoid learning on that particular connection. This one sounds like it is much easier to install. If I read what you wrote correctly, the idea is to get that rubber sleeve to stop just before it gets to the inside of the housing, and to allow the inner plastic tube to extend about 1/4" inside of the housing, correct? It would seem like an adequate fix for "bravoitis", which really hasn't been a concern for me since I'm in the Upper Chesapeake where we have a pretty low salt content, and I also keep my boat in dry stack.

Note that there was so little room behind the engine I could not get any sockets in there for torquing so I just did the best tightening I could.

LOL... That was going top be my only follow-up question. No way I'm getting my torque wrench in there. Not even my smaller one.
 

MarkSee

Lieutenant Junior Grade
Joined
Sep 10, 2010
Messages
1,172
User Friendly Note: Start at the bottom of page and read upwards.

instruc-pg3b.jpg
instruc-pg3.jpg
instruc-pg2c.jpg
instruc-pg2b.jpg
instruc-pg1.jpg


If I read what you wrote correctly, the idea is to get that rubber sleeve to stop just before it gets to the inside of the housing, and to allow the inner plastic tube to extend about 1/4" inside of the housing, correct?
LOL... That was going top be my only follow-up question. No way I'm getting my torque wrench in there. Not even my smaller one.

I just tried again and looks like I'm able to upload so here you go; hopefully they will attach properly.
To answer your question: the sleeve really does have a recess as the instructions show so when you insert that in the t/a you will fee it seat in there and know to stop. Then when you install what they call the bushing retaining tool, it will keep the sleeve from going to far inside the boat when you push the hose in.

I ended up using a combination of a swivel socket, open and box end wrench tightening ever so slightly while laying on top of the engine; yes I did drop tools so try and place something underneath the water cover to catch what may fall as it may not drop all the way to the bilge, it might get lodged somewhere else.

I also found the size of the water bolts then bought a bolt of the same size and cut off the head to use as a temp support for the water cover-top bolt while I got the bottom bolt started which was all by feel and I probably lucked out.
Once the bottom bolt was started, I removed the temp support and put in the bolt.

Mark
 

Attachments

  • instruc-pg2b.jpg
    instruc-pg2b.jpg
    90.2 KB · Views: 2
Last edited by a moderator:

MarkSee

Lieutenant Junior Grade
Joined
Sep 10, 2010
Messages
1,172
Looks like it duplicated so removing.

Note the attachments may have attached in reverse order so just follow steps in order 1 to 11.
 
Last edited:

MI_Pirate

Seaman Apprentice
Joined
Apr 27, 2016
Messages
33
No Title

Thanks again, Mark.

I'm baaaaack. The saga continues. LOL... It's not that bad. Just a couple of updates.

#1 - Got all of my parts in a box, in the cabin. I'm ready to go. I don't have all of the tools and I want this job done in relatively short order, so I am going to have my mechanic come help me do it. It should be a 1 - 2 day thing (I hope). I bought all Merc stuff except for the actual swivel shaft, which I got from Nuwave Marine. The Nuwave shaft certainly looks nice. I hope it performs well.

#2 - I called all of my normal parts places (fortunately, this area has quite a few) looking for the design 2 intake hose. None of them had a clue. All of them had the original style. I happened to be in one of the few places that I didn't call before (due to #3 below) , and I gave them the p/n for the design 1 hose intending to purchase it. They didn't have it. He came back to the counter with the design 2 kit in hand. Funny how things work sometimes...

#3 - On my 3rd run of the season - Guardian mode at 4000 RPM. Low sea water pressure. I pulled my 3 year old Hardin Marine SS Gen 7 pump, and sure enough, BOTH wear plates badly scored. I didn't have a rebuild kit and knew I had to order it online, so I knew I was done for the day. I went to the restaurant next door to the marina to have a few brews and something to eat. A guy pulls up to the restaurant dock in a go fast boat (no idea what kind), and sits a couple of stools down from me at the bar. We start talking, and he mentions that he was on a test run after replacing his water pumps on his 496s. I laughed and told him that I had just finished taking mine apart. He started telling me about his new, rebuildable, SS pumps that he just bought from a place that I go to all the time. I told him that I had a SS pump made by Hardin Marine. He says, "Yep, that's the ones I just got.". He bought them locally from a place that I had been before. I called them (Weaver's Marine for any of you Upper Chesapeake folks), and sure enough, they had the Hardin rebuild kit I needed in stock. Sweet! Only 15 minutes from the marina, too! I rebuilt and reinstalled the pump and had the marina put me in the water. Now, I've got even LESS water pressure - almost none. WTH?

I had the marina pull the boat and I installed clear tubing on both the inlet and outlet of the pump. When they put me back in, I could see a steady stream vortex of air coming up the inlet side, and very big bubbles (almost the complete diameter of the outlet tube) of air coming out of the outlet side. I removed my water inlet housing cover, and well... there's a pic of the gasket. I lost a few small pieces of it, but you can clearly see where the air was being sucked in around the upper bolt hole to the center. I got "bravoitis", but it seems as though the housing was not as tight as it should have been, so some of the force from the corrosion that normally crushes the hose lifted the housing cover instead. This was allowing the air to get into the intake. I can't get a picture of the hose, but it is still about 80-90% open. No wonder it couldn't build any pressure. Just like drinking through a straw with a hole in it. Lesson learned. I will never troubleshoot a raw water cooling problem without installing the clear tubing on both sides EVER again. Being able to see what is going on is a wonderful thing.

Got a new gasket this morning, so I'm going to clean up the part of the transom that the inlet housing attaches to and put it all back together. Maybe I can take a couple of rides before I have to pull it all apart again.
 

Attachments

  • photo246074.JPG
    photo246074.JPG
    127.5 KB · Views: 0
Last edited:

MI_Pirate

Seaman Apprentice
Joined
Apr 27, 2016
Messages
33
Another update. Marksee - you were correct, that new hose was a breeze to install. MUCH better than trying to get a tapered insert started in the 1-1/4" of space available to work in back there. It literally took 5 minutes from start to finish.

The JR Marine swivel shaft repair method is fantastic! I ended up using a Merc swivel shaft. A friend from my marina had a brand new one laying around that he bought for his old boat that he never used. He gave it to me for free, so I figure I'd use it and install the grease fitting as suggested. My mechanic was there helping me, and he really liked doing the job the JR Marine way. He said that he's going to do all of them this way from now on. That says a lot since he's been doing this for a very long time.

Tomorrow, we reinstall the bell housing an finish up the remaining little things, and I hope to be ready for the 4th!
 
Top